As a store owner or manager, you may want to provide customers with promotional products and incentives. GonnaOrder makes this possible through a system of ordering rules, with each rule specifying what to achieve for a customer to qualify for the promotion. Every rule is designed to trigger an action as you will see here below. Further, you can choose to have prices for the promotional items and sell them along with other products.
Example Ordering Rule
IF the order value is between £20 and £49
THEN promote a free/discounted dessert to the user
AND the user can choose between Ice cream and Cheese Cake
On This Page
- Creating New Ordering Rules
- Add Option Groups and Options to Your Rules Actions
- Use Ordering Rules To Add Promotional Items
- Use Ordering Rules To Increase Average Order Values
- Update an Ordering Rule
- Deactivate an Ordering Rule Temporarily
- Delete an Ordering Rule
Creating New Ordering Rules
You may use ordering rules to encourage your customers to buy more from your store. Or, say, you want to gift those who are buying more. You may also have different gifts for people buying different values of products. For instance, you may want to give deserts to people whose order values range between £20 and £49 and give a free bottle of wine to people ordering items worth between £50 and £100 and so forth.
In your GonnaOrder store, you can have several rules with each rule containing as many options as needed. For example, if you will be giving away a bottle of wine, then it is wise to let the customer choose between blends of the drink. This applies to any other rules you may create. See how to create new ordering rules below.
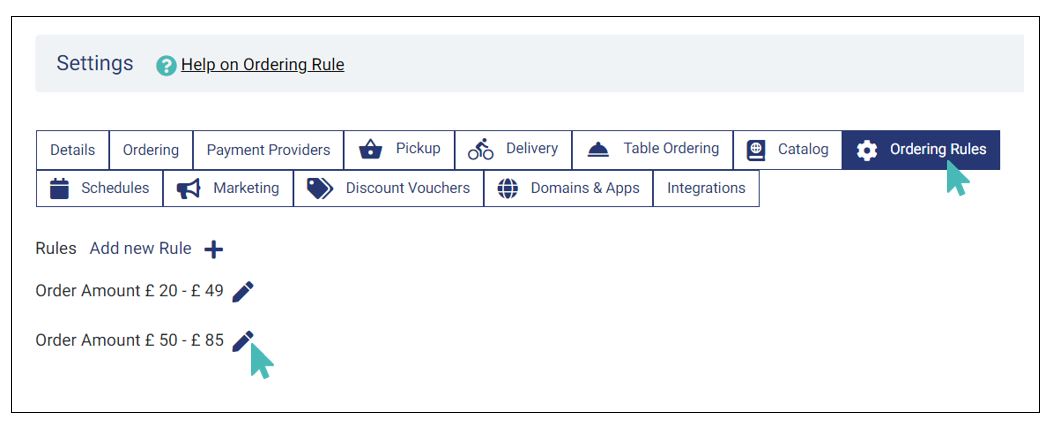
In your store dashboard, go to Settings> Ordering Rules. Just below the menu bar is a label named rules beside which is a button to create new rules. See the image below.
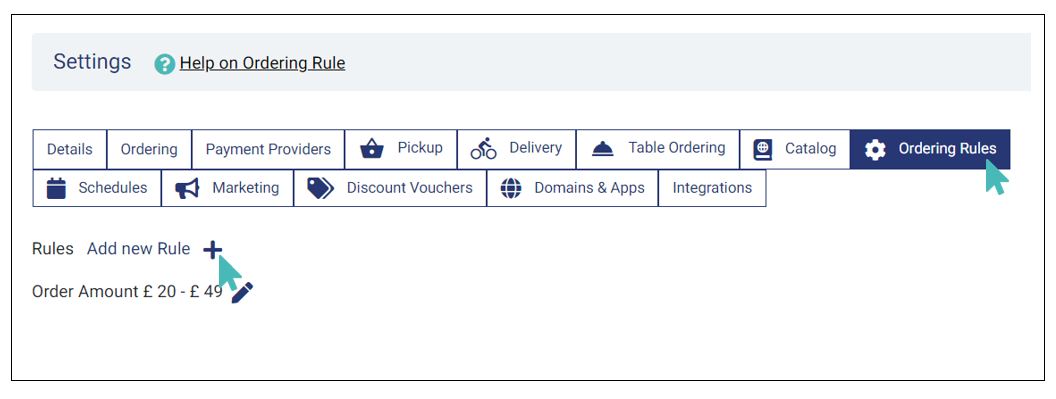
Click the Add new rule button, fill in the minimum and maximum order amounts that should trigger the rule, and then down below, click next.

Add Option Groups and Options to Your Rules Actions
In GonnaOrder stores, an option group refers to a set of products that a user may add to his order for free or at a subsidized or normal price. Generally, an option group is similar to a category, but now contains promotional items and upsell products.
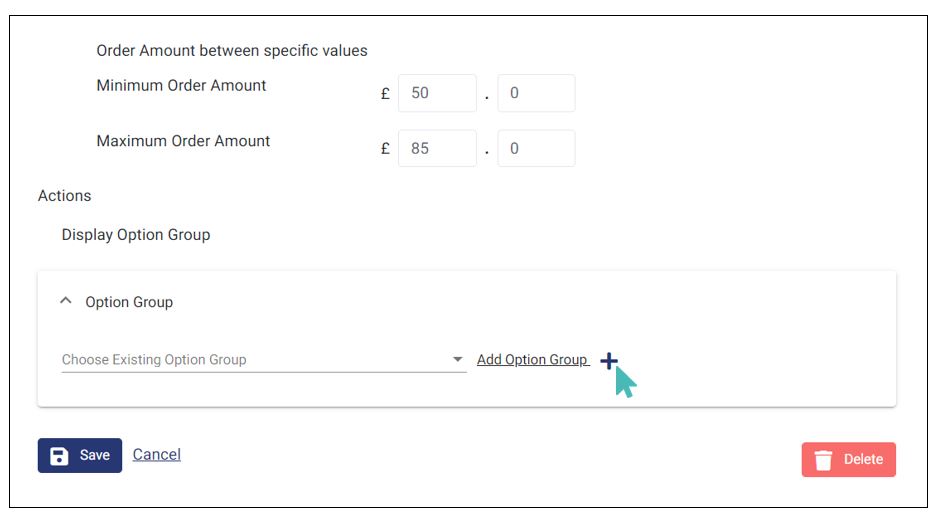
The Add Option Group button in the actions section of an ordering rule allows you to create a new option group for your store. Still, you can choose to associate your ordering rule with an existing option group, but this only applies if you have existing groups.
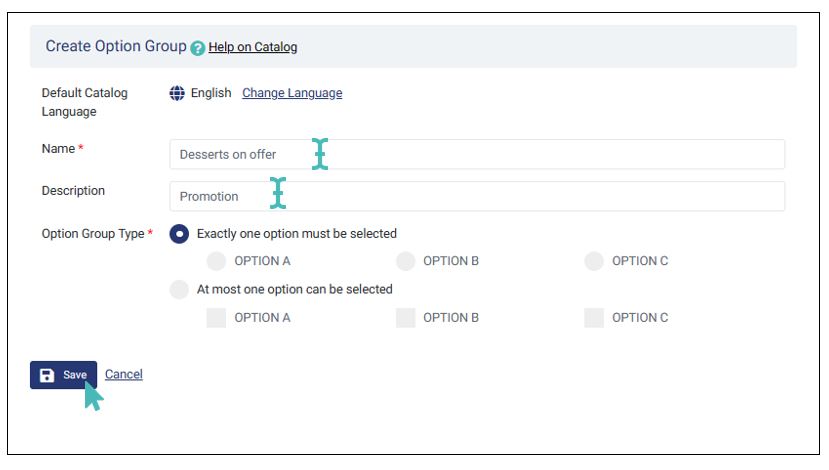
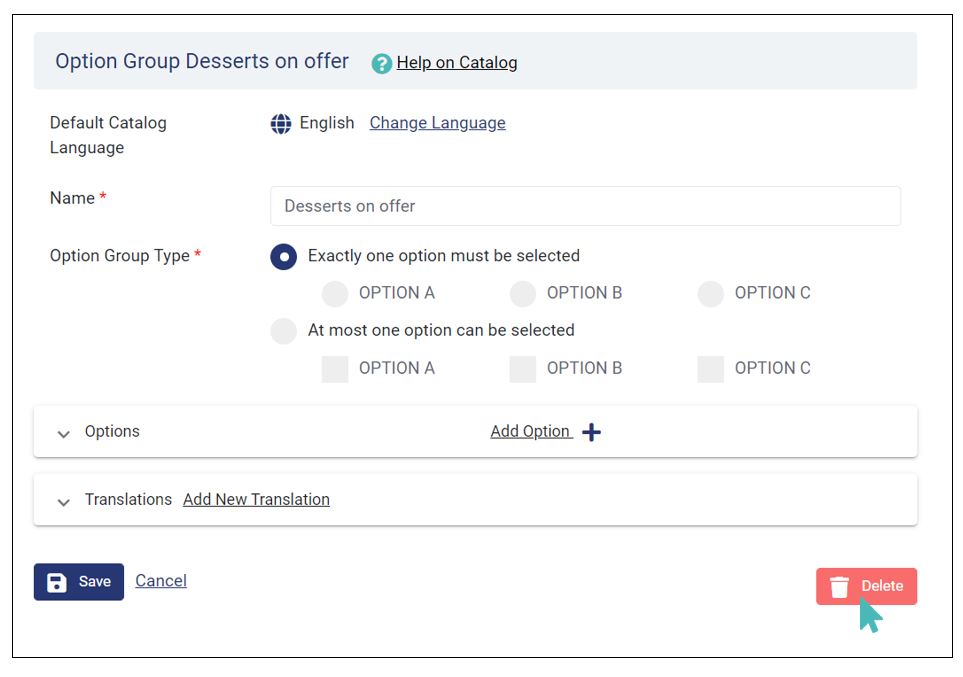
An option group has four characteristics:
- Default catalog language: This is inherited from your catalog settings but you can always change it to any other language that most of your customers will understand.
- Name: This is the name of the option group you are creating and which will be associated with the ordering rules. You are encouraged to choose a descriptive name so that customers understand. For instance, if you want to add a free dessert to every order between £20 and £49, then “Free Dessert” might be the right name. The name field can have up to 50 characters.
- Description: A word or phrase that can help identify/understand the option group, why it is needed, or where and how it is used. The option group description is not displayed to customers, instead, it is used on the store administration dashboard on the option group selection drop-down where it is shown in parenthesis beside the option group name. This way, store users can distinguish between option groups with the same name.
- Option Group Type: The option group type characteristic indicates the nature of the group you create. Promotional products can either be mandatory, where a user must select one, or be optional where customers have the freedom to pick one of the provided items or leave them all.
Be sure to click Save after selecting items.
Adding Options to an Option Group
An option group remains meaningless to your store until you have added options to it. You can have any number of options in an option group but we advise you only add those that are to avoid confusing customers.
An option can be any item that you can sell individually, an item that is listed in your catalog, or a new item that complements a main product.
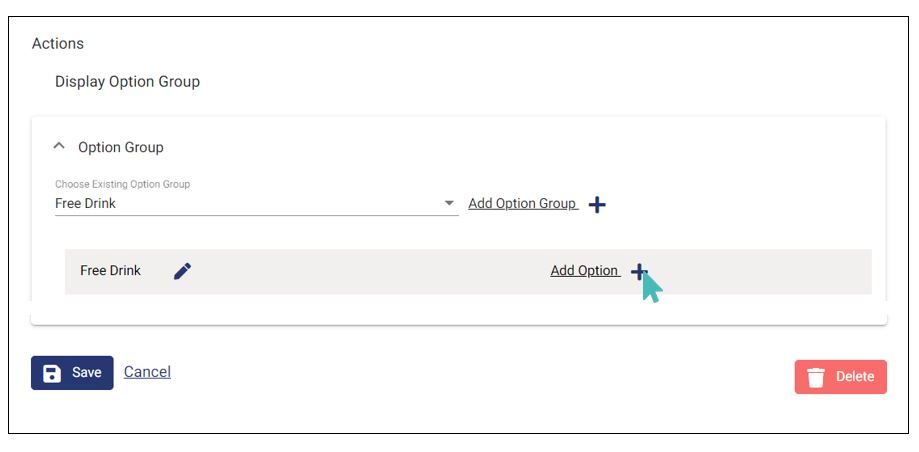
To add an option to an option group, find the ordering rule to which the option group is attached and click Add option next to the option group’s name.
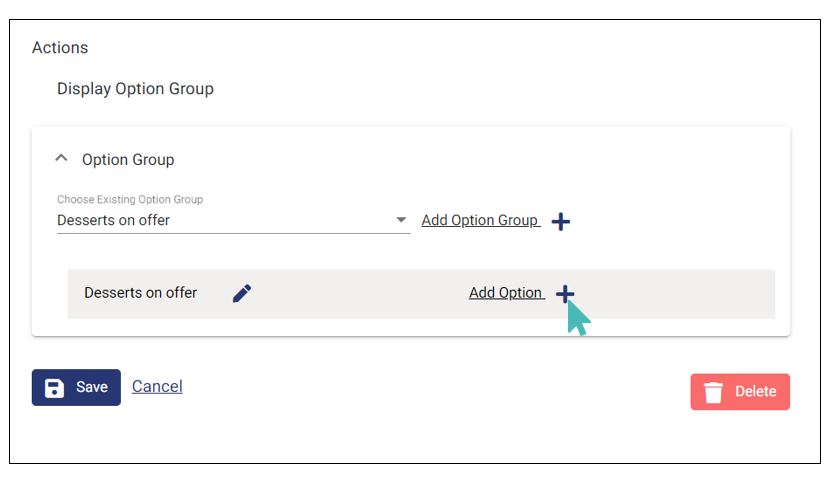
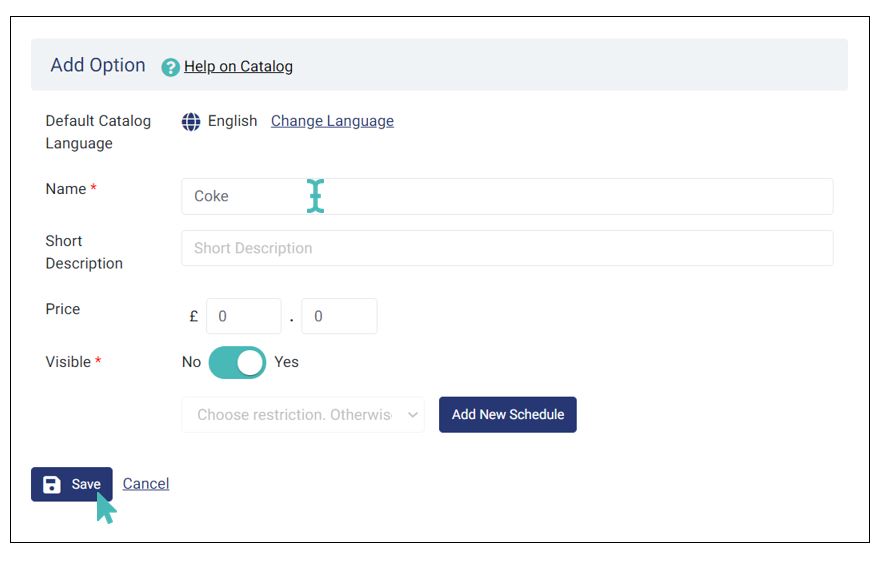
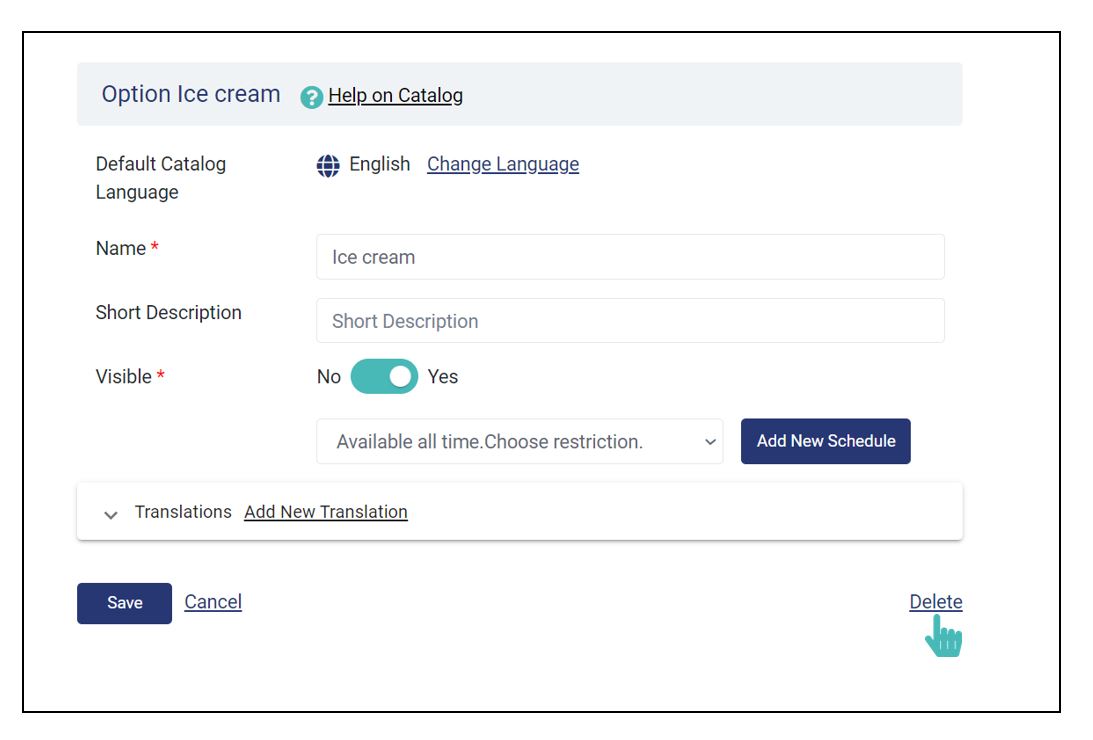
The option details page will come up where you can choose a name for the option, and provide a short description and price of the option. You can also set the visibility of the item and optionally associate it with a store schedule.
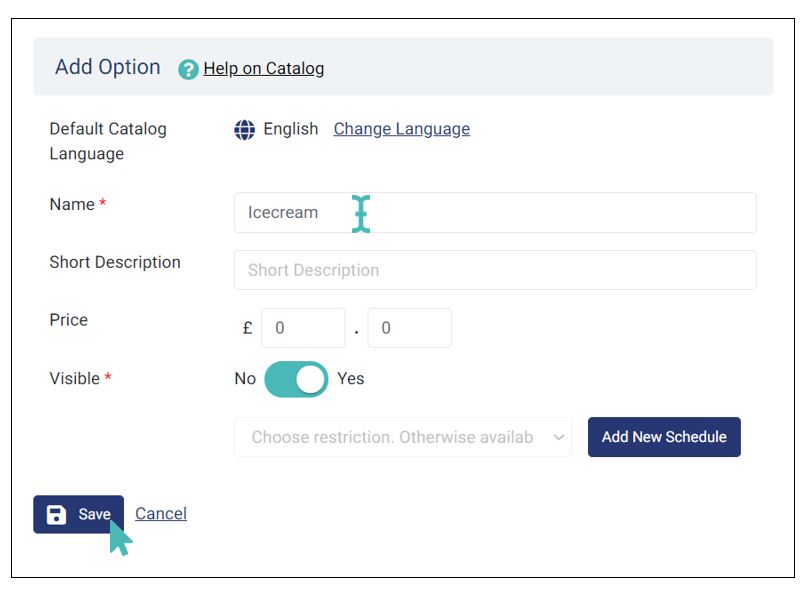
You can follow the same procedure to add more options to your option group. Once all is done and your ordering rule is triggered by a customer order, your options will be displayed on the order page. The customer can then choose what to add to their order.
Rearrange Options in Option Group
You can rearrange the order in which options appear for customers on the order page. To rearrange the order options, click the Down or Up arrow next to the option to move the list accordingly.
Use Ordering Rules To Add Promotional Items
Free options are useful when you want to introduce new products as gifts. With these, you do not specify the price of the product and they do not increase the order value for a customer. They are free or they are part of the product to which the option group is attached.
To add a free option to an option group, go to the store dashboard and choose settings from the side menu. In the settings page select ordering rules and click on the edit icon next to the rule in question.
On the ordering rules details page that comes up, select the appropriate option group to which you want to add free options and click Add option.
Provide a name for the option, and optionally a short description of what the option entails. Since you want to make the option free, you must leave the price field empty or fill in a zero (0).
For your option group to match up the name, you need to have more than one option. Follow the same procedure as above to add more options.
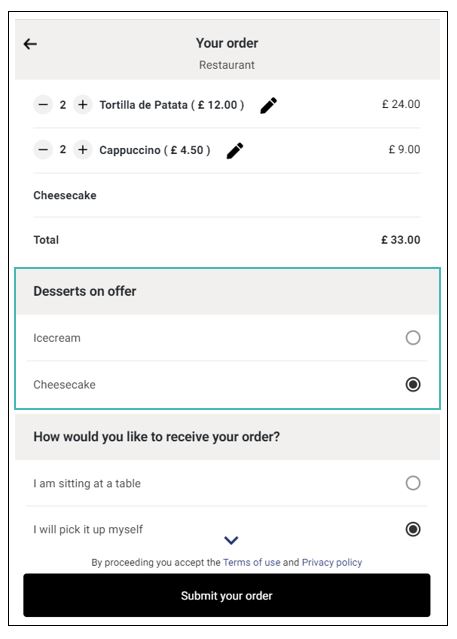
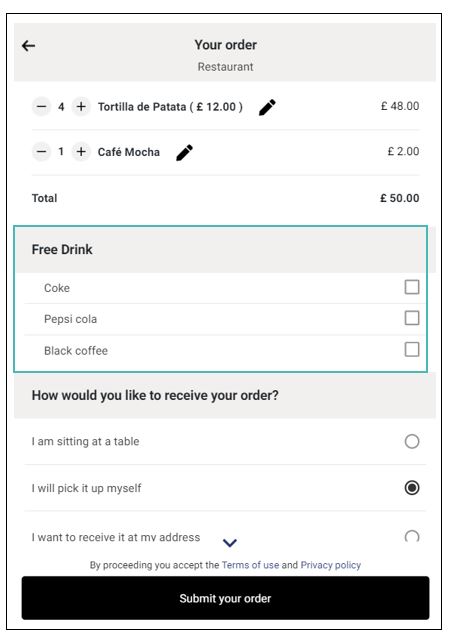
When a customer order triggers the ordering rule to which the free options are attached, the option group will appear on the order page as below. Notice the options do not have a price attached.
Use Ordering Rules To Increase Average Order Values
You can use option groups with upsell products to increase average order values for customers and thus increase revenue for your store.
Paid or upsell products are similar to the free options in every aspect except for the fact that upsell products have a price. In fact, there is no difference in how you create the two. A good example of products you can use as paid options can be drinks or desserts.
To create paid options in an option group, follow the same procedure we explained under Free promotional options, but remember to have a price for every option in the option group.
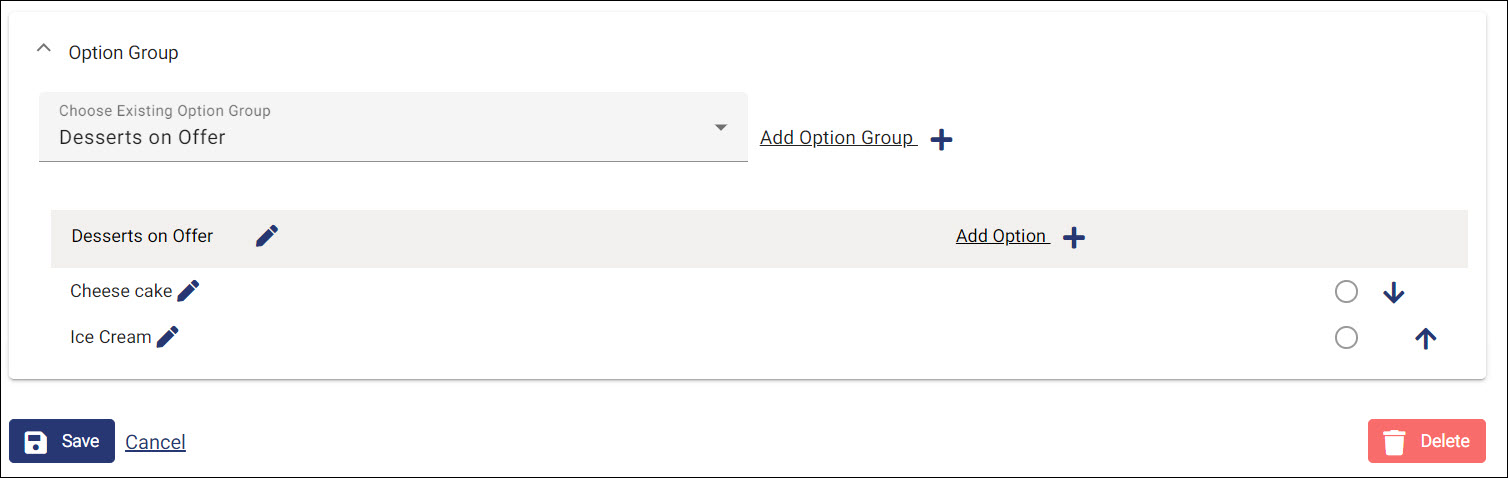
Furthermore, you can convert free options to upsell options by adding a price. We will upgrade the Desserts on offer option group that we used elsewhere on this page to add prices to the options.
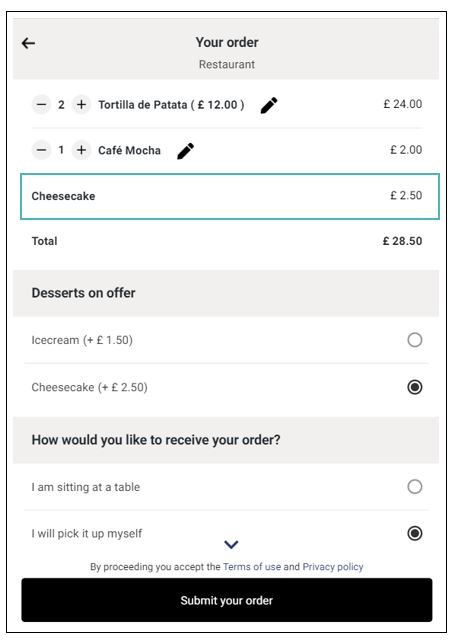
If the ordering rule associated with the Desserts option group is triggered, the options will appear on the customer order page alongside their prices. If they choose any of the options, its name will appear in the list of order items and items will add to the total order value.
Update an Ordering Rule
Like other GonnaOrder store details, you can update an ordering rule to fit the current needs of the store. Among other things, you may from time to time want to update the order amount that triggers the rule or change the option group associated with the rule. See the section on Add option groups and options to your rule’s actions to learn how to add options to an option group. Otherwise, here is what you need to do to update your ordering rule.
Select the ordering rule you wish to update from the ordering rules tab in the settings menu.
The next screen shows the details of an ordering rule. This is where you change the order amounts that trigger the rule and also change the option group associated with the rule.
In the example case demonstrated below, We want to switch the option group associated with the current ordering rule so that instead of giving our customers Free dessert, we now give them Free wine for orders between $20 and $49. You can have different Wine brands in the new option group.
We assume that you know how to create an option group and we will only be showing you how to make the switch.
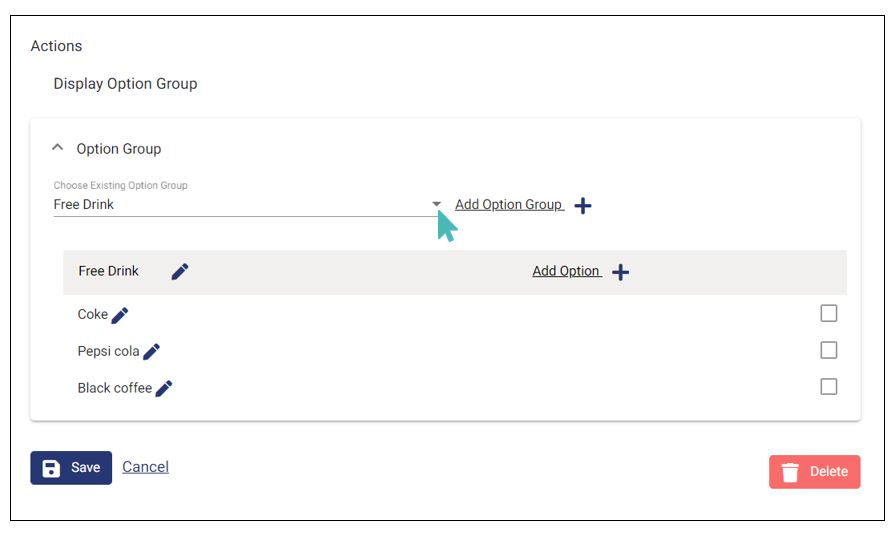
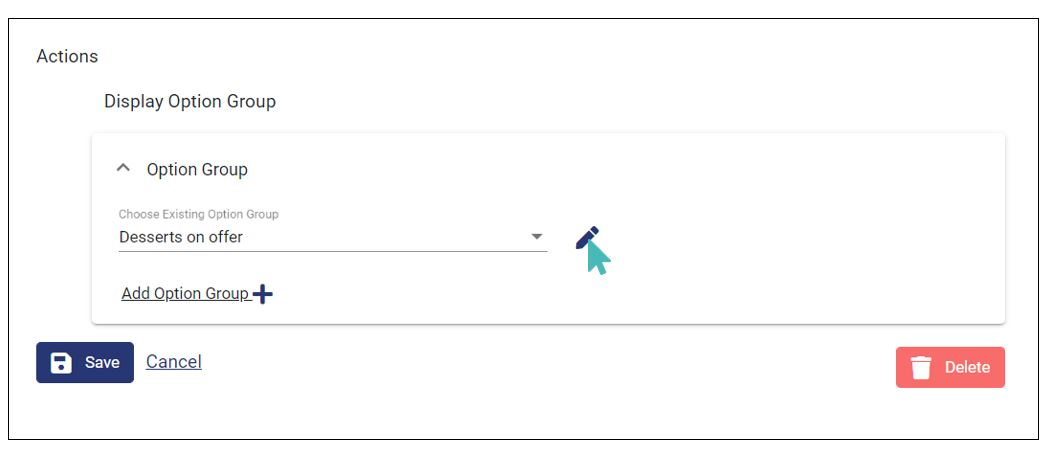
On the details page of the current ordering rule, scroll to see the Actions section. Click on the caret symbol that is to the left of the edit option group icon to bring up a list of available option groups.
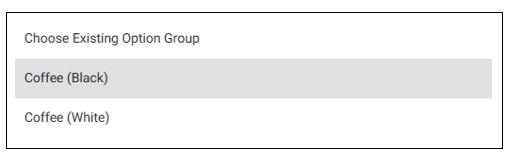
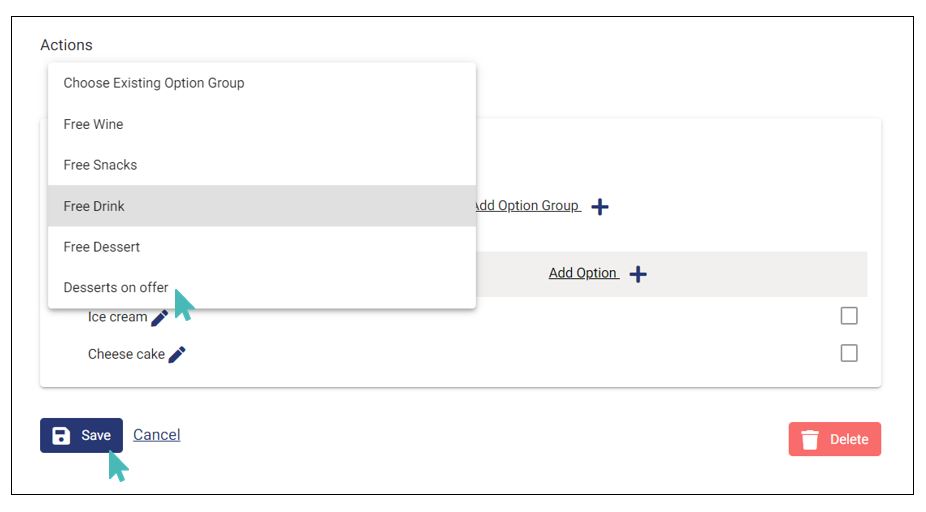
The option groups available in your store will appear as a pop up where you can choose the group you want. The image below shows that our store has several options groups and we want to choose one.
Deactivate an Ordering Rule Temporarily
All ordering rules are set to be active when they are created. Here is what you need to do in the event that you want to deactivate a rule.
Go to the store dashboard and choose setting then select ordering rules. Choose the rule you want to turn off and click on the edit icon next to it.
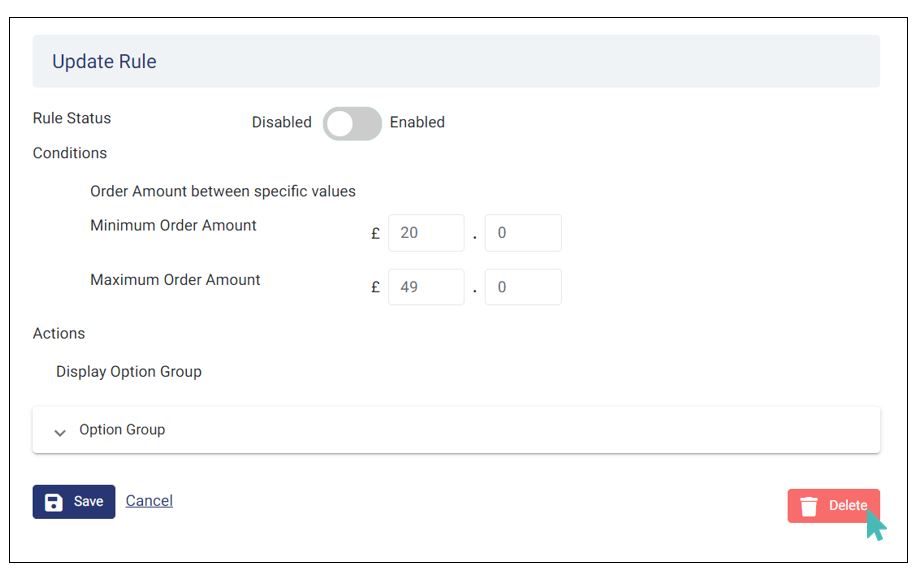
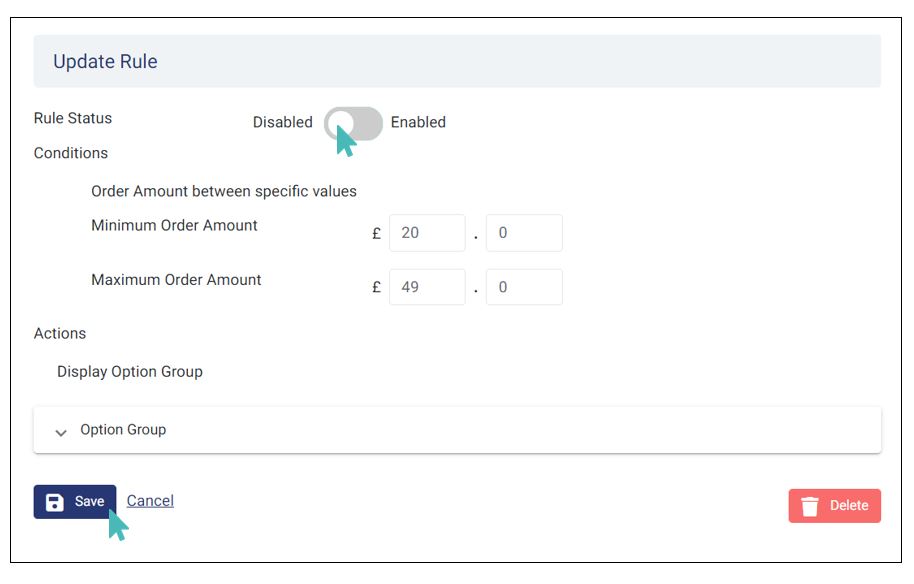
On the rule details page, toggle the Rule status button to inactive and save for the changes to take effect. Note that you will have to enable the rule again when you have restocked or when you are ready to continue with the promotion.
Note that customers will no longer see promotional items associated with deactivated rules.
Delete an Ordering Rule
Sometimes disabling a rule is not enough. It is possible to remove rules from your store permanently. However, only rules that do not have products in them can be deleted. That is to say that you will need to delete all associated items before you can remove a rule.
You do not need to delete rules when you run out of promotional items since you can always turn them off and activate them later. Only delete rules that you no longer need.
To delete an ordering rule, go to the store dashboard and in the settings menu choose ordering rules. Find the specific rule you want to remove and click on the edit icon next to it (see image in the previous section).
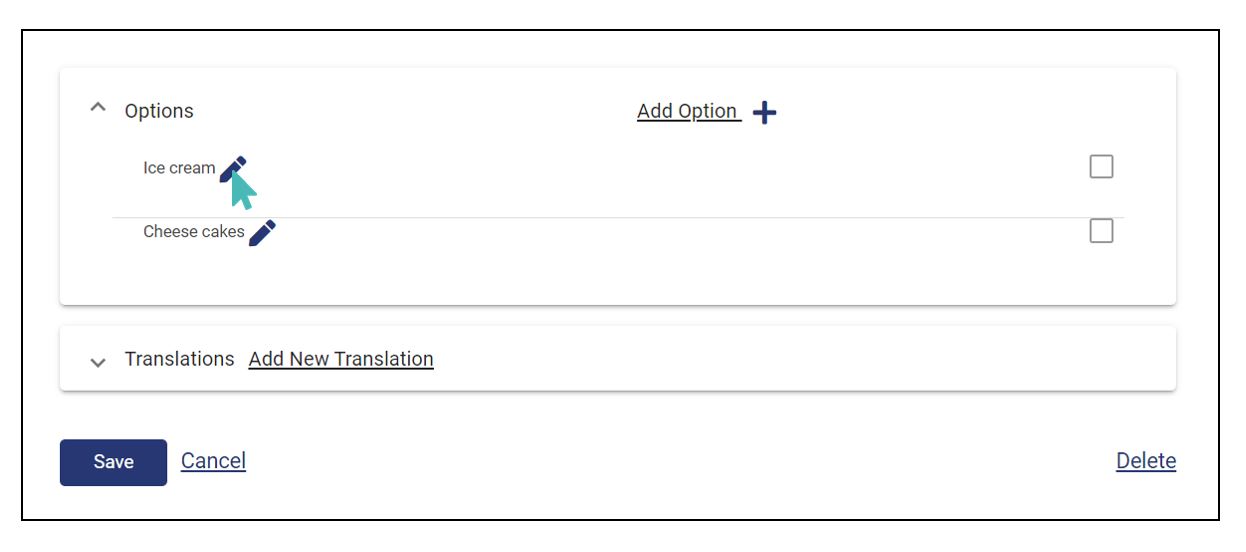
In the actions section of the update rule page, expand the option groups to see the associated options. Click on the edit icon next to the name of an option group of choice to see items listed under the option group.
In the next step, you will need to remove all the options listed in the current option group. To do this you will need to select one option every time so you see its details page.
The option’s details page is where you are supposed to edit all information regarding the specific option. To the bottom right is a delete button that you will use to remove unwanted options. You will need to remove every option or an error will occur when you attempt to delete an option group.
Now that the option group does not have any options listed in it, you can go ahead to delete it and the associated ordering rule. Here is how the option group page will look like when you remove the options.
Finally, you can remove an ordering rule by clicking on the edit icon next to it on the ordering rules section of the settings page and then clicking on the Delete button provided at the bottom-right section of the page. Since this is an irreversible action, you will need to confirm deleting the option group by clicking Ok on the pop-up that comes up.