When you start receiving orders, you need a way to organize them better. For example, you may want to classify orders as ready or processed. You can also classify orders as rejected. Additionally, you may want to highlight orders that you cannot process, change the contents of an order, or permanently remove an order from your store.
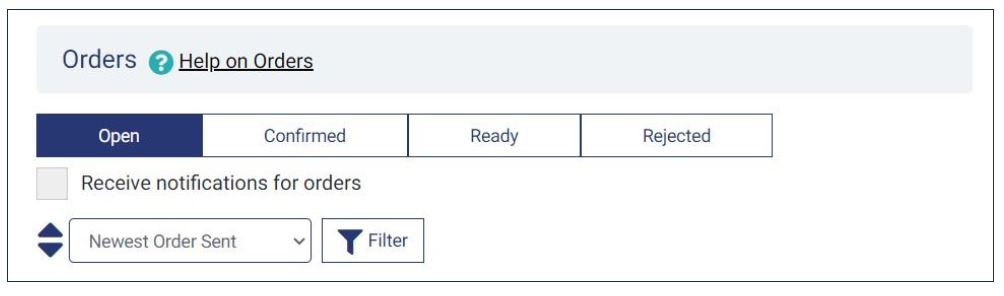
The below tabs within the Orders page help you achieve this.
- Open
- Confirmed
- Ready
- Rejected
Additionally, using this functionality helps you communicate order statuses to customers. They will know when you accept or reject an order and can, thus take any necessary steps.
Still, you may decide that you do not need to work with the workflow of closing and rejecting the orders. This is purely optional. The disadvantage will be that you will not have a good overview of the orders and their statuses. As a result, your customers will also not be informed about the status of their orders.
On This Page
- View Orders
- Confirm an Order
- Accept or Schedule an Order
- Reject an Order
- Confirm or Reject Multiple Orders
- Mark Multiple Orders Ready
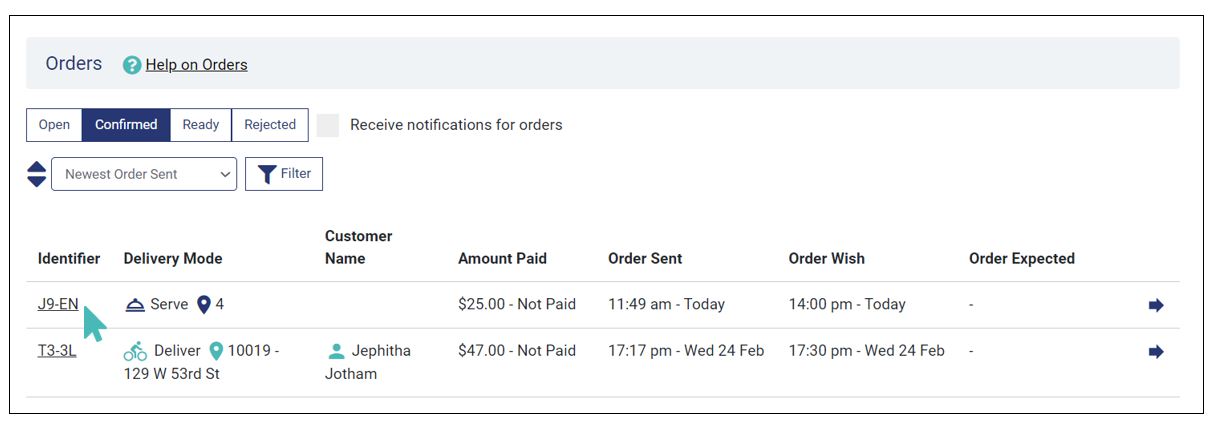
All orders arriving at your store will first be listed under the Open tab. You will then have to check every offer to see what each customer needs. And if you have set up stock features, the list of open orders will only contain offers that you can fulfill.
Order Details
The First order will always be in expanded mode. To view details of other orders, click the order. This also minimizes the already expanded order.
An open order detail displays the following options you can click to segregate the orders into the tabs explained above.
View Orders
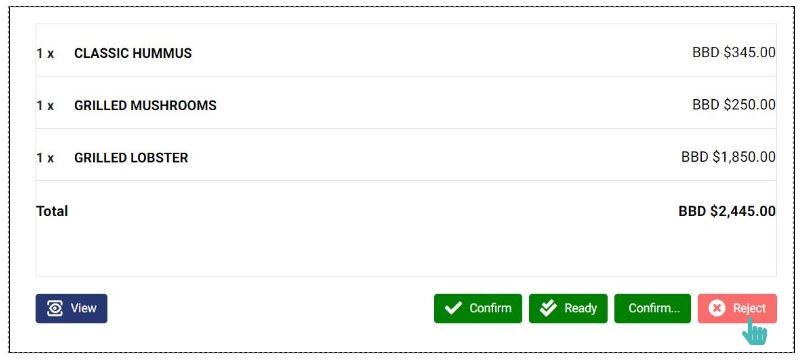
To view details of the order placed, click the View button.
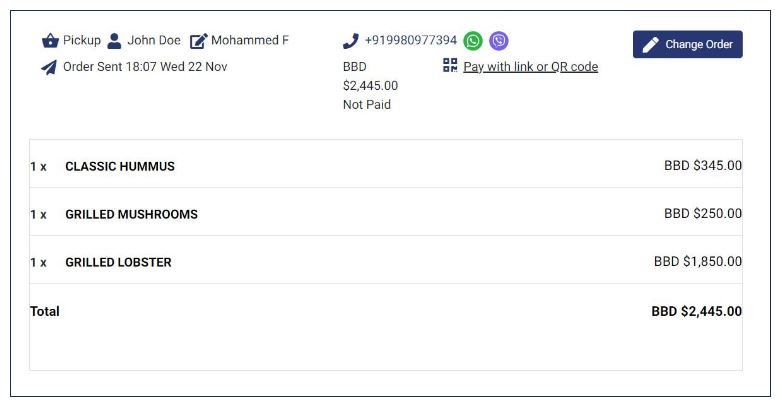
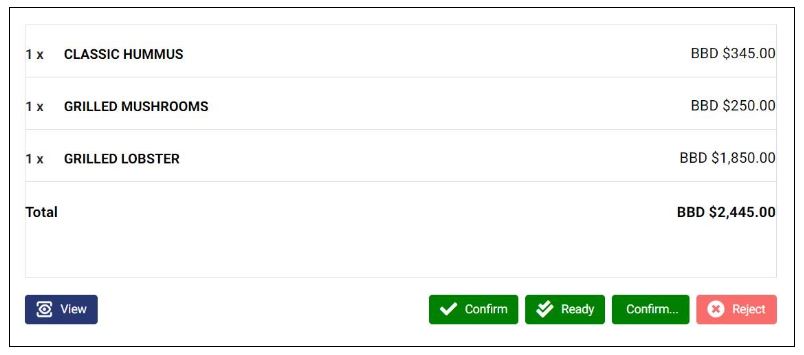
The order details are now shown. Here you can either Confirm, Reject or Change Order.
For more information on how to Change Order, refer to the Update Submitted Orders article.
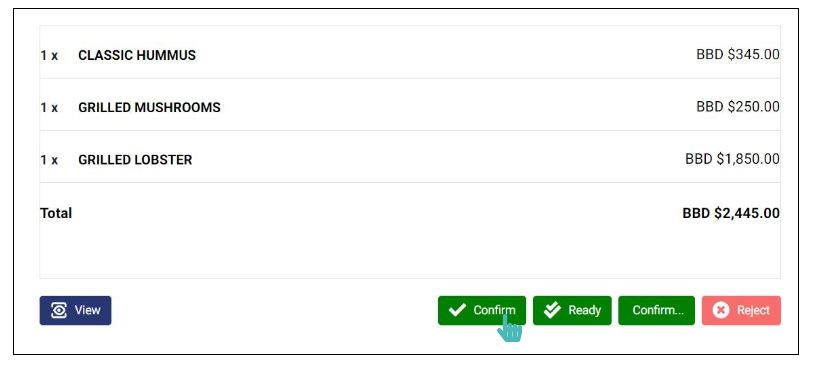
Confirm an Order
From the expanded order details, you can confirm the order and move it into the confirmed orders tab.
Before proceeding read the details of the order and confirm that your store has the capacity to successfully process every order. Once you are certain, then click on the Confirm button.
Accept or Schedule an Order
When an order is placed, you may want to inform the customer that the order is either ready or will take sometime to prepare. In such cases, you can click the Confirm… button.
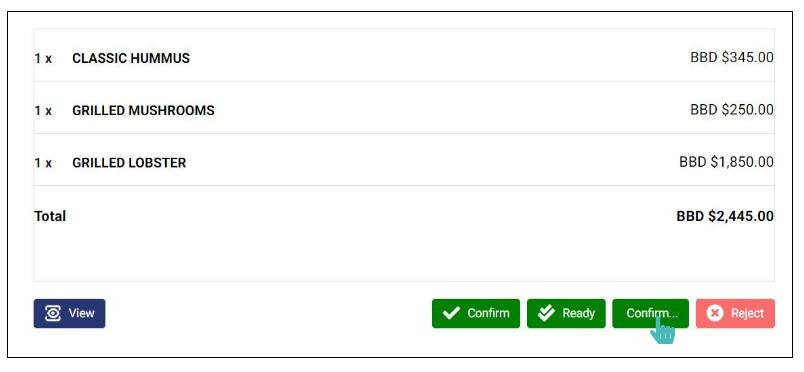
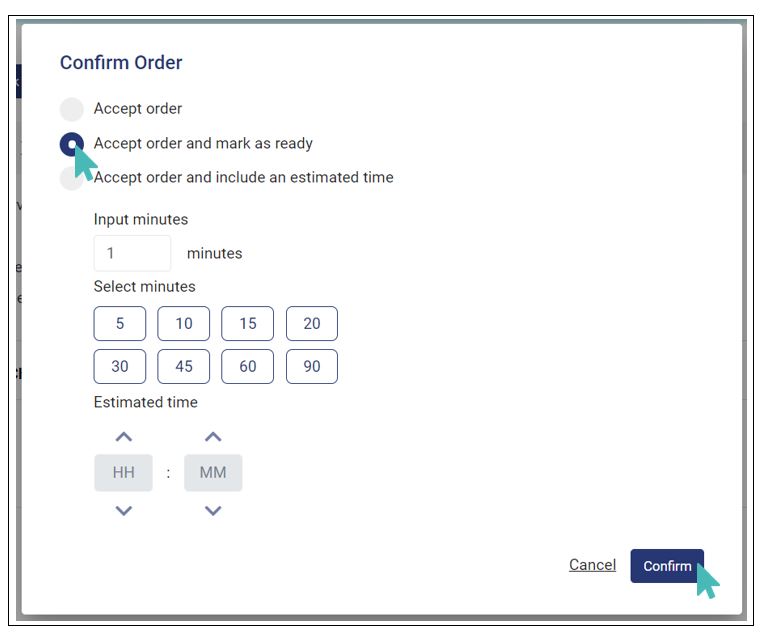
The opens a dialog box with more options. Select the options as required.
- Accept order: This option allows you to accept orders and continue processing them while the customers wait.
- Accept orders and mark them as ready: Accepting orders and marking them as ready may come in handy when you have pre-prepared orders. Say, for instance, your store usually prepares popular lunch meals around lunchtime. The customer will be notified that the order is ready at the same time it is accepted.
- Accept order and include an estimated time: This option allows you to accept orders and give the customer the estimated processing time you need before the order is ready. This lets the customer know when the order will be ready for pick up or delivery. As a store user, you will be able to either enter a custom time or click a button to choose the waiting time. For the custom time, you must enter a future time or an error will arise.
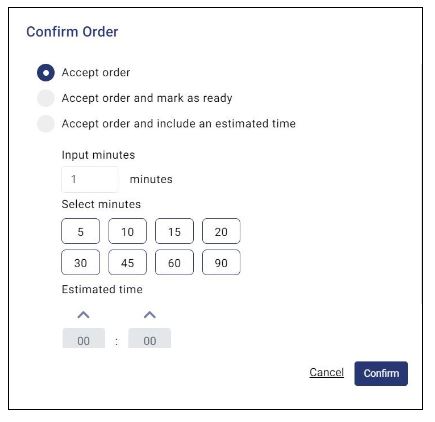
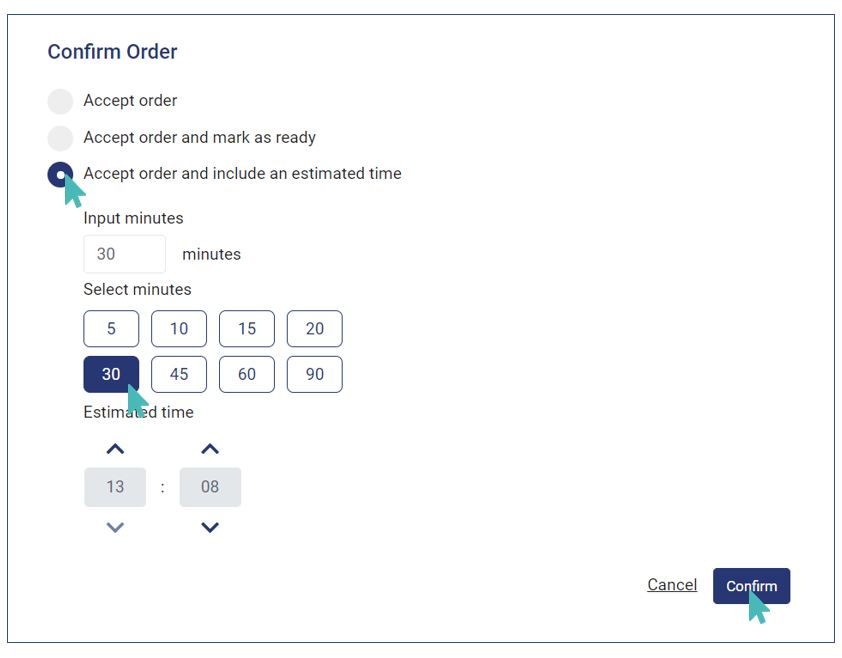
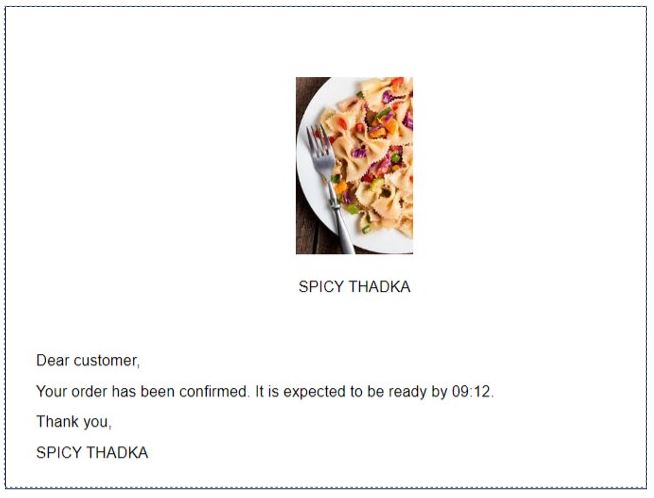
Once you have chosen a time, the customer will be notified of their order status through the order page and optionally through a notification email. Both the order page and the notification email will show the time when the order is expected to be ready.
Choosing the Accept order or the Accept order and include an estimated time options will move your order to the Confirmed orders tab. However, accepting orders and marking them as ready at the same time moves them from the open tab to the Ready orders tab.

The confirmed orders tab is where all orders undergoing processing reside. This is the list of orders that your team is currently working on. Like with the open orders tab, you can click on any order listed here to view the details or to confirm its status. Orders in this list can be confirmed further to set their statuses as ready.
To confirm that an order is ready for pick up or delivery, click on it from the confirmed orders list.
This will bring up the order details page similar to the one you saw in the previous section. You will also proceed to click on the Confirm button to bring up the offer confirmation options as you did in the previous section.
But instead of clicking Accept order you are to click on the second option, Accept order and mark as ready, so that the customer is notified of the order readiness.
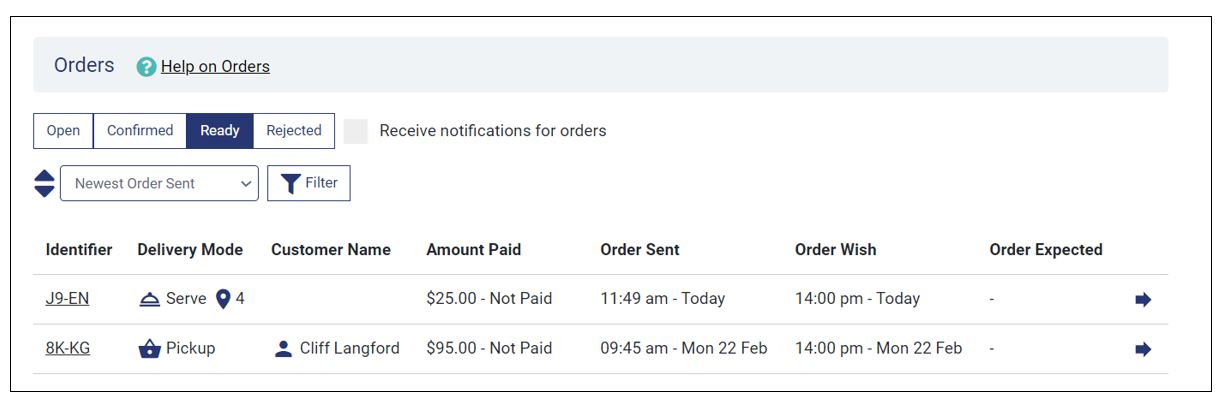
Orders confirmed in this manner will move from either the Open and Confirmed order lists to the Ready orders tab. The ready orders tab is the pinnacle of successful order processing. All orders that have been served, delivered, picked up, or waiting for any of these should essentially be on this list.
Order Status for Customers
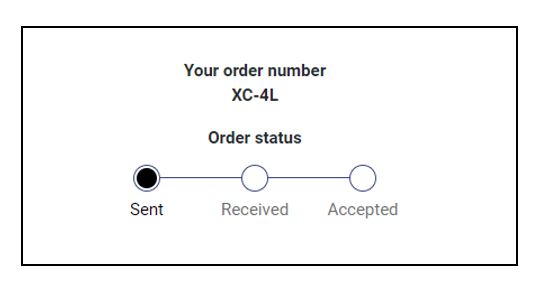
Your customers need to know the status of their orders. When a customer places an order for an item in your store, the Sent status will be displayed to them regardless of the chosen delivery mode.
For orders that are of type Pickup where the user opts to pass through your physical location to pick up the order, it is possible for the customers to see the status of their orders. This will allow them to know when they can pick up their orders.
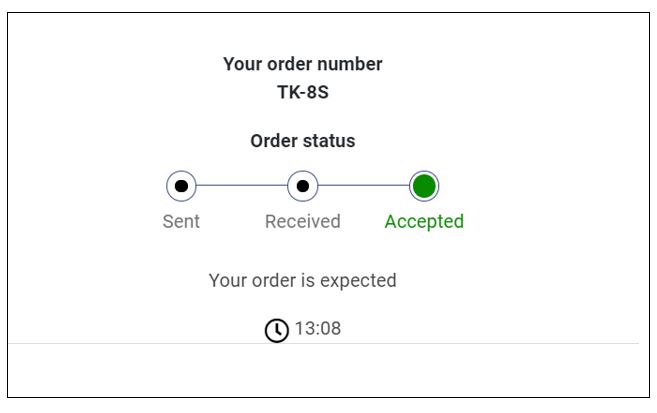
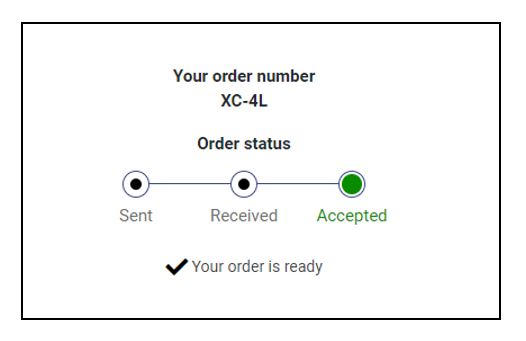
- Sent: New orders that recently arrived in your store open orders list are communicated to the customers as Sent on their screen. It basically means that the customer has made a successful order. And, as soon as the order has arrived in the order dashboard, the customer will see the visual below.
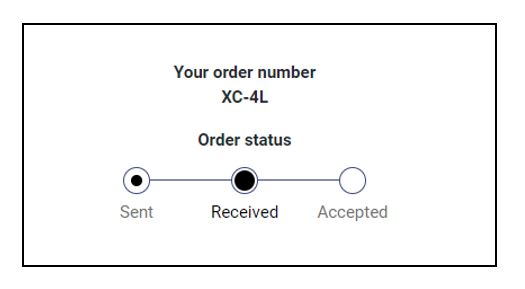
- Received: Orders that have been viewed at least once by someone in the store and are in the Open tab list are communicated to the customers as status Received. This basically means that the order has been received by the store. As soon as someone has clicked on an order and viewed it, the status will be shown as Received.
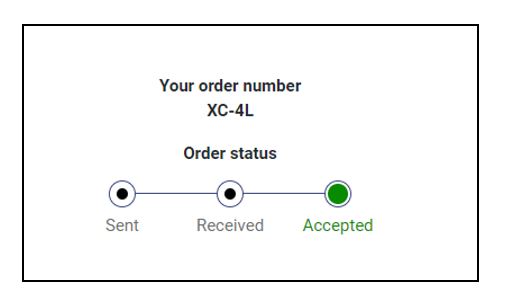
- Accepted: When you confirm a customer’s order for processing, it will appear on their screen as Accepted. This basically means that the order that they have placed is ready for processing. Orders presented to the customer as accepted are listed under the Confirmed orders tab in your orders dashboard.
- Ready You can mark an offer as ready when accepting it. This will trigger the system to notify the user that their order is ready. In the case of pickup orders, the customer will receive an email at their preferred address notifying them of the order readiness. This is the highest status any order placed in your store can have. Ready orders are listed under the Ready tab in the orders dashboard.
Reject an Order
After you have seen the details of an order, you may decide that you cannot process it and therefore choose to reject it. Your customer will be notified if you reject their order. GonnaOrder also allows you to optionally tell your client why you cannot fulfill the offer. All orders in the open confirmed and ready order lists can be rejected. If you reject an order that you had previously confirmed, the customer will receive an update on the same.
To reject an order, choose the order list to which it belongs – either open, confirmed, or ready – and find specific order. Click on the order to bring up its details page where you will find the Reject offer button.
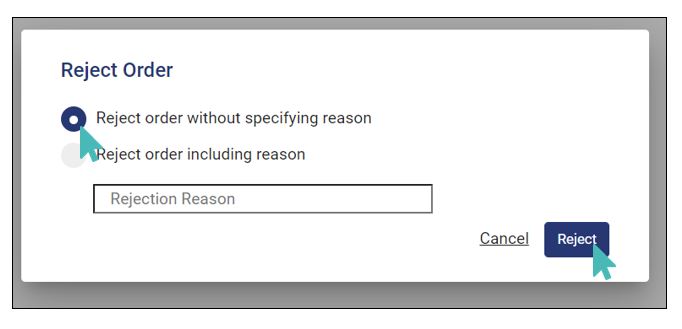
A dialog pop-up will appear with two order rejection options. One option will be to reject the order without providing a reason and the second will include a reason that will be shared with the customer. After choosing the option that works for you, click the Reject button to move the order to the rejected orders tab.
Even though you can reject orders that have already been accepted, this practice is not recommended. It is better to evaluate orders while they are still open and resolve to either accept or reject them. We also recommend that you provide reasons for offers you reject so customers understand you better.
Customer View of Rejected Orders
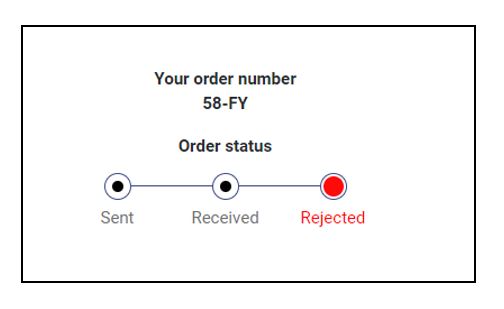
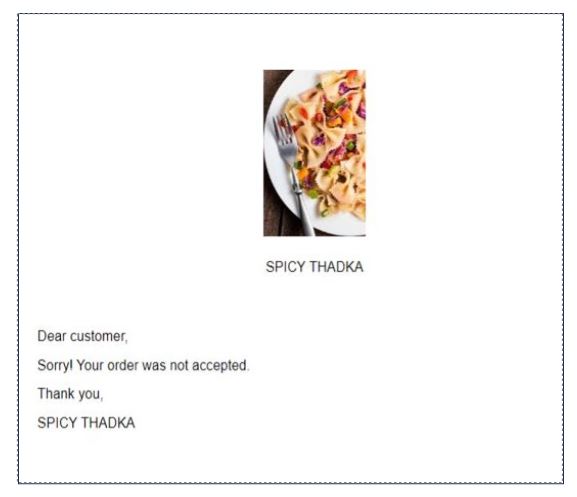
When rejecting an order, the customer will see the order as Rejected. The customer can see this on the Thank-you page after they have placed an order. They can also see this in the order status link they receive. Further, customers who provide their emails to receive order status updates will receive an email notifying them of the order cancellation and the specified reasons, if any.
Here is what an order rejection email sent to the customer would look like.
Accept or Reject Multiple Orders
Rather than accepting or rejecting one order at a time, you may as well mark multiple orders and accept or reject them at once. This saves you and your staff time and allows you to concentrate on order preparation and delivery. As an example, you may want to reject all orders that arrive when you are about to close the store or when you have cleared all available inventory. Only open orders can be accepted or rejected in bulk.
While on the orders dashboard under the Open orders tab, you can mark the orders whose status you would like to change by clicking on the checkboxes to the far left of the orders.
After marking the orders, click on either the Accept or Reject button above the list of orders to assign the appropriate status.
Marking the checkbox that appears on the orders header will select all visible open orders and you can apply a status on all of them without marking each one of them.
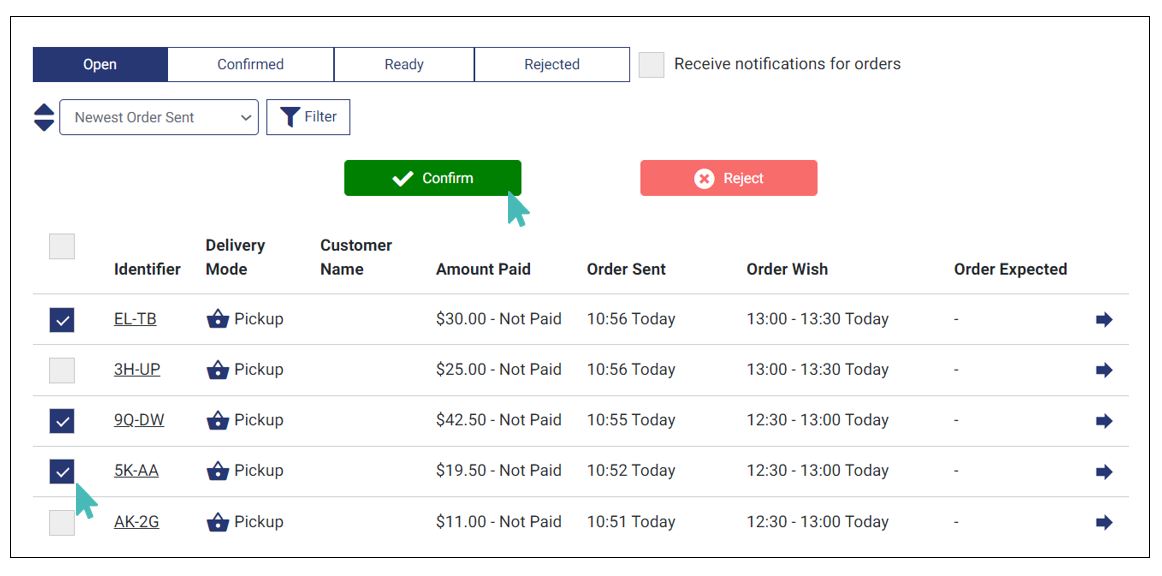
If in the previous step, you confirm the marked orders, they will all be moved to the Confirmed orders tab. Rejected orders will move directly to the Rejected orders tab.
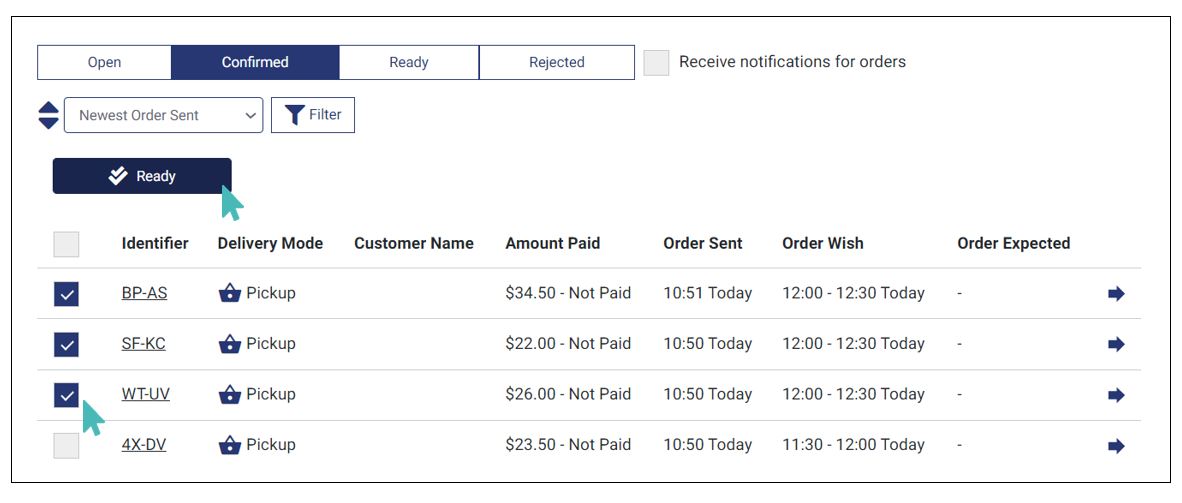
Mark Multiple Orders Ready
All confirmed orders appear in the Confirmed orders tab. These can be further processed to indicate that they are ready to be picked, served, or delivered to the customer.
You can mark multiple orders and mark them as ready at once. To do so, click on the checkboxes that appear to the far left of the orders appropriately and then click on the Ready button that comes up when you start marking.
To mark all confirmed orders as ready, you can mark the checkbox that appears on the orders header and then click on the ready button.