GonnaOrder allows you to configure schedules based on the nature of your store operations. Schedules have two purposes. First, they allow you to easily configure the opening times for your store and ensure that users can place orders to be delivered only within the store opening times. Additionally, you can use schedules to control certain products or categories’ availability for specific days of the week or times. You can associate a category or an item with a schedule and it will be visible during the given schedule. They help in managing customer expectations and thus help you maintain a good reputation for the store.
On This Page
- Managing Store Schedules
- Schedules for Specific Dates
- Set Your Store Opening Times
- Setup Store Ordering Times
- Create Two Schedules for One Day
- Configure Categories and Item Availability Based on Schedules
- Set Wish Date at Order Level
- Set Multiple Wish Dates Per Order Item
Managing Store Schedules
A store schedule has start and end times as well as days of the week. You can create schedules to show your customers when you will be open so they can place their orders during that time or you can use schedules to control the menu. When used for the latter, items associated with specific schedules will only be visible during the scheduled time. For instance, you may use a lunchtime schedule (11.30 – 14.30) or a Sunday brunch schedule (10.00 -13.30 on Sunday) to hide and show products in this category.
When creating schedules, you need to take into account your opening and closing times as well as the purpose they will fulfill. You can control what customers see on your menu by associating individual items and categories with schedules and then switching between schedules when appropriate.
Deleting a schedule involves disassociating it with categories and products and then permanently removing it from the store.
Creating a Schedule
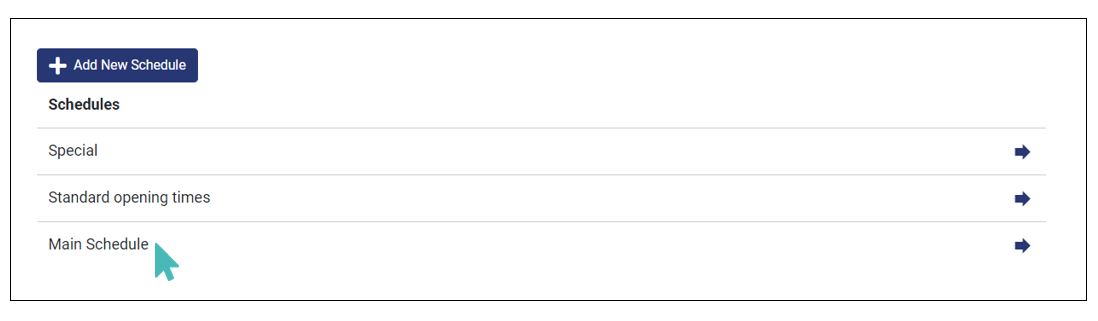
Log in to your store dashboard and select Settings from the side menu and click on the Schedules tab on the menu strip.
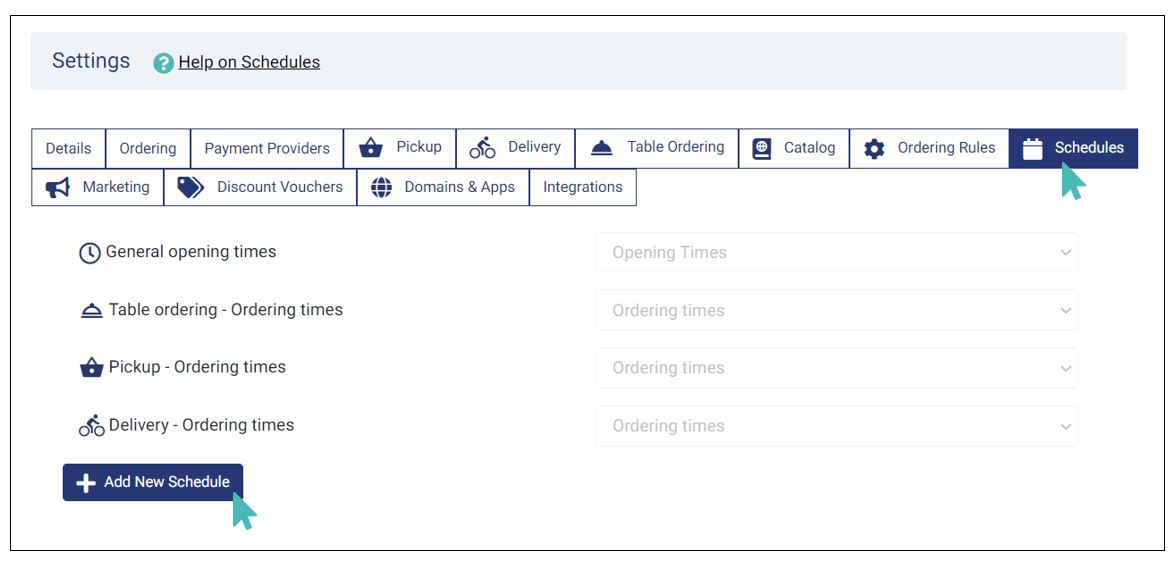
Click on the Add New Schedule button to create a new schedule for the store.
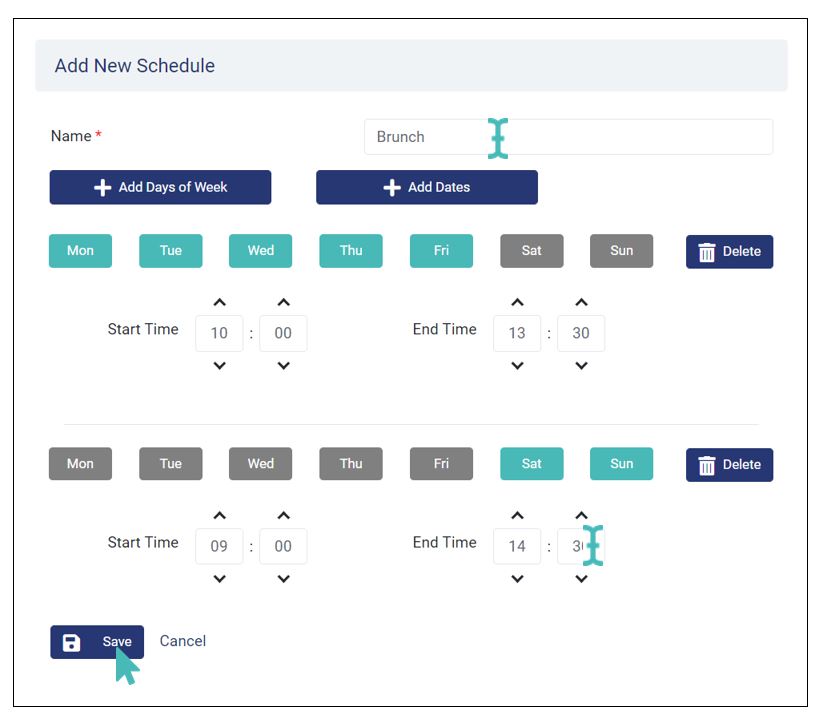
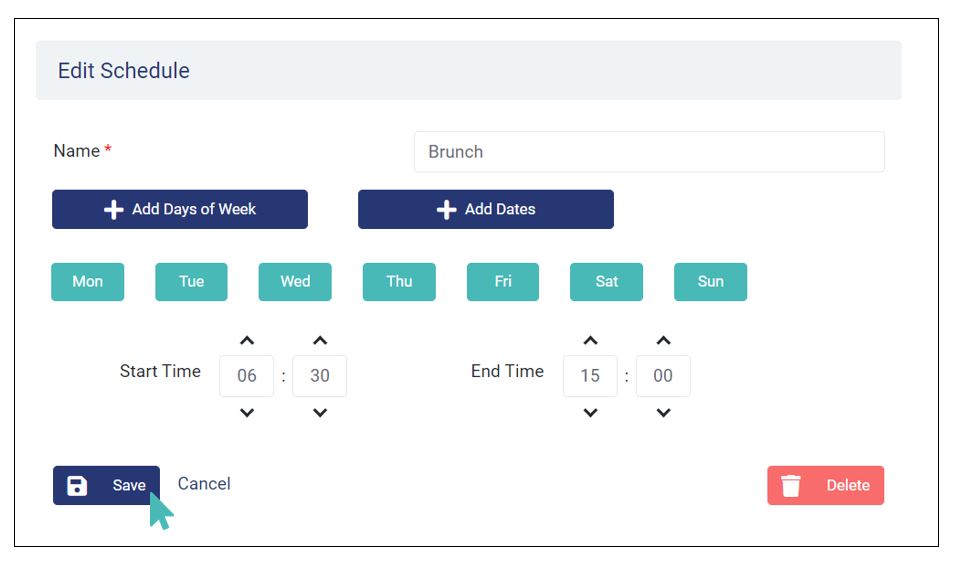
On the next screen, enter the name of the new schedule and pick the timeframes. Note that you can have several schedules, each satisfying a unique requirement in your store. In the image below, we have chosen “Brunch” to be the name of our schedule and 10.00 – 13.30 to be the operational time on Weekdays, and 9.00 – 14.30 on weekends for the schedule, but you can have anything. Click the Save button for the changes to take effect. See that you can have different time thresholds for different days on the same schedule.
Updating a Schedule
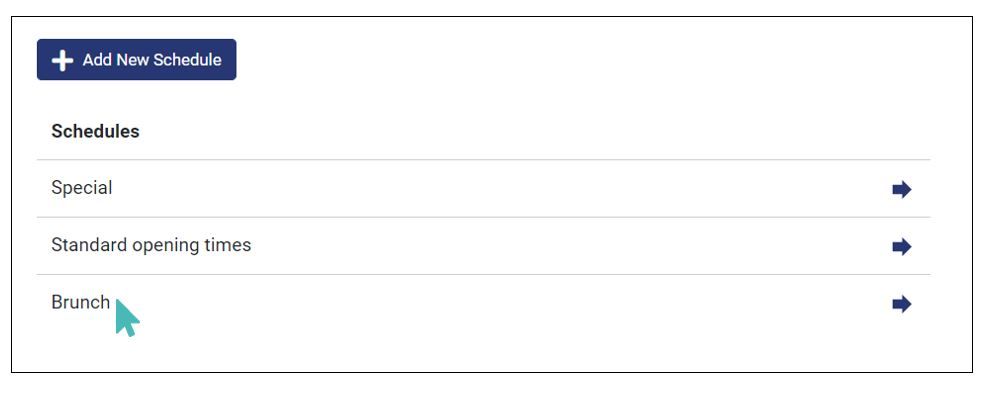
As a store manager, you may at times want to update a schedule to align with your operations. When that is the case, you visit the store dashboard and select schedules from the settings menu bar. Next, you find the name of the schedule you want to update and click on it. This section will show you how to update a schedule to suit your needs with reference to the Sunday Brunch schedule you previously created.
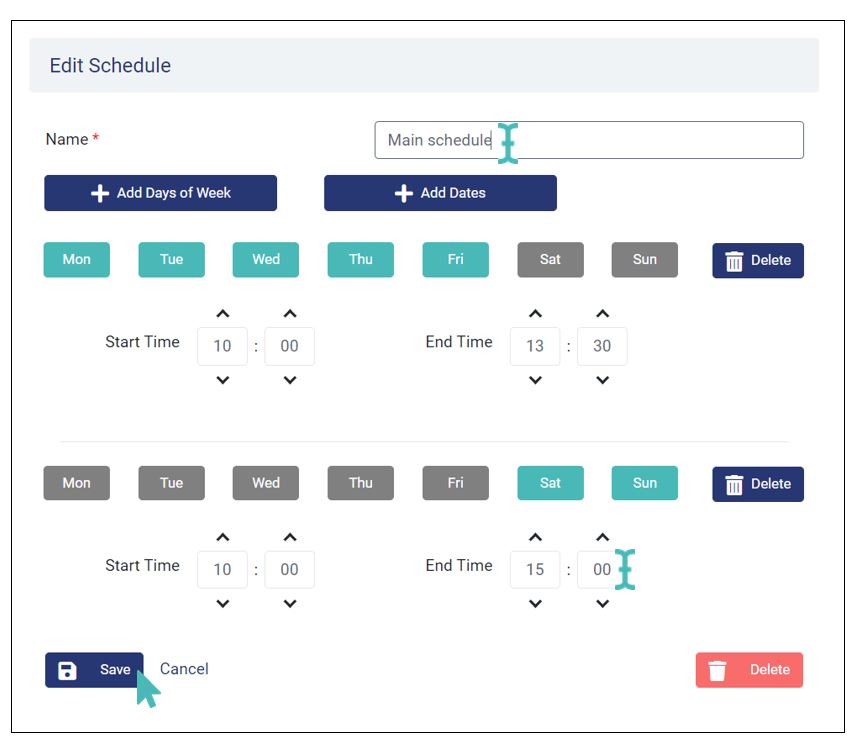
Assume now that you have decided the schedule will run between 1000 Hrs and 1500 Hrs on both Saturdays and Sundays without affecting weekdays and that you want to give it a different name as well. Here is what you do.
Choose settings from the store dashboard’s side menu and click on Ordering rules. Next, you will need to click on the name of the schedule to bring up its details page.
On the details page, you may update the schedule name, schedule start, and end times, and the days when the schedule is active as well as include special dates for the schedule. The example case shows giving the schedule a new name, updating the scheduled end time, and changing the active time for Saturday and Sunday.
Deleting a Schedule
You can always discard unneeded schedules. Say, you had a Sunday special schedule but you are no longer opening on Sundays.
Deleting a schedule involves three easy steps as follows.
- Log in to your store dashboard and select Settings from the side menu, then click on Schedules as shown in section one of the creating a schedule section above.
- Scroll down to find the schedule you want to delete and click on its name. At this step, evaluate the schedules you already have and choose one that you do not need. You do not need to delete a schedule since you can always disassociate it from products and categories.
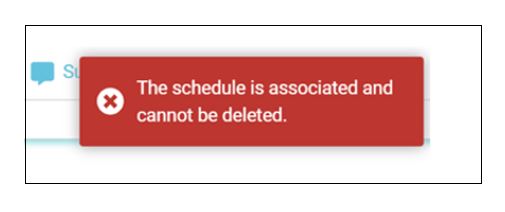
- Finally, click on the Delete button to permanently remove the schedule from your store. This action is irreversible and care should be taken to only delete schedules that are no longer needed.
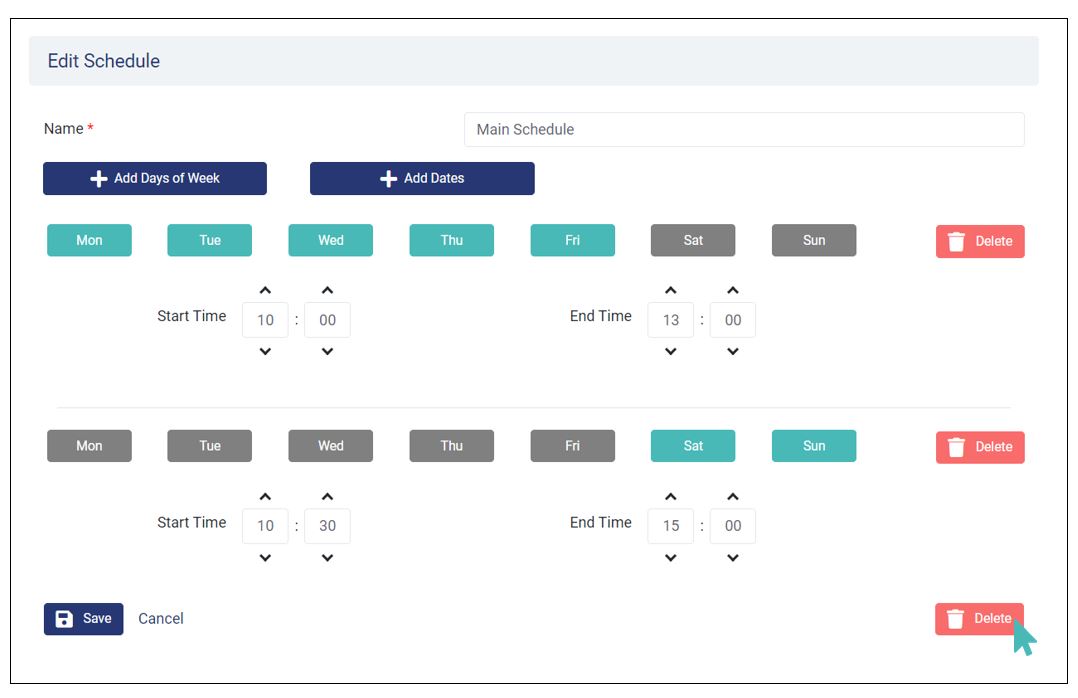
While on the delete section of the schedule, you can delete one or more rows of dates or days of the week by clicking on the Delete button next to the said date or row. This means you do not need to permanently delete a schedule if you only wanted to remove a day or date.
Note
GonnaOrder will not allow you to remove schedules that are currently associated with store categories or store items. You must remove all associations or an error will occur when deleting.
Schedules for Specific Dates
Besides the schedules based on the day of the week, like the one created above, you can also have schedules based on a specific date of the month. A good example is a schedule designated for the 14th of February (Valentine’s Day) or one created for Christmas Day. For Valentine’s Day, you may choose to have additional products in your store which you may not have on other days. In that case, you need to create a special category or products for the day and associate it with the schedule (see how to configure categories and item availability based on schedules.) On the other hand, most stores will scale down operations on Christmas day and remain with a few products. In this scenario, you will need to hide all other items and remain with what you serve on that day. Say, for example, that you will only be serving drinks on Christmas, then all foods can be excluded from the Christmas menu through a schedule with a specific date.
To create this type of schedule, choose the Add Dates button on the schedule creation page.
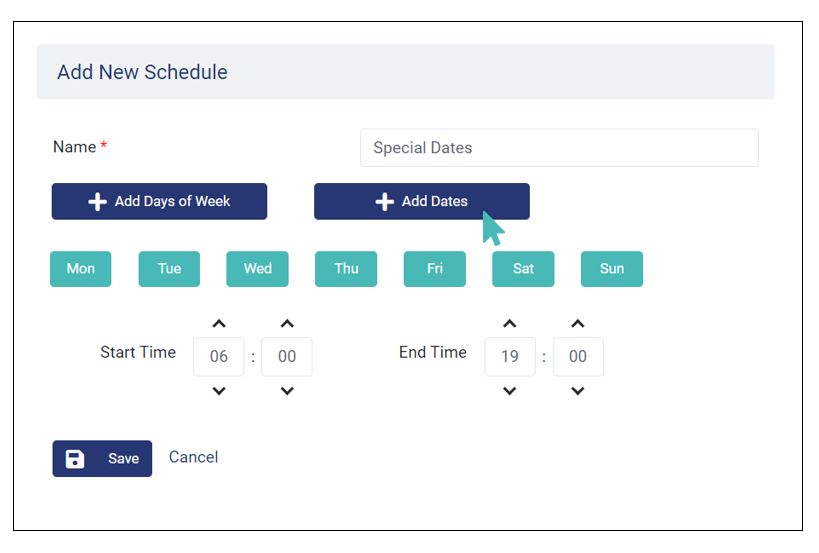
Provide the date for which the schedule applies, the start and end times, and indicate whether you want to show/include or hide or exclude items associated with this schedule on the menu. Once you are sure you have the right dates and times, click save so your changes can take effect in the store.
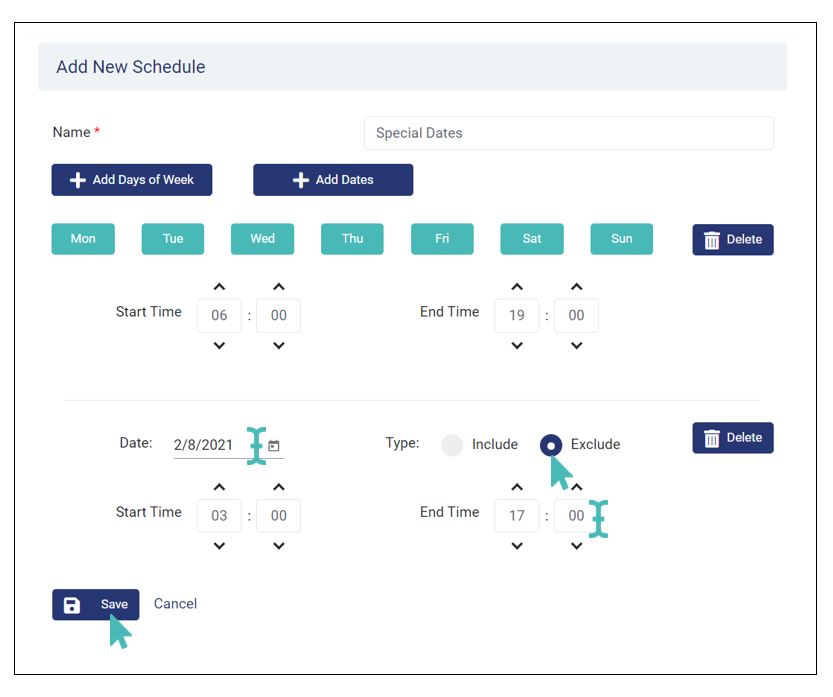
When you set the schedule type to Include, all categories and products associated with the schedule will be included in your store menu on the chosen date. Conversely, a schedule of the type Exclude will hide associated products and, or, categories from the menu. That is to say, you can have a special category of items that will only be available to customers on a particular date. Likewise, you can hide some items from the menu on a specific date.
In the example case, the schedule has both days of the week and a special calendar date. This means that any products associated with the schedule will be available to customers on all days of the week between the specified times. However, we have used the Exclude schedule type for the special date. Therefore, all items associated with this schedule were excluded from the store menu on the selected date.
Tip
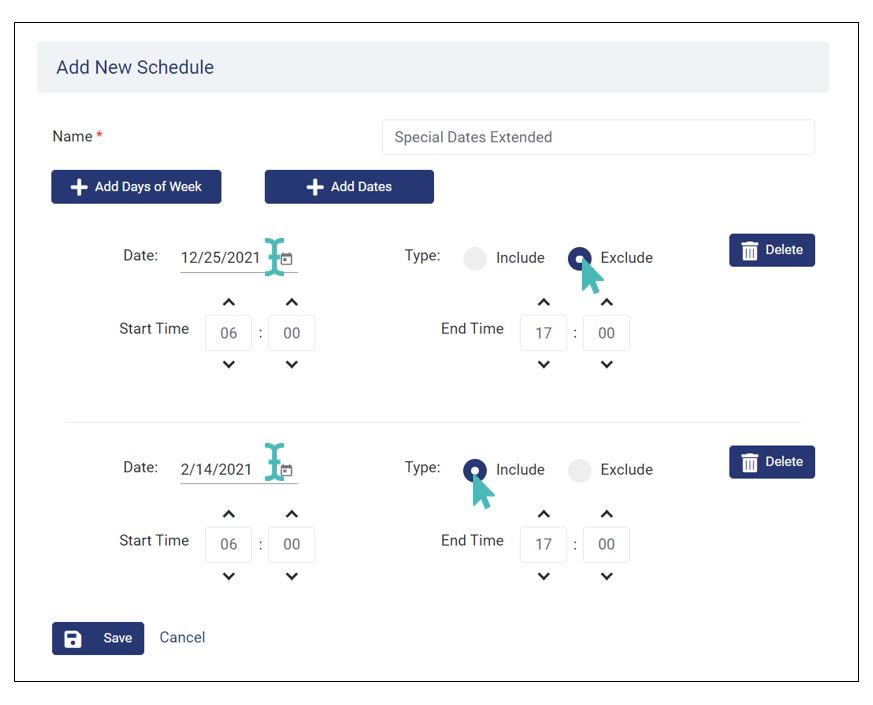
You can also create a schedule for several special dates without specifying any day of the week.
Set Your Store Opening Times
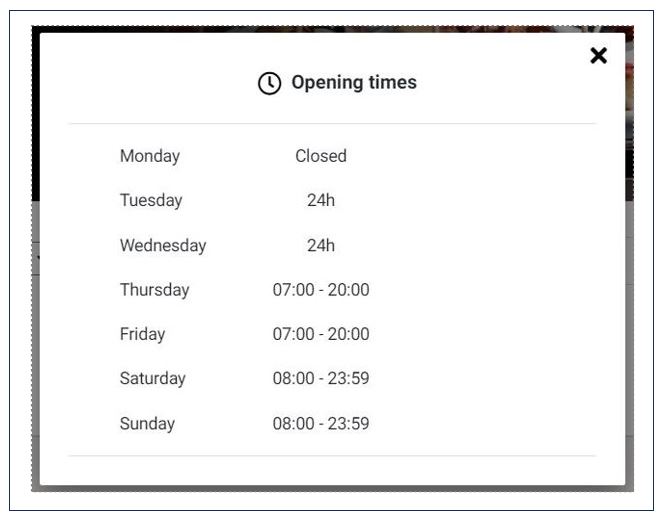
With GonnaOrder, you can configure your opening times through a schedule. A schedule can have different start and end times based on your store operations. Say, for instance, that you are open 24 hours on Tuesday, and Wednesday and between 0700 Hrs and 2000 Hrs during Thursday, and Friday and between 0800 Hrs and 2300 Hrs on weekends and closed on Mondays.
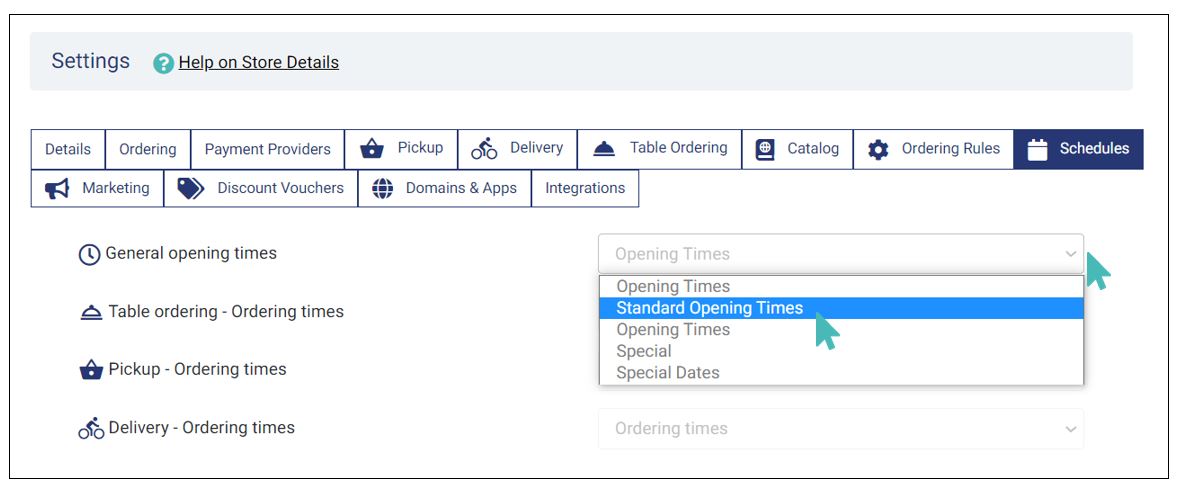
To create a store opening times schedule, go to Settings and select Schedules. Just below the settings menu bar is a selection panel for General Opening Times. No schedule will be selected unless you have previously set opening times.
For the example case, we have already created a schedule for this and we have named it Standard opening times. Our example store is open during the hours listed below and which we have used in the standard opening times schedule.
- Monday: Closed
- Tuesday – Wednesday: 0700 Hrs to 2000 Hrs
- Thursday – Friday : 0800 Hrs to 2300 Hrs
- Saturday – Sunday: 1000 Hrs to 2300 Hrs
Your case will definitely be different depending on your premises’ location and operations, among other things. Notice that you can also include or exclude specific dates from the schedule. See schedules for specific dates for details.
Setting the store’s opening times involved picking a schedule to control the opening times. To do this, go to Settings > Schedules. Click on the caret symbol on the General opening times field and choose the appropriate schedule. The times defined in the schedule selected will effectively be your opening and closing times.
Schedule Inheritance for Child Stores
In a multi-store setup, child stores can inherit the opening times set for the parent.
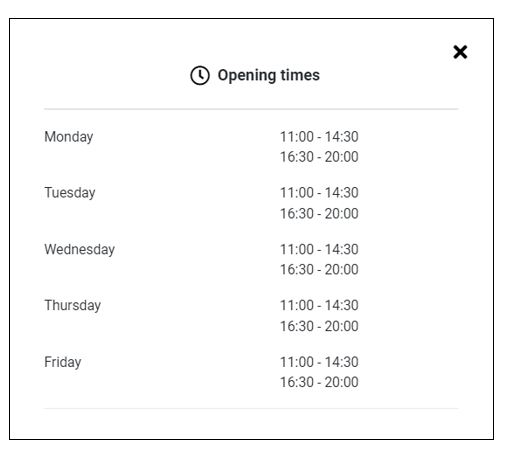
How Customers View Your Store Opening Times
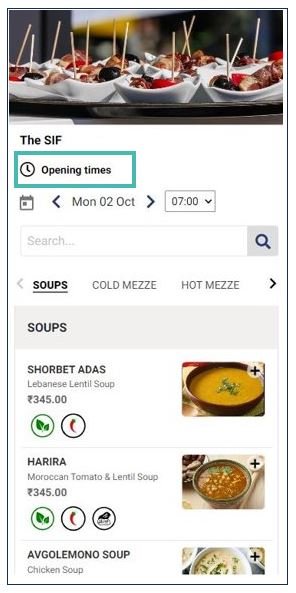
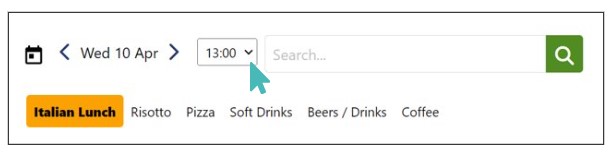
When you configure opening times and ordering times, they will appear on the user interface as a link that users can click to view opening and closing times for each day or delivery mode. To see how users will view your opening times, click on share and preview from the store side menu.
On the next screen, click your store’s GonnaOrder domain to bring up your store page with the changes you made.
This is how the page looks like, with opening times sitting at the top of the page right above your items.
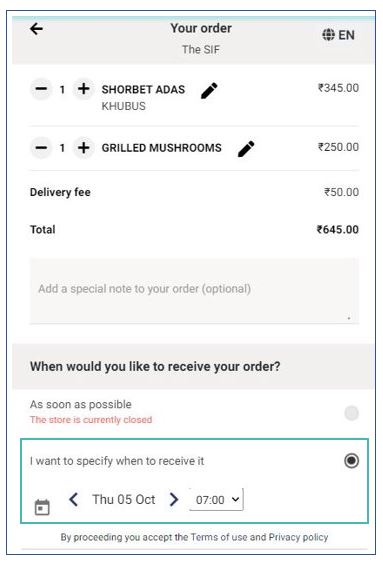
If a customer has already selected a delivery mode, then the opening times for the store will be the ordering times for the chosen delivery mode rather than the general opening times. The same case applies to the wish time dropdown on the order page where the times presented to the user will be within the ordering times of the selected delivery mode.
Furthermore, if the schedule controlling the opening times for the delivery mode a customer selected has not started yet, then the order will not go through and they will have the option to change the delivery mode or change the order wish time.
Ordering Outside the Opening Times
Ordering When Future Order Desired Time Is Allowed
GonnaOrder allows users to place orders even when your store is closed and the store has enabled the future order desired time under store schedules. In that case, customers will be notified that your store is closed and be provided with an option to have their order fulfilled at a later day or time. The current store opening times determine when orders can be fulfilled.
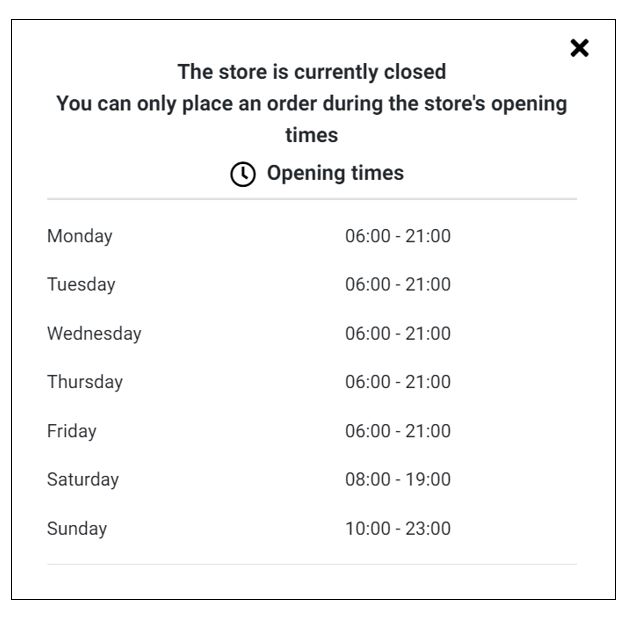
Ordering in a Closed Store With Future Order Desired Time Disabled
With future order desired time disabled, a closed store will show a popup of the opening times and include a message indicating that the store is closed and not accepting orders.
Additionally, the store will not show the Add to your order button on the item details page and neither will customers be able to Submit orders.
Setup Store Ordering Times
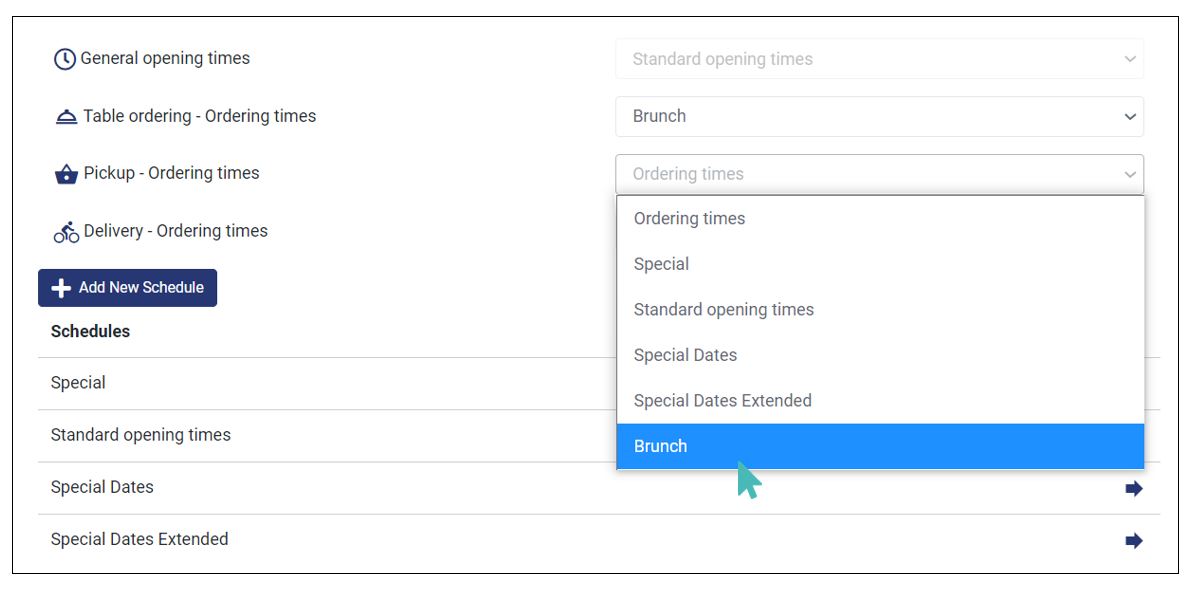
There are instances where a certain ordering mode is inconvenient for you and your store staff. Also, there are other times when one ordering mode performs better than another (for example you receive more orders for one delivery mode than another). These are among the reasons why you may want to control the time when you receive orders for particular delivery modes.
Like with general opening times, ordering times for every mode can be controlled using a schedule. Further, every ordering mode can have a schedule within the general opening times but independent from the same. Different ordering modes in the same store can also have different time thresholds.
We will use an example case where a store serves breakfast and lunch via table service and pickup modes and not delivery. We also assume that the same store serves dinner via delivery at address mode but not the other two modes.
In this case, we can create two schedules for the store. We will call the first schedule “Brunch” and the second one “Take away dinner” so it is easy for you to follow.
Setting the ordering times for a certain delivery mode is equivalent to picking the relevant schedule to control ordering. This happens in the same way we selected a general opening times schedule.
Tip
- You can skip setting the ordering times per mode if you want to receive orders for all delivery modes when the store is open
- In a multi-store setup, the child store can inherit the ordering times configured for the parent store. Therefore, you would only need to create and maintain schedules on the parent store.
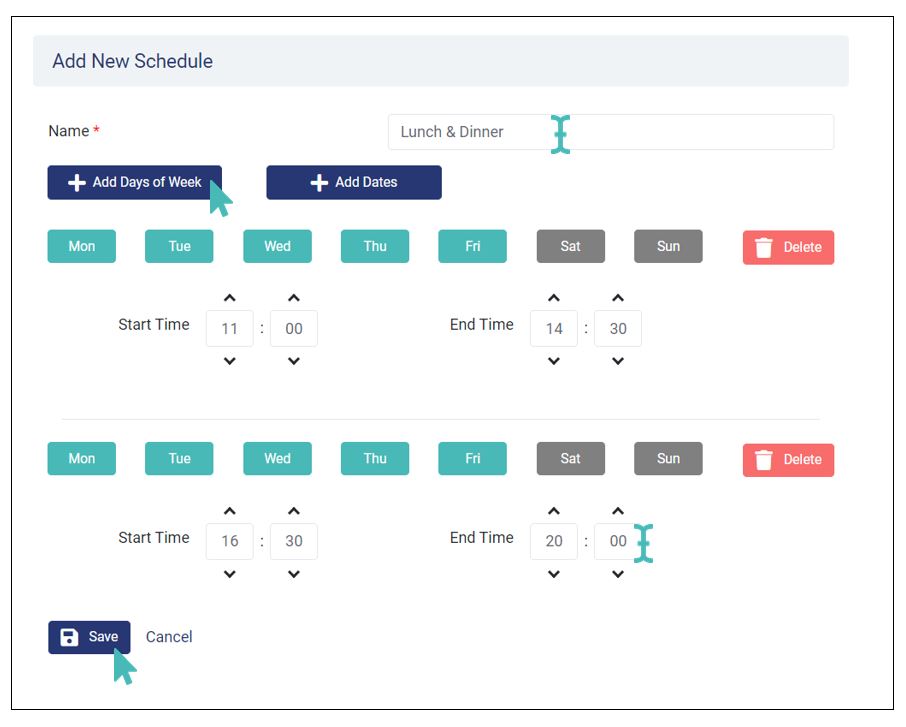
Create Two Schedules for One Day
It is possible for your store to have more than one schedule for the same day. This applies for both opening times and ordering times.
For example, a store may have lunch and dinner schedules under one name.
To create this type of schedule, go to Settings > Schedules and click Add New Schedule.
On the schedule details page, provide a name for the schedule, pick the days when the schedule should be active, and select the start and end times for the first schedule (Lunch in this case). To add the second schedule, click on the Add Days of Week, set the appropriate days, and pick the appropriate schedule start and end times.
Configure Categories and Item Availability Based on Schedules
Assume your store has special brunch meal combinations that are only available on Sundays. In that case, you may want to hide the Sunday brunch products from the menu for the other days of the week. Still, you do not want to create a separate menu. GonnaOrder takes care of this scenario through the configuration of item and category availability based on schedules. You can associate the brunch products with a Sunday brunch schedule to make them available on your menu on Sundays alone and within the time specified in the given schedule.
Associating a category with a schedule makes that category and all products under it to be available to users only on the days and within times specified in that schedule. The same case applies to products, where those associated with a schedule are only visible to users during the schedule.
You must have created one or more schedules to configure category availability based on schedules. See the section above to learn how to create schedules, otherwise here is how you can configure a category or item to only appear in the menu during a certain schedule.
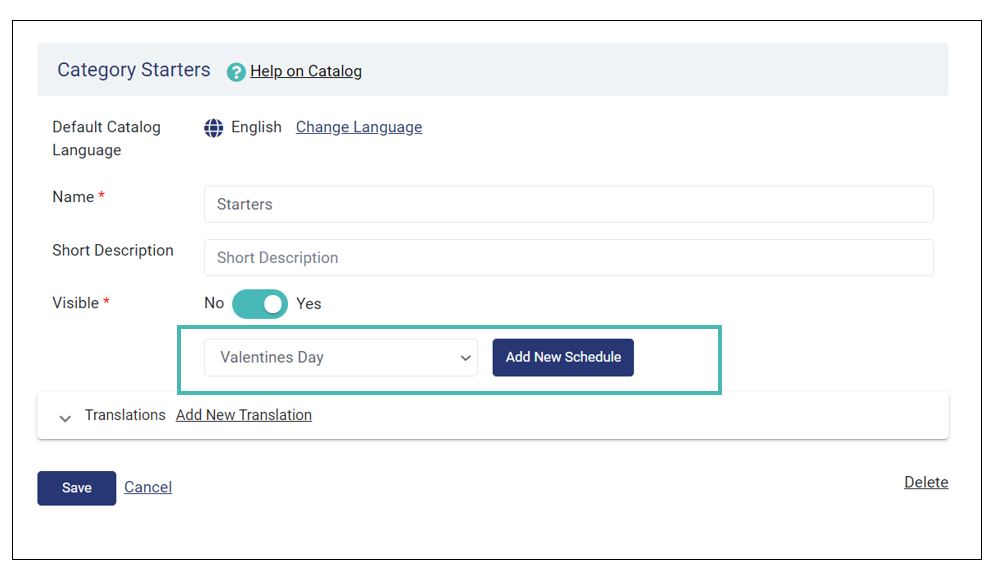
Select Catalog from the side menu in your store dashboard and click to edit the category you want to associate with a schedule. Your page should look like the one below where you select one schedule from the dropdown list.
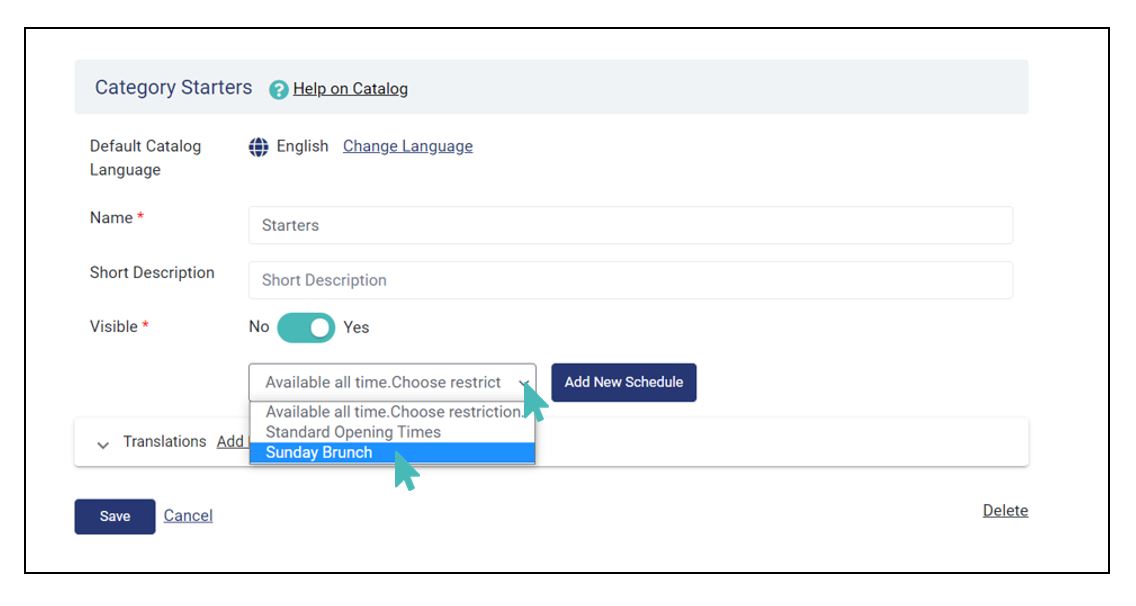
Now, the selected category will only appear in your menu during the schedule you have picked for it. Customers will not be able to order any item in this category until you activate it by choosing it in the opening times of the schedules page in settings. However, there is an exceptional case where you have associated items with a schedule that includes special dates. In that case, the visibility of the items will be determined by the type of schedule you choose. See the section on Schedules for specific dates.
Configuring a store item to appear in the menu during a given schedule follows the same process but now you will have to edit its specific details and not the category.
Menus for Special Dates
Schedules for special dates will often affect the store menu when they are associated with categories or products. Like with other schedules, categories, and products associated with schedules for special dates will only appear in the menu on the particular date when you created such a schedule.
If we created a special schedule for Valentine’s Day and associated it with a particular category, then that category would only appear in the menu on Valentine’s Day. This happens automatically and your customers will not see items listed in the said category unless they are ordering the items on the said day, or they have set the order wish date to the 14th of February. Notice that the items associated with a special date schedule can either be included or excluded from the menu.
For this example case, we have associated the Starters category with a Valentine’s Day schedule that is set to include associated products.
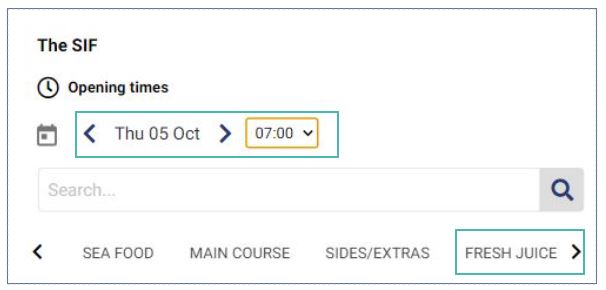
Therefore, if we viewed the store on any other day without specifying an order wish date, the starters category will not appear in the menu. See the image below where the store has only two categories.
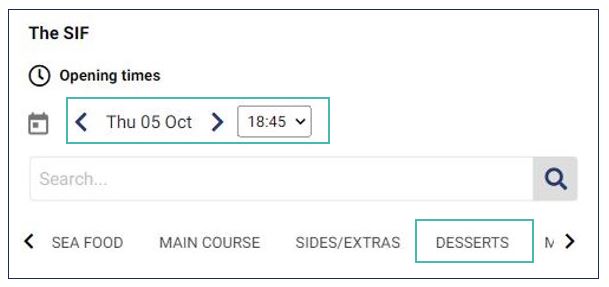
However, if we choose the 14th of February to be the date of the order, then the store menu will include the starters category as shown in the next image.
Message Displayed to Customers if an Item Is Not Available on a Selected Date/Time
With GonnaOrder, you can configure categories and item availability based on schedules. That is to say that some products will only be available in your store during specified schedules.
If a customer places an order for an item that is schedule-restricted and then chooses an order desired date (the day they want to receive the order) outside the schedule the store will inform them that the product will not be available at the specified date and time. They can then choose to update the desired date.

Set Wish Date at Order Level
GonnaOrder allows you to set a wish date and time when the customer can receive an order. This setting gives your customers the freedom to choose when they would like to receive their order.
To configure this feature, go to Settings > Schedules and scroll down to the Desired Date & Time Level section. Select Order Level to enable this setting.
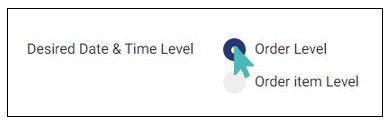
Once you have configured this setting, the customer will be able to set when they wish to collect their order.
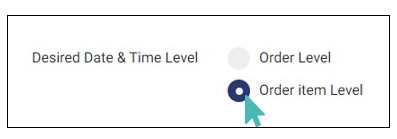
Set Multiple Wish Dates Per Order Item
GonnaOrder enables you to empower customers with a more advanced way to schedule individual orders. This new setting allows customers to set multiple wish dates per order items. In other words, customers are able to submit an order that has different wish dates per item. This means they don’t need to create several orders with same content.
To enable wish date per order item, go to Settings > Schedules and scroll down to the Desired Date & Time Level section. Select the order item level option to activate this setting.
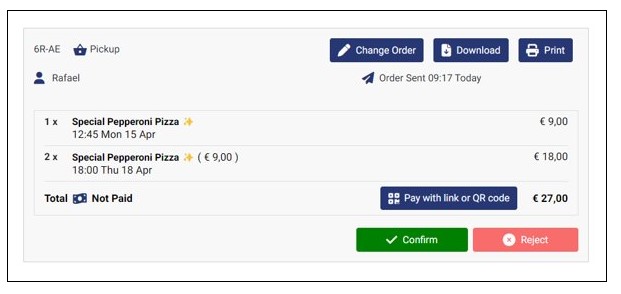
When you enable this setting, a customer who wants to have a special pepperoni pizza on Monday and Thursday can place the order once and select their preferred date and time. The order will contain the customer’s specified wish dates for each item. This means the store manager can prepare the order on time and also customers can enjoy a smooth ordering experience for multiple orders with different wish dates.
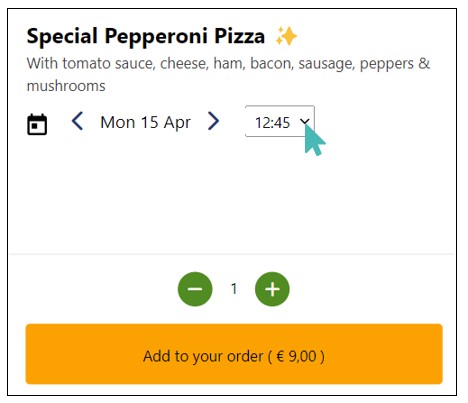
Before checking out, the customer will be able to view and confirm the set wish dates for each order item.
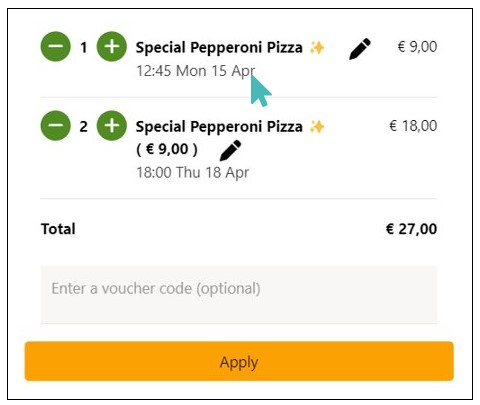
The store manager will also be able to view the order items and their respective wish dates. This will enable them to fulfill them in accordance with their customers’ wish dates.
Tip
The store manager can filter orders with wish dates and time for easy identification and processing.