Automated order printing lets you concentrate on fulfilling submitted orders rather than looking up every order in your store. You can then pass on the order for processing as soon as it arrives in your store. Before you can configure automated printing for orders, you must register and enable at least one printer for your store.
The GoAdmin app supports Bluetooth and WiFi printers on both iOS and Android. Additionally, the GoAdmin app for iOS supports printers with the AirPrint protocol.
On This Page
- Register Bluetooth Printers on GoAdmin App
- Register WiFi Printers on GoAdmin App
- Register AirPrint Printers on GoAdmin for iOS
- Enable Auto Printing for Orders
- Disable a Printer
- Remove a Printer
Register Bluetooth Printers on GoAdmin App
You can register one or more Bluetooth printers in your GonnaOrder store. The registration process is short and easy to follow.
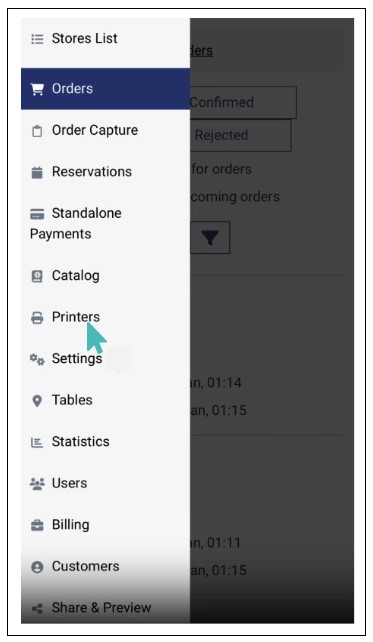
Click the top left menu icon to view the GoAdmin app menu and select Printers. The printers page should show you the registered printers if you have any. To register a new printer, click the Register button and proceed as instructed below.


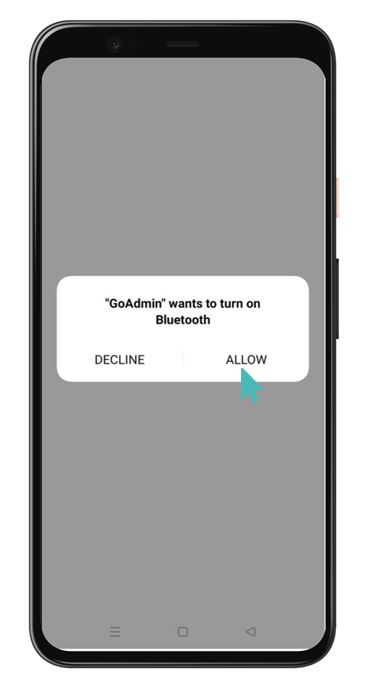
The Bluetooth printer registration page requires you to select the Connection method for your printer. Click on the Bluetooth option to connect to a Bluetooth-enabled printer. GoAdmin will request your permission to open a Bluetooth connection. Click on the Allow button to continue with the setup.
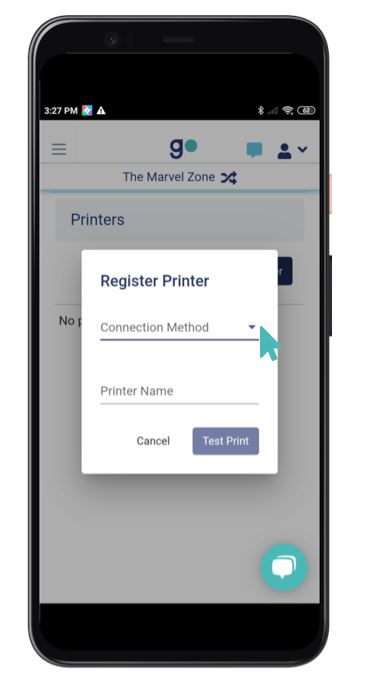
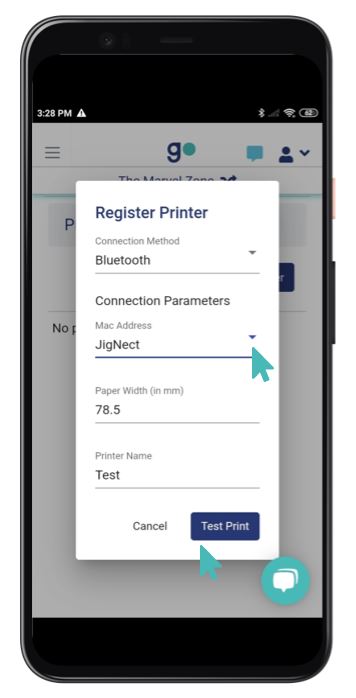
At this stage, ensure you have powered up your printer, and it has Bluetooth connectivity turned on. To proceed, click on the drop-down labeled Mac Address and click on the name or Mac address of your printer. You also need to specify the width of your printing paper and provide a short name for your printer and spec. The width of your printing paper ensures that GonnaOrder prints legible and presentable receipts without cutting content on the sides. The name can be anything that will help you know which printer you are connecting to. For example, Kitchen printers, BT, etc.
Confirm that you have configured your printer correctly. Also, ensure that you have inserted the appropriate printing paper, then click Test Print to check that your printer is online and working properly.
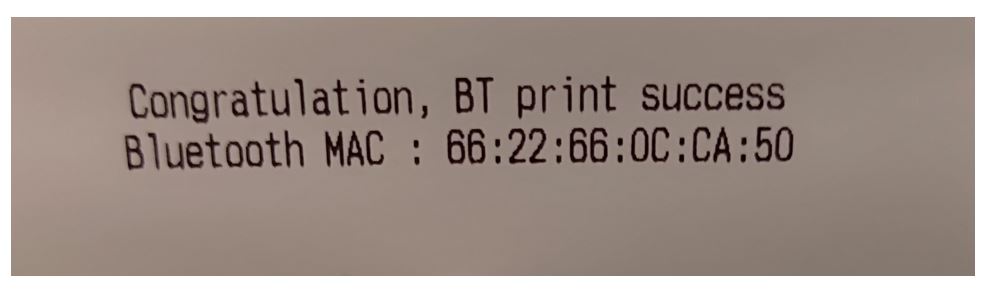
If GoAdmin successfully connects with your printer, the app will show a toaster message indicating the type of printing that was successful.

GoAdmin will then attempt to print a success message to your printer. The connection and printing should occur in less than a minute. You may need to check that you are connected to the correct printer or replace the printing roll if it takes longer.
Register WiFi Printers on GoAdmin App
The GoAdmin app can connect to a Wi-Fi-enabled printer to print order receipts automatically. Your printer must be connected to the same network as your phone or tablet for successful connection and printing. Here is how to connect and test a WiFi printer.
On your GoAdmin app, click on the Printers menu entry, then click on the Register button.
Next, you must fill in some connection parameters, as explained below.
- IP or Host Name: This refers to a unique address that identifies your printer on your local network (or the internet). It consists of four numeric values joined with periods and allows communication between connected devices. An example IP address is 192.168.88.242.You can check the manual that came with your WiFi printer to see its default IP address, or you can contact the manufacturer to assist you in locating the IP address.
Alternatively, if you have access to your WiFi router administration panel either through a website or app, you can search for a section labeled Clients/ Connected Devices and try to locate the IP address of the printer from there.
- Port: A port refers to a communication endpoint in an internet-enabled device. Most WiFi printers use 9100 as the default port number; we have added this to the GoAdmin app. However, you are advised to check the user guide with your printer to confirm the port number to use.
- Printer Name: This should be a short name that can be used to identify your printer. There are no limitations to the printer’s name since it is only an alias.
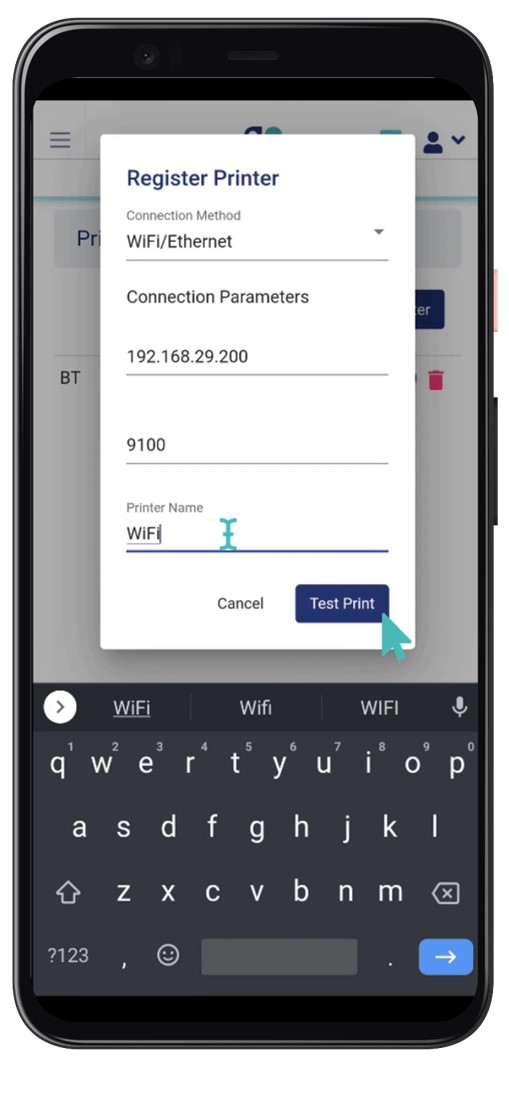
After filling in the IP address, the port number, and the printer name, click on the Test Print button to initiate a connection to the printer.
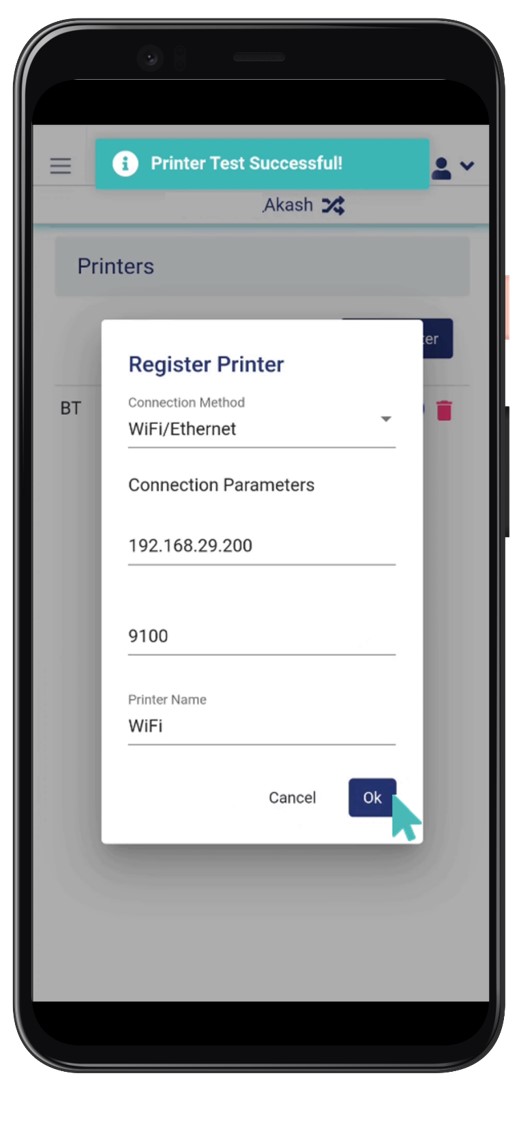
If GoAdmin connects successfully to the printer, it will notify you on the screen with a toaster message reading Test print successful!. You can then click the Ok button to register and enable the printer.
If the print test fails, you will be alerted with a similar toaster message. Also, you should ensure your printer has appropriate printing paper and is connected to the same network as your Android phone or tablet.
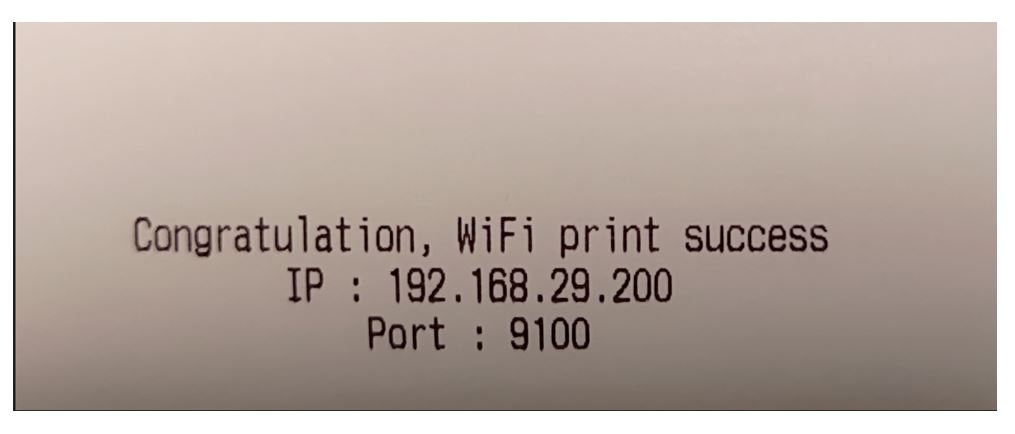
GoAdmin will print a success message on your printer after a successful connection and testing. The message includes the IP address of the printer and the port number.
Register AirPrint Printers on GoAdmin for iOS
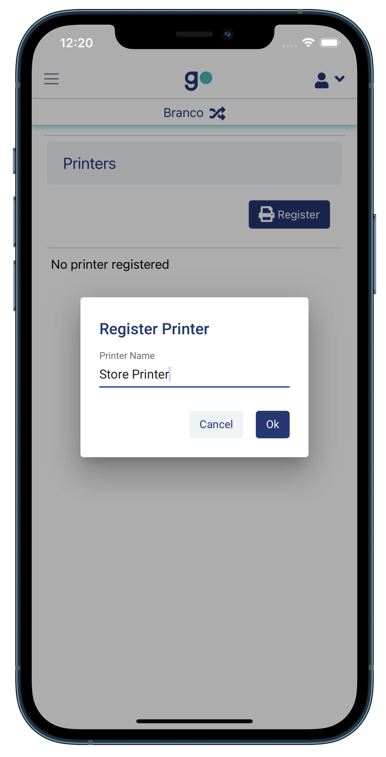
To register a store printer, click on the menu icon on the top left section of your screen and then choose printers.
The next step will require you to register a printer by clicking on the Register button with a printer symbol and entering a name for your printer. We have chosen Store Printer to be the name for the example case, and we will save the changes using the Ok button.
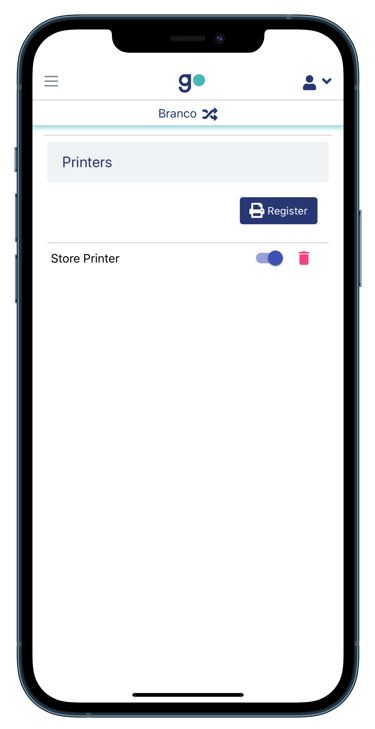
You can register several printers to suit the needs of your store. Registered printers will appear on the printers page that you can access from the app menu.
Which Airprint Printers Are Compatible With the GoAdmin App?
Both manual and automated printing of orders is possible for printers that support Apple’s AirPrint protocol. With this protocol, it is possible to print from a Mac or any iOS device without installing new software.
Apple has an elaborate list of AirPrint devices that you can check to see if your printer supports AirPrint.
Supported printers have these characteristics:
- Must support the AirPrint protocol
- It should be an 80mm printer and not an A4 printer
- It should be a WiFi printer (wireless)
GonnaOrder’s Recommended Airprint Printers for iOS Users
We have picked several devices that work effectively with the GoAdmin iOS application from the long list of printers with the above qualities. Consider buying one of these printers to use the application’s order printing functionality.
Brother TD2130N 2-Inch Desktop Thermal Printer
– Supports USB, Serial, and LAN connection.
– Supports WIFI with Airprint or Bluetooth printing.
– Has a touch control panel display.
View item on Amazon
TSP847II AirPrint by Star
– Has WiFi and AirPrint support.
– Works with 80mm, 104mm, and 112mm wide thermal printing rolls.
View item on the Star website
ZYWELL 80mm AirPrint Thermal printer
– Prints over WiFi and supports AirPrint protocol.
View item on Alibaba
Rongta AirPrint Wireless 80mm Thermal printer
– Has serial, parallel, LAN, and WiFi Connection support.
– Supports the AirPrint protocol.
View item on Alibaba
OCPP-88A 80mm WiFi AirPrint Thermal Printer
– Available in various connection configurations, including WiFi+LAN+Bluetooth.
– Supports the AirPrint protocol.
View item on Ocominc
TSP654II AirPrint by Star
– Has LAN and WiFi Connection support and supports AirPrint.
– Compatible with 80mm thermal printing rolls.
View item on the Star website
Check if my printer supports AirPrint
Enable Auto Printing for Orders
Registered printers appear on the printers page with a toggle button and a delete icon on the same row. The toggle button sets the specified printer as one of the default automatic printers (you can have more than one). On the other hand, clicking on the delete icon removes the printer from your store. You will no longer be able to print orders automatically/manually to the said printer.
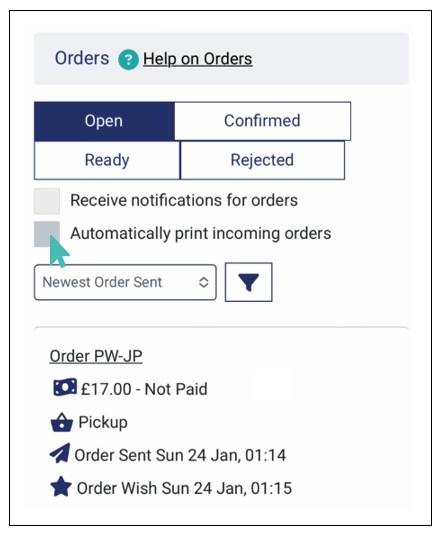
And now, with the printer added and enabled, you can enable automatic order printing from the orders list screen via Menu>Orders and then click on the check box labeled Automatically print incoming orders. Every new order in your store will be printed out from the enabled printers.
Tip
- You should have the GoAdmin app in the foreground or background for a smooth automatic printing experience. Printing will stop if the app is closed.
- You must enable order notifications for automatic printing to work. The automatic printing setting is disabled if you turn off notifications. Checking the automatic printing option also enables notifications on your app.
Disable a Printer
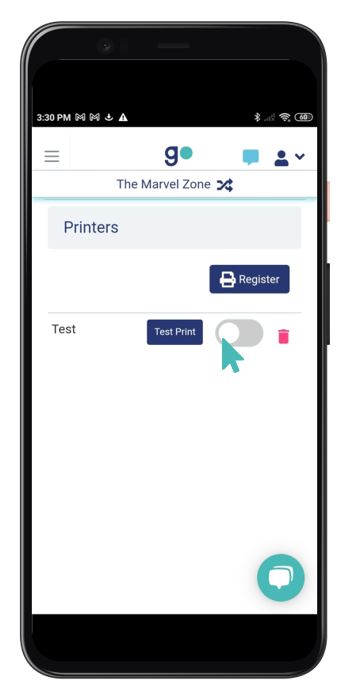
A store can have more than one printer. When automatic order printing is enabled and all the printers in the store are enabled, GonnaOrder will send every receipt to all the printers. Therefore, it may become important to disable some of the printers if they are no longer needed. Say, for example, that your store has three printers, but only two are actively used. In that case, the third printer will still be printing receipts and hence wasting your printing paper rolls. The best thing is to disable all unused printers and keep only the necessary ones.
To disable a printer, go to your app menu and select Printers. Choose the printer you would like to disable from the list and click on the toggle button, so it turns grey. This will effectively stop the selected printer from receiving new orders from your store; therefore, no new receipts will be printed on it.
Remove a Printer
Other than deactivating printers you are no longer using, you may also completely remove a printer from your store. Removing a printer might be viable in case it has malfunctioned or if you have decided to work with fewer printers. Removing a printer from your store means that it will no longer appear in the list of registered printers and may no longer be used to produce order receipts.
You can permanently remove a printer from your store by clicking on the Trash can icon and confirming the action.
