GonnaOrder has a variety of independent settings for ordering and schedules. However, we have several settings that affect both ordering and are related to schedules. These include, but are not limited to, same day ordering, time slots, and upfront order dates. We will help you understand how every feature works on this page.
On This Page
- Request Order Date Upfront
- Maximum Items per Slot
- Same Day Ordering
- Request Desired Time as Soon as Possible
- Request Order Desired Time in Future
- How Future Order Desired Time Works With ASAP Setting
- Desired Time Intervals -Minutes
- Display Desired Time Format
- Slot Duration
- Enable Order Throttling
- Orders per Slot
- Desired Future Time in Minutes
- Default Ordering Mode
- Display or Hide Order Desired Time
Request Order Date Upfront
GonnaOrder allows you to specify whether you want customers to select a date and time when they can receive their orders. This is what we refer to as the order date upfront. When you enable this setting for your store, a customer will be able to specify the day or time for their order. The store will then find the appropriate schedules for the selected day and time and present a harmonized menu with all available products. Essentially, customers can place post-dated orders.
This setting appears under Schedules in the settings section of your GonnaOrder dashboard as shown below.

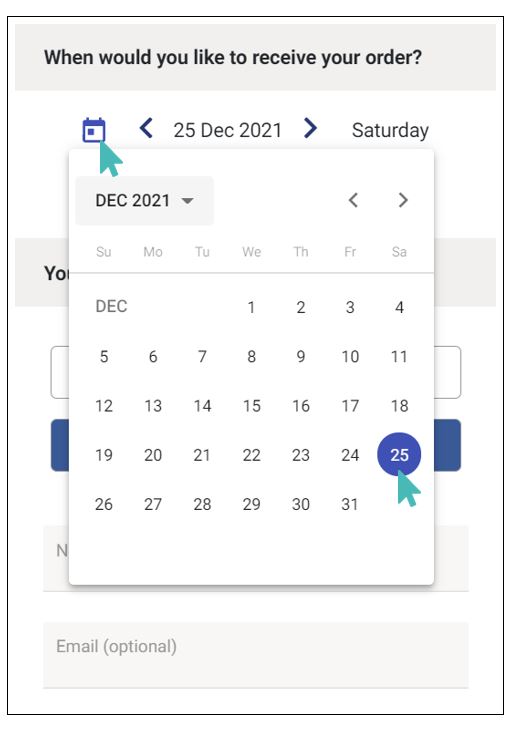
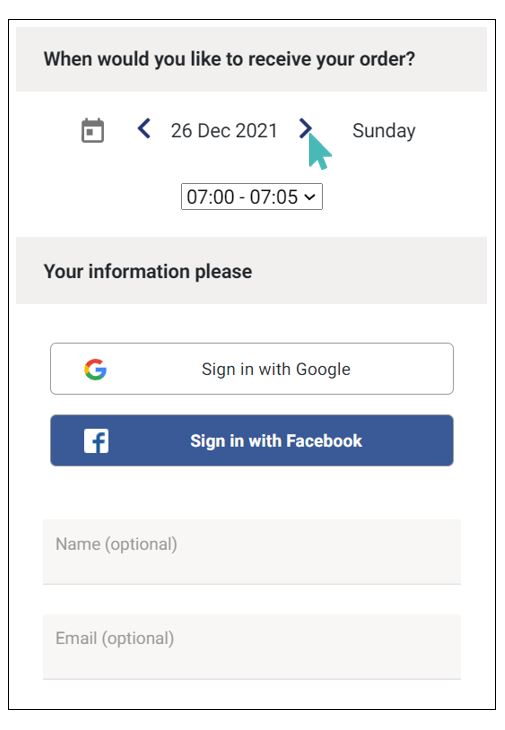
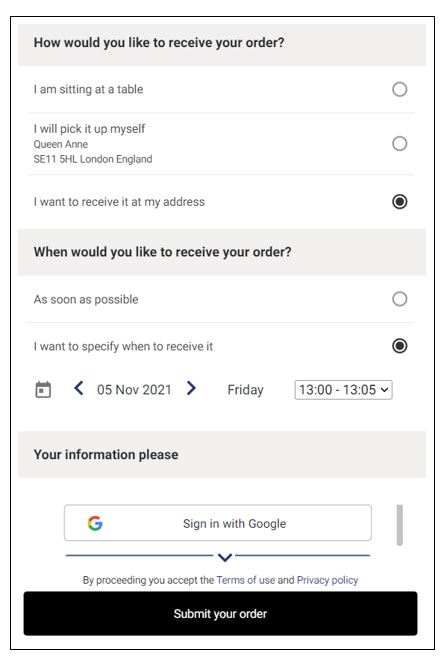
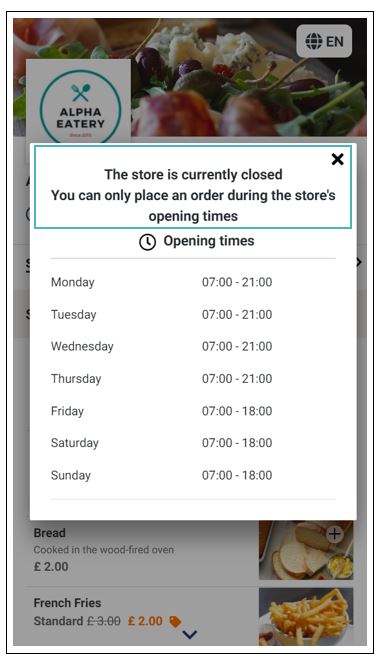
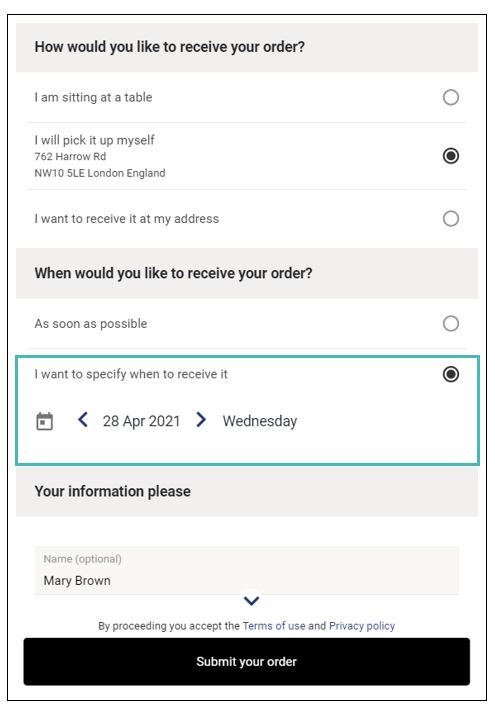
When set to enabled, a calendar icon and a time selection dropdown will appear below the opening times on the customer interface and they can choose the day and time for their orders as shown below. On the other hand, when set to disabled, GonnaOrder will interpret the setting to mean that the store does not take post-dated orders. For the example case, we have selected a date in November to be the order date.
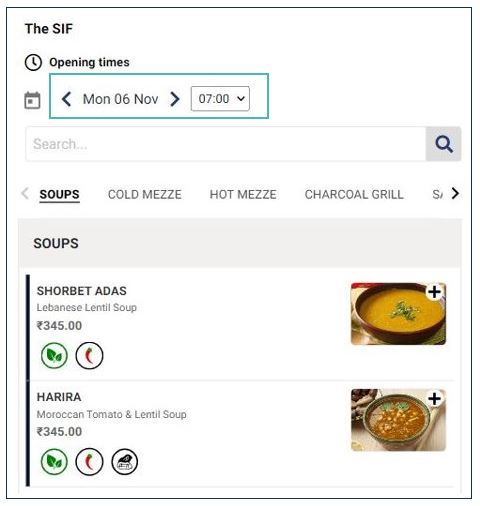
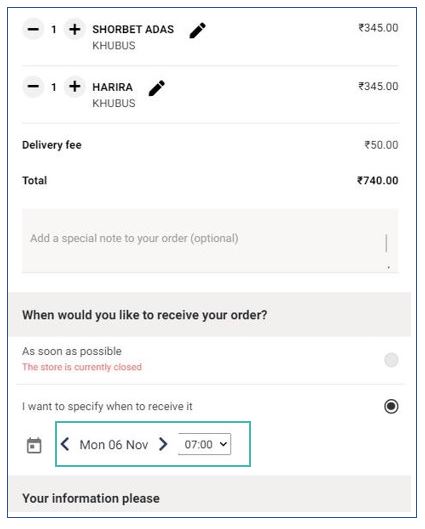
The moment a customer selects a future date for an order, GonnaOrder will remember this and associate the date with the said order. Therefore, on the order page, instead of suggesting the current date for the order desired date, GonnaOrder will suggest the selected future date and show the customer the available timeslots they can choose from.
Maximum Items per Slot
The maximum number of items per slot represents the numeric total, equal to or greater than zero, items that a store can handle in a single time slot. When set, GonnaOrder will disable any time slot that has received the maximum items and customers will not be able to schedule delivery or pick up orders within that time.
This setting is useful for stores that sell items that are time intensive in preparation. For example, a local pizzeria owner and his staff can only prepare a maximum of 15 pizza orders in 30 minutes. During this time, the store can still serve coffee, tea, soft drinks, and other easy-to-prepare products.
For this reason, not every store product should count toward the maximum number of items per slot. You can pick which items, if included in an order, will affect this number and hence the availability of the slot. Maximum items per slot use the same logic as the maximum number of orders per slot but now for main store items.

After setting the maximum number of items per slot, you need to set items whose orders should count towards the sum. This you do by visiting the catalog from your store dashboard and on individual item details. Using the Pizza we mentioned earlier, we can go to the Pizza details page and enable the Count against slot count button. You can learn more from the manage store items help page.

Same Day Ordering
In restaurants, and in general the hospitality industry, some items are more complex than others. In the same vein, some items may require more time and planning to prepare. Therefore, a restaurant manager may choose to have deferred orders for some items.
Take an example case where a restaurant manager needs to buy and slaughter chicken to sell or any other complicated product you may think about. The manager needs to know how many chickens will be needed on a particular day upfront for the sake of logistics. This means the restaurant, hotel, eatery, or bar cannot receive an order for such an item and process it on the same day.
That is why we have the Same day ordering setting for all the available delivery modes to cater to this and other scenarios. Same-day ordering is enabled for all delivery modes and all products in the store by default.
To change this to fit your preferences, you need to visit store settings and then choose Schedules. Under schedules, scroll down to find the Same day ordering and toggle the button to Disabled or Enabled as the case may be.

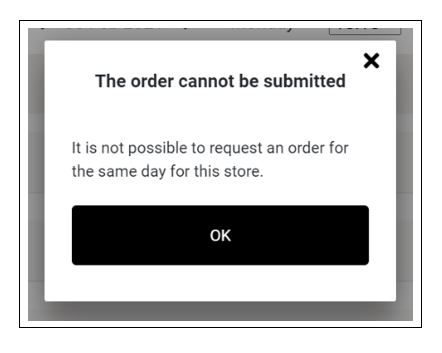
Turning off same-day ordering for your store means that every customer will be required to select a date when they want to receive their order. Failure to choose a date other than the order submission date will result in an error and the customer will be notified that the store does not accept same-day orders.
Same-Day Ordering for Individual Items
Same-day ordering is both a store-wide setting as well as an item-level setting. This means you can choose to enable same-day ordering for all items through the store-wide setting we have explained above, or you can enable/disable the setting for selected products.
To enable or disable Same day ordering for individual products, visit your store dashboard and choose Catalog from the side menu. Select the category under which the order you want to edit resides to bring up the list of available items.
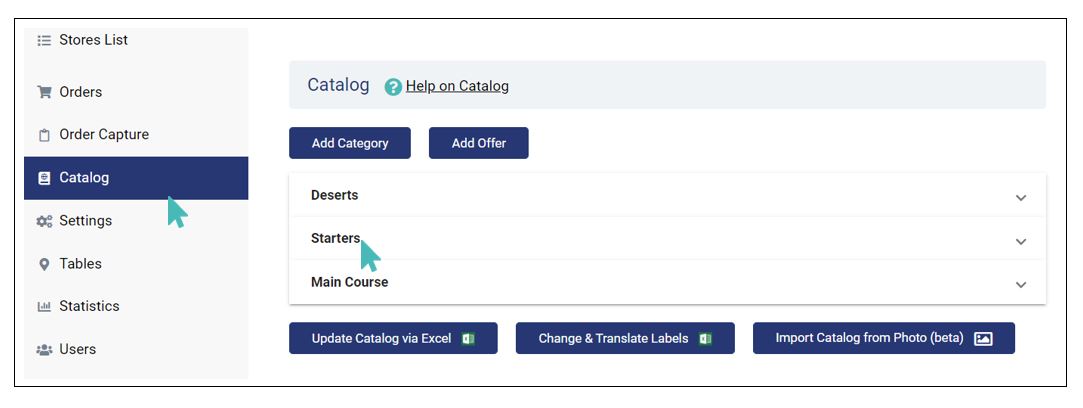
From the list of available items, choose the one for which you want to change the same-day ordering settings and click on the Edit icon next to its name.
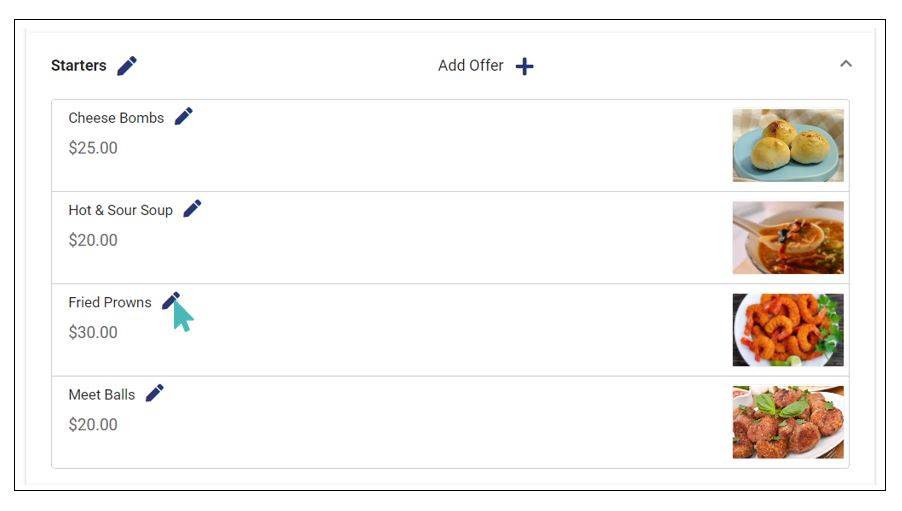
By default, all items have the same-day ordering setting enabled.
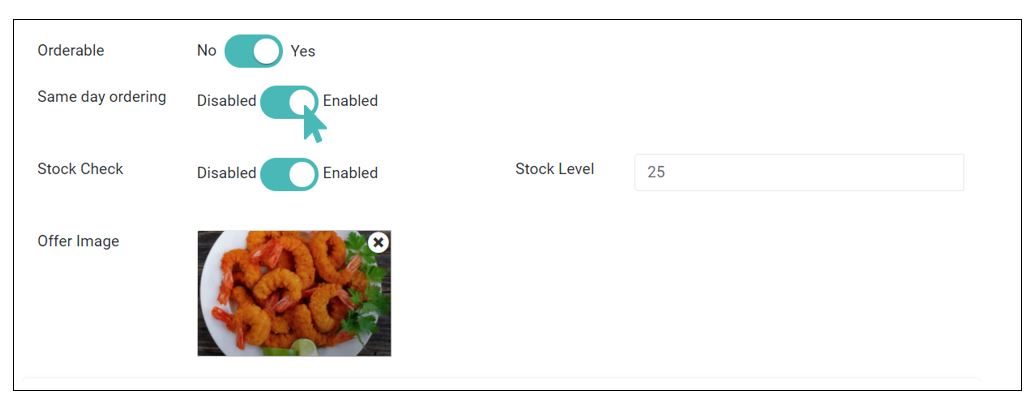
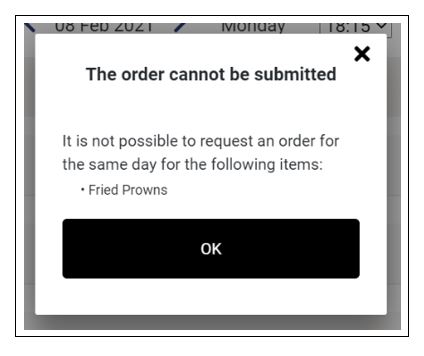
If you choose to disable the setting for any item, then you need to be aware that customers will need to choose a desired date for their order. If a customer attempts to submit an order containing an item whose same-day ordering is disabled without changing the order’s desired date, they will be informed the product cannot be ordered on the same day. They will then have to edit the order to remove the said item or to change the order’s desired date.
Request Desired Time as Soon as Possible
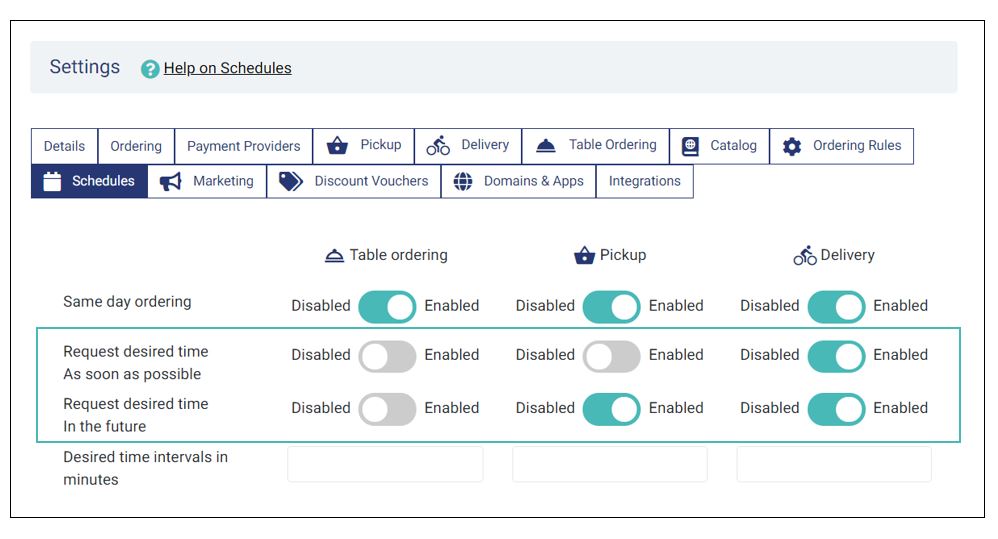
GonnaOrder allows you to control whether you can process orders as soon as possible. This is possible for the three available delivery methods where each is independent of the other. Simply put, you can disable/enable the setting for one delivery mode without affecting the rest.
By default, this setting is disabled for table ordering but enabled for pickup and delivery at address orders.

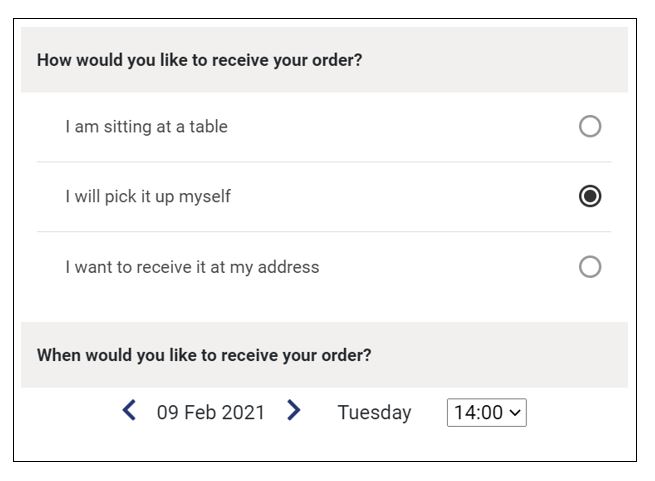
When enabled, the customer sees the option to receive or pick up their orders as soon as possible from the store.
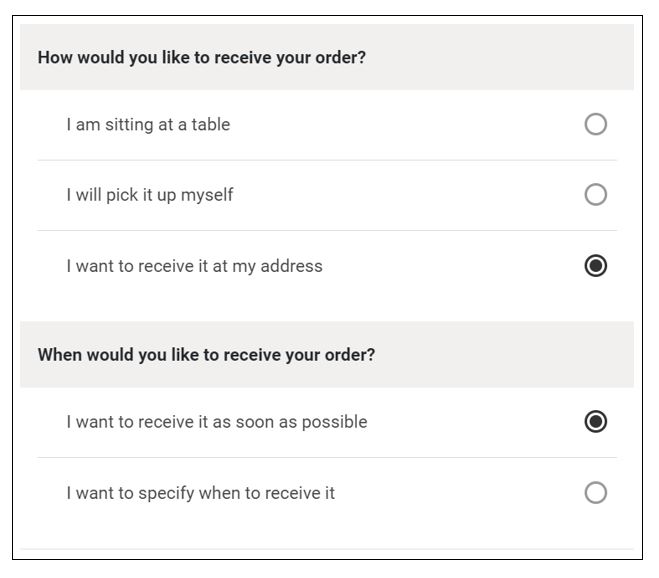
On the other hand, disabling the setting removes the option for customers to receive orders as soon as possible. In this case, the customer will have to pick a date and time when it is convenient for them to receive the order.
Request Order Desired Time in Future
The desired time in future settings allows you to configure the store so that orders are processed and served/delivered in your own time or within a customer’s selected future time.
Having the future desired time setting enabled means customers can specify a date and time when the order should be fulfilled. However, the selected desired delivery time must be within the store’s operating time.
On the contrary, disabling this setting for a particular delivery mode implies that customers cannot specify a future time when they would like to receive orders for the said delivery mode.
For closed stores, only the delivery modes for which the future desired time is enabled will be enabled on the order page.
You can enable/disable the order desired time in future for each delivery mode independently.

Selecting a Future Date for an Order
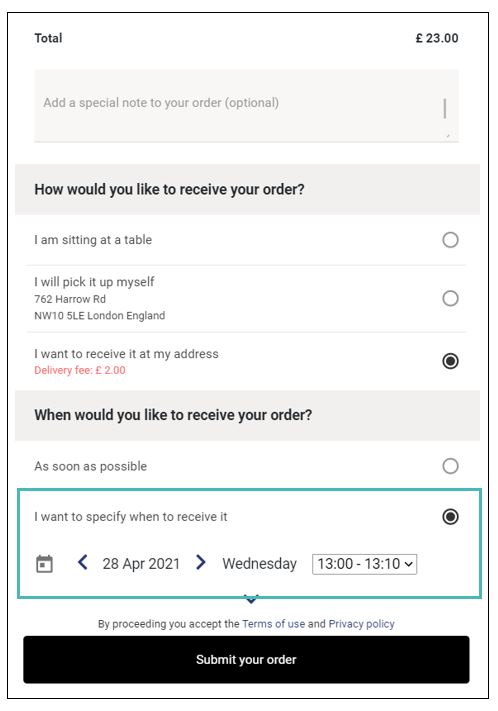
To select a future time for an order, customers can either click on the calendar icon to choose the day or use the arrow buttons to move to the next or previous day appropriately. To choose the time for the order, a customer will click on the drop-down time field and pick a time/time slot.
See also how to share a store link customized with a future menu and order date.
How Future Order Desired Time Works With ASAP Setting
The future order desired time setting works together with the ASAP time setting and store opening and ordering times. There are only three possible combinations of the two settings per delivery mode.
- Both ASAP and future order desired times enabled
- Only future order desired time is enabled
- Both ASAP and future order desired time disabled or only ASAP enabled for one delivery mode
Tip
Notice that ordering for a particular delivery mode can be controlled by a schedule and in that case, a store is considered closed if a customer attempts to place an order outside the given ordering times.
When Both ASAP and Future Order Desired Time Are Enabled
Case 1: Open store
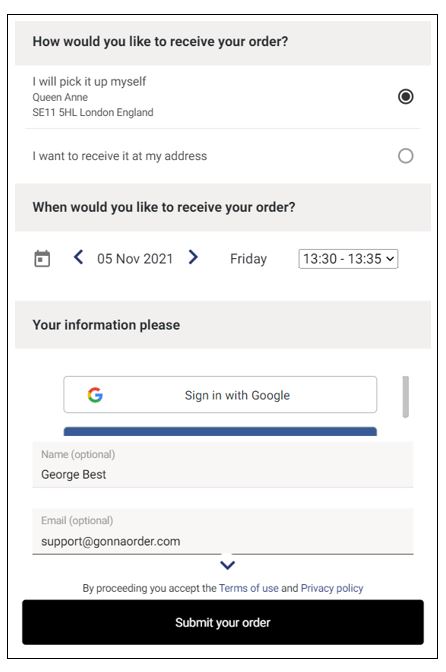
If a customer visits an open store and picks a delivery mode for which both the ASAP time and future desired time settings are enabled, they will be required to select between having their order fulfilled as soon as possible or selecting a day and time when the order can be fulfilled.
Case 2: Closed store
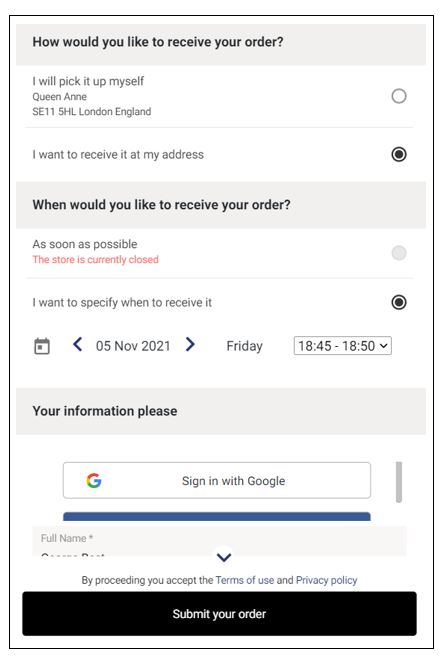
For a closed store, customers will still be able to place new orders but only if they can pick a future time for order fulfillment. The ASAP option will be disabled and a message indicating the store is closed shown on the screen.
Only Future Order Desired Time Is Enabled
If a customer chooses a delivery mode for which only future order desired time is enabled, then they will be prompted to select a date and time when they would like to have the order fulfilled. The ASAP option is not displayed in this case.
This applies to both open and closed stores.
Both ASAP and Future Order Desired Time Settings Are Disabled or Only ASAP Time Is Enabled
Case 1: Open store
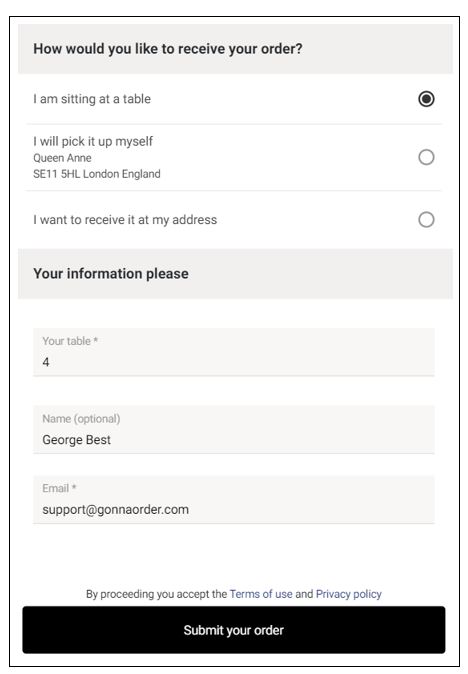
If a customer chooses a delivery method for which both ASAP and future order desired time settings are disabled or only ASAP time is enabled, they will not need to select when they would like to receive the order. The prompts are hidden so that the customer only provides identifying information to facilitate order fulfillment.
Case 2: Closed store
If the future desired time is disabled for all delivery modes, regardless of whether the desired time as soon as possible is enabled for one or all delivery modes, customers will not be able to add items to the cart or submit orders when the store is closed. For product detail pages, the button to add an item to an order will no longer be available in closed stores.
Additionally, customers will not be able to add items to order with a single click.
Desired Time Intervals -Minutes
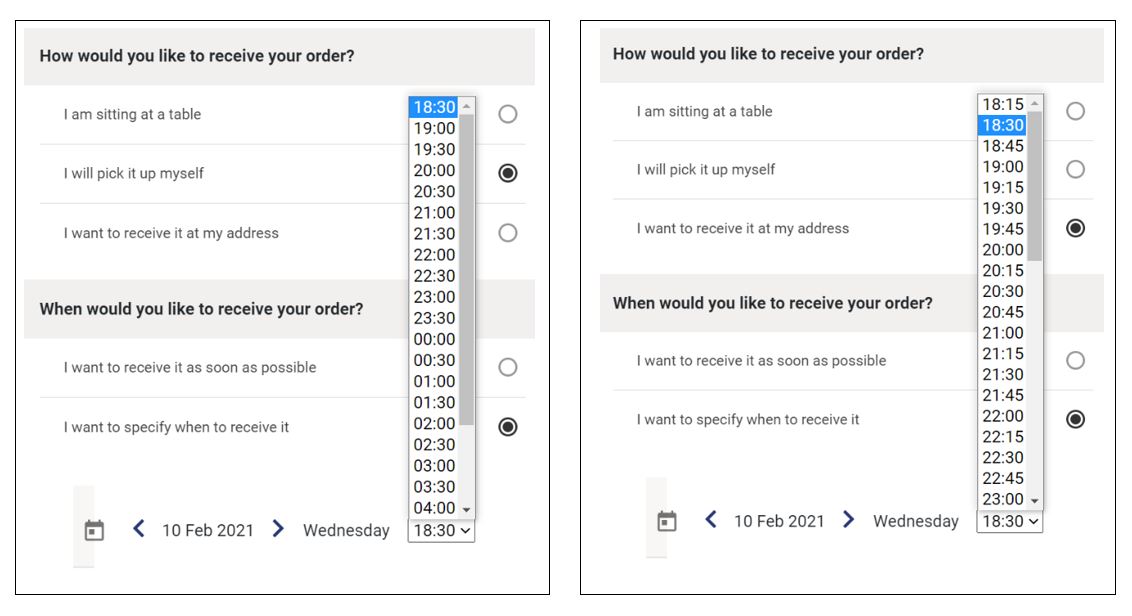
Desired time intervals are essentially the difference between the times suggested for order pickup or delivery by the store. The interval is set in minutes and you can have any value. By default, GonnaOrder will have the desired time interval set to 15 minutes but you can change this to your liking.

In the example case, we have chosen 30 and 15 minutes to be the desired time intervals for pick up and home/office delivery. See the images below to see the desired times displayed to the customer based on these desired time intervals.
Display Desired Time Format
The desired time format setting indicates how desired time will be displayed to customers. There are two possible display methods that GonnaOrder can use to show your desired time format.

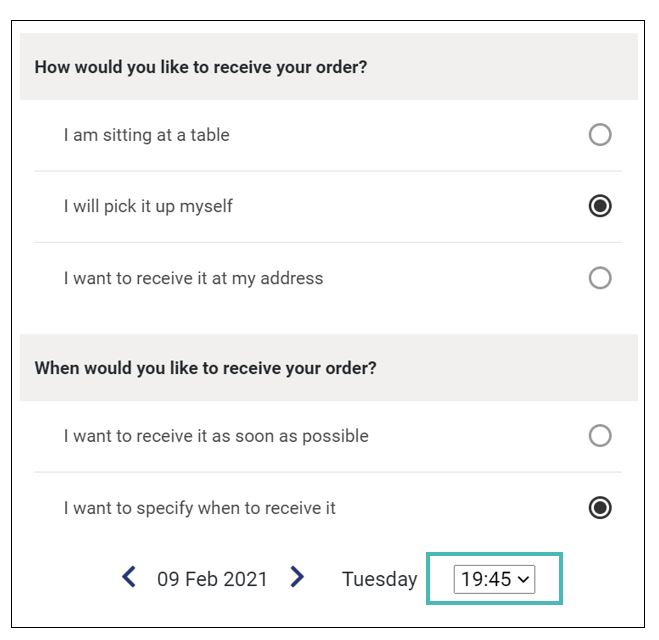
- Times: Using this format, the customer is shown the exact possible times after which they may receive their orders. Depending on the desired time intervals you have chosen for your store, the times can be de displayed like 13:15, 13:30, 13:45, and so on.
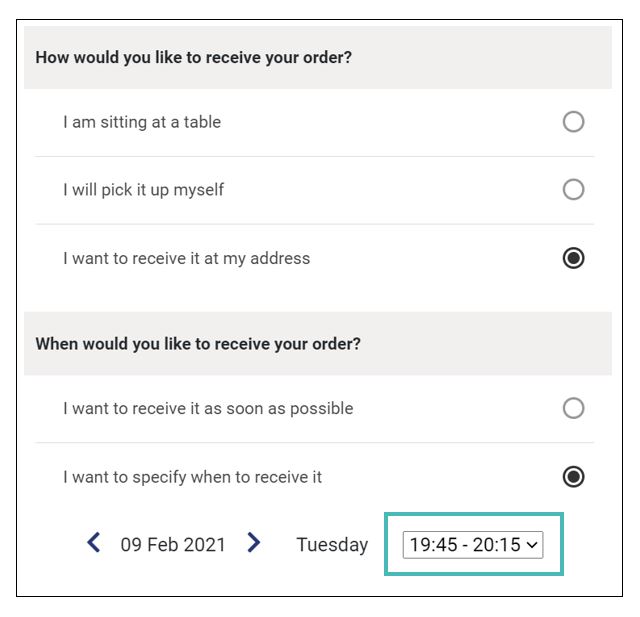
- Time slots: When this option is chosen, the desired time is displayed as an interval, for example, 13:00 – 13:30 and 13:30 – 13:45. The interval in this case is determined by your selected time slot duration.
Slot Duration
The slot duration field allows you to specify a duration in minutes that you can use as a reference frame for your store. The duration can be of any length but it is preferable to have 15, 30, or 45 minutes. The slot duration you choose will determine the values GonnaOrder displays when you choose Time slots as the desired time display format.

With the settings in this example case, GonnaOrder will display the desired time for the three delivery methods as intervals. However, the slot durations will be different as set in the image above.
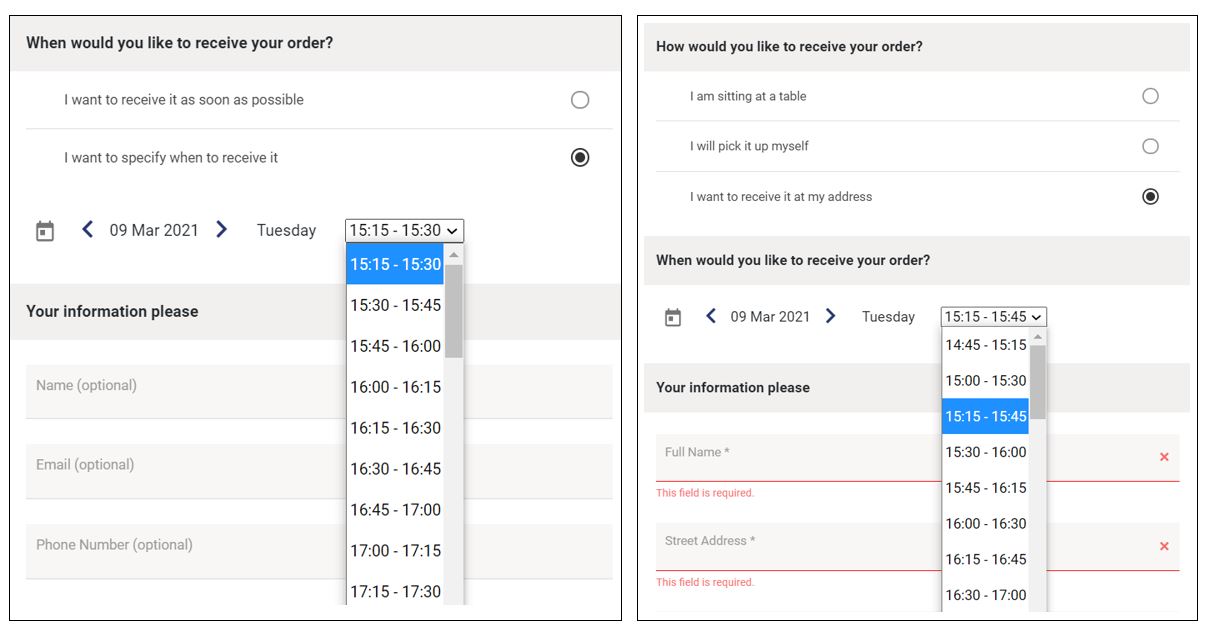
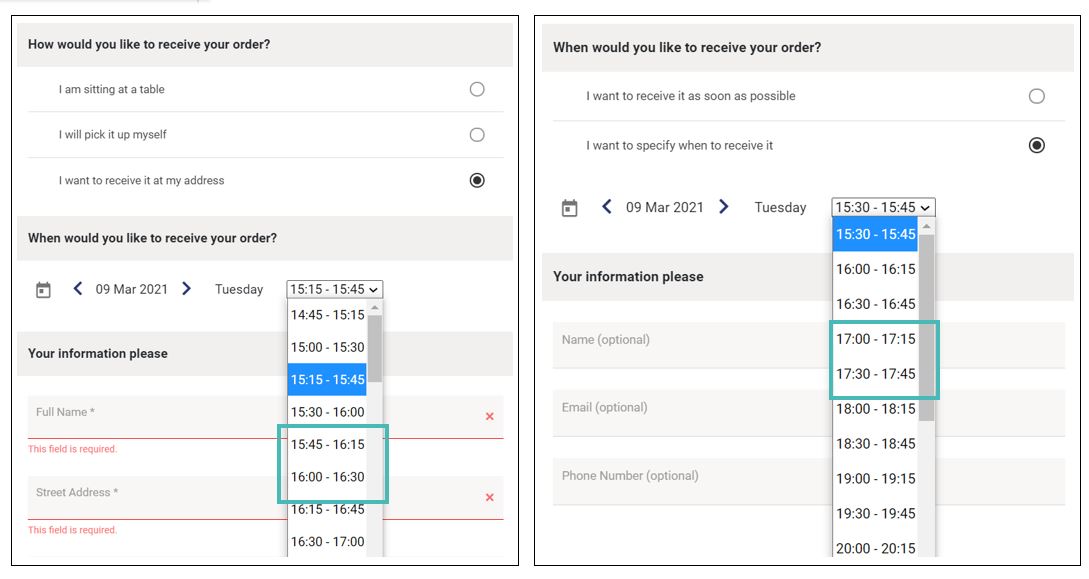
The image on the left shows the desired time in slots for pick orders while the one on the right is a display of desired times in slots for delivery orders. Notice that the slot duration for pick-up orders is 15 minutes while that for delivery orders is 30 minutes. It is also important that you notice the overlapping timeslots for delivery orders. The desired time intervals set for the store are the cause.
If desired time interval duration is less than the slot duration for the same delivery mode, the slots will overlap. The opposite is also true where the store may have disjoint time slots if the slot duration is less than the desired time interval. We do not recommend disjoint time slots. You should ensure the slot duration is always higher than the desired time interval.
Enable Order Throttling
Order throttling is a strategy that enables you to limit the number of orders accepted within a specified timeframe. GonnaOrder supports one key throttling strategy that allows you to limit the number of orders you can receive in a single time slot.
By default, the Limit orders per slot throttling setting is disabled for all the three delivery modes. Therefore, customers can place unlimited orders in any given time slot. However, when you activate this setting and the set Orders per slot limit is reached, your store will temporarily disable ordering for the given timeslot.
To activate this order throttling setting, go to Settings > Schedules and scroll down to find Limit orders per slot.
Toggle the button to Limit for the different delivery modes you want to restrict the number of orders per slot.

Orders per Slot
This order throttling setting is associated with the Limit orders per slot that we have explained above. You only need to fill in a value here if the said setting is enabled. Note that the value you choose for this field will be the maximum number of orders you can receive in a time slot for a given delivery mode. Therefore, if you choose 35, 20, and 15 to be the orders per slot for table service, pickup, and delivery respectively, you will only receive as many orders for the delivery modes within a single time slot.
The number of orders per slot is independent of every delivery mode. Therefore, if you receive more pickup orders than table service orders, the pickup option will remain disabled from the moment its limit is reached until your store enters a new time slot. Once customers have placed the maximum number of orders as specified by this setting, GonnaOrder will disable the slot and highlight the next available timeslot.
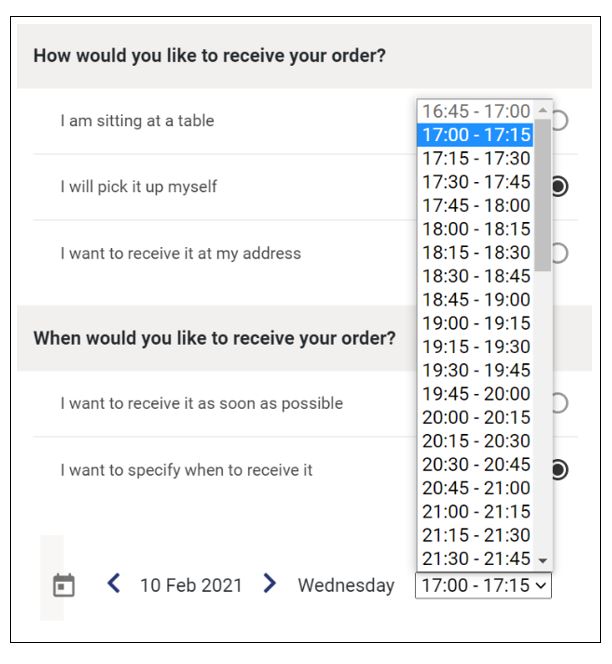
In the above image, the customer cannot select the 16:45 – 17:00 timeslot as the desired time for the order because the store has received a maximum number of orders for the given slot and the selected delivery method.
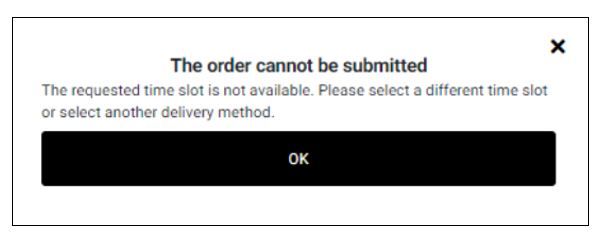
If only a single order was remaining before a time slot is disabled for a given delivery mode and two customers were placing orders at almost the same time, the first order submitted will disable ordering for the given time slot. The second customer would then have to change the time slot or delivery mode. This is a rare situation that does not always happen and which does not cause significant inconvenience to customers. The message below will be displayed to a customer if they are caught up in this kind of slot fill-up.
Desired Future Time in Minutes
You can use this feature to set a desirable delay for orders. For example, if you do not wish to receive orders that are expected to be fulfilled in the next 30 minutes, then you may set this as your future order desired time. In that case, a customer can only select a time or timeslot that has at least 30 minutes allowance from the current time. You may consider the desired future time as the average amount of time you need to prepare orders.
This setting allows you to prevent orders that are expected in a very short time. It helps you control customer expectations on how fast you can fulfill an order.
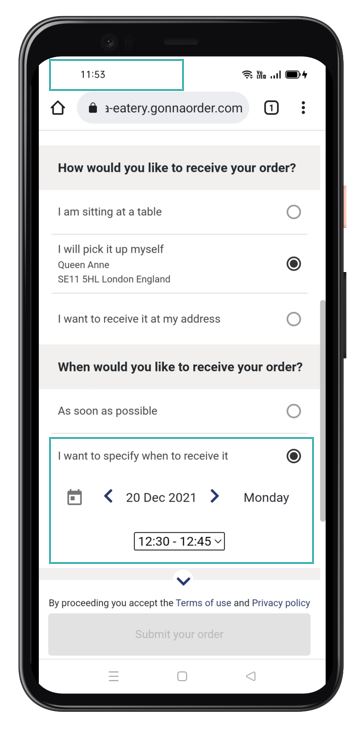
You can choose a favorable value for the desired future time for individual delivery modes in your store. The value is set in minutes.

If you set 30 minutes to be the desired future time in minutes for delivery orders, GonnaOrder will only allow customers to pick an order desired delivery time not earlier than the current time plus 30 minutes. Therefore, if a customer attempted to place a pickup order at 12:00 or thereabouts, the default order wish time would be 12:30 or the time slot starting at the same time.
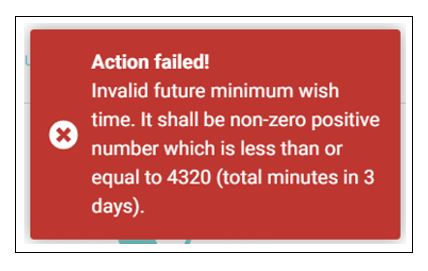
GonnaOrder allows you to set a desired future time duration of up to three days. Therefore, you can only enter a numeric value greater than zero and not exceeding 4320 for any of the delivery modes.
Consider the following points when choosing the appropriate future desired time duration for your store:
- 1 hour has 60 minutes,
- 6 hours are equivalent to 360 minutes,
- 12 hours are equivalent to 720 minutes, and
- 1 day has 24 hours and therefore 1440 minutes.
Attempting to enter a value greater than 4320 minutes will result in an error and GonnaOrder will notify you that the future minimum wish time should be a positive number not larger than 4320 minutes.
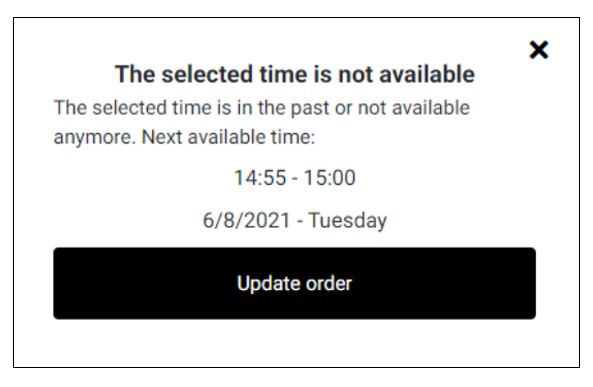
For customers placing orders in your store, selecting a time slot that is in the past or one that is in the future but which is made unavailable by the future desired time setting will result in an error. In that case, GonnaOrder will let the customers know the next available time slot and they can update the order with the suggested time.
Default Ordering Mode
If you have a preferred ordering mode based on your operations, you can save it to the store using this setting. Choosing a default ordering mode means that that mode will be preselected when a customer views their order before submitting it. They can then change this to their liking.
Further, GonnaOrder will display most of the settings we have discussed according to the default ordering mode. Particularly, the default ordering mode will be used to display times when the customer can receive the order when the Request order date upfront is enabled.

Display or Hide Order Desired Time
By default, customers choosing to specify when they would like to receive their orders may choose a day as well as a time. However, the time might not be needed depending on the type of products you sell. For this reason, you can choose to hide the time selection field and only allow the customer to choose a desired day for their order.

