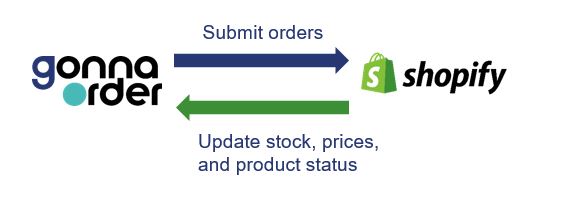
GonnaOrder’s Shopify integration enables your store to send new orders to Shopify. GonnaOrder will communicate with your shopify store to synchronize stock levels, prices, and product statuses for configured items. To fully utilize the integration, you will need to connect your store to Shopify through Settings >Integrations >Shopify and perform some additional configuration in your Shopify Admin dashboard.
| Website | www.shopify.com |
| Company Logo |
On This Page
- Send New Orders to Shopify
- Get Your Shopify URL, Admin API Access Token, and Location ID
- Connect Your Store to Shopify
- Add Required Webhooks to Shopify
- Automatically Fetch Updates From Shopify
- Set the External ID for Products, Price Variants, and Options
- Navigating the Shopify Order Dashboard
- Disconnect Shopify
Send New Orders to Shopify
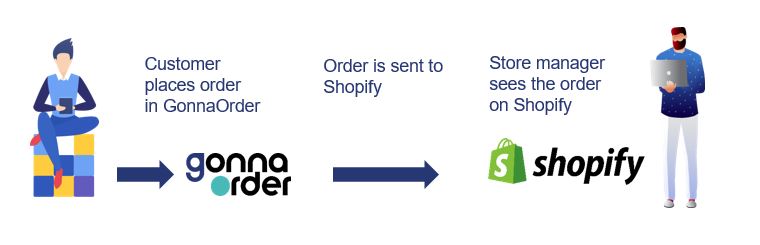
The purpose of the Shopify integration is to make catalog and order management easier. Part of the objective is to enable you to view and manage orders submitted through GonnaOrder on your Shopify dashboard.
When a new order is submitted to your GonnaOrder store, a corresponding order will automatically be created in the connected Shopify store. However, notice that only items with an external product ID that matches a Shopify product or variant will be sent in the order. Items that do not have external IDs, or whose IDs do not match any Shopify variant, will not be added to the corresponding Shopify order.
Required configuration for sending orders to Shopify
To automatically send new orders to your Shopify store, you must fulfil the following conditions:
Add your Shopify URL to your GonnaOrder store
Add your Admin API access token to your GonnaOrder store
Add your Shopify location ID
Map Shopify products to GonnaOrder items using external product IDs
No webhooks are required for this functionality
Get Your Shopify URL, Admin API Access Token, and Location ID
Shopify URL
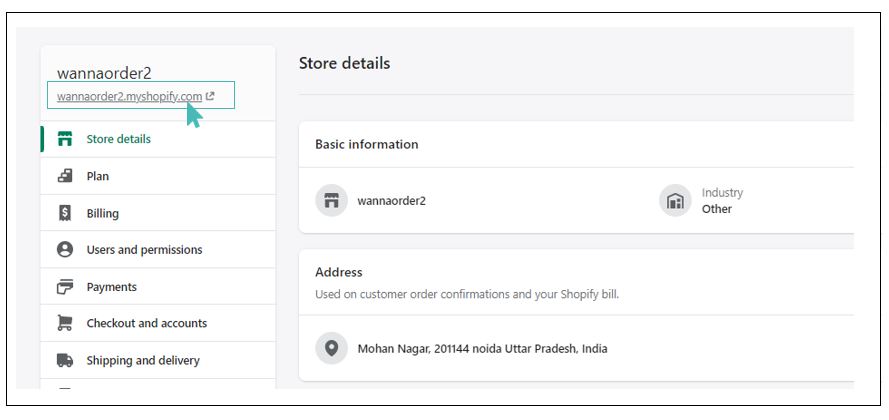
The Shopify URL refers to the URL that customers enter in the browser when visiting your store. You can also click on the settings icon in your Shopify Admin dashboard to reveal your Shopify URL just above the settings menu.
Tip
When adding Shopify URL to GonnaOrder, ensure the URL does not contain /(Forward-slash) at the end the URL.
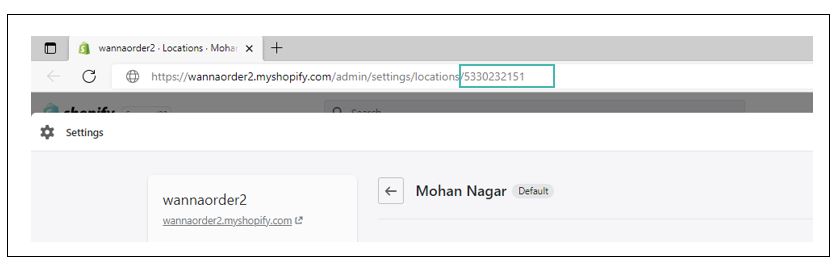
For example: The correct URL from above image is wannaorder2.myshopify.com
Admin API Access Token
The Admin API access token allows GonnaOrder to communicate with your Shopify store when forwarding orders or reading inventory counts.
You must create and install a new Shopify app to get the access token and use it in your GonnaOrder store.
Follow the steps below to create your app and obtain your Admin API access token:
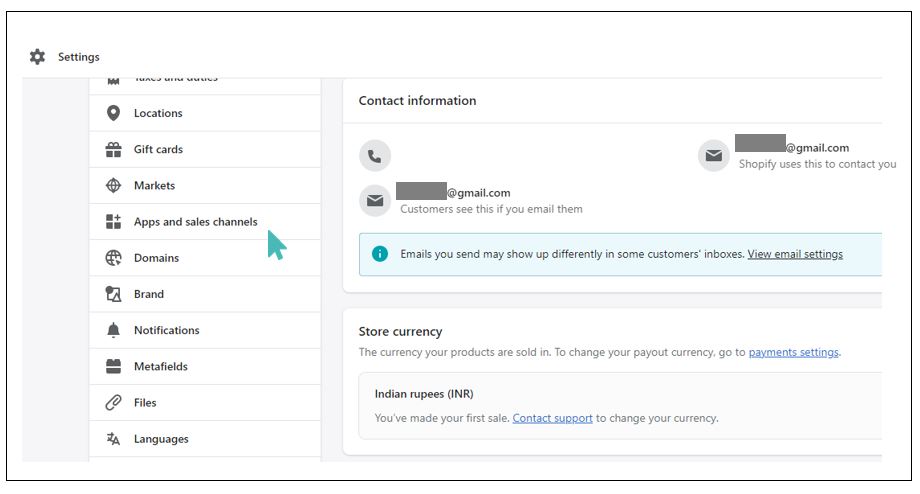
- On your Shopify admin dashboard, navigate to Settings >Apps and sales channels
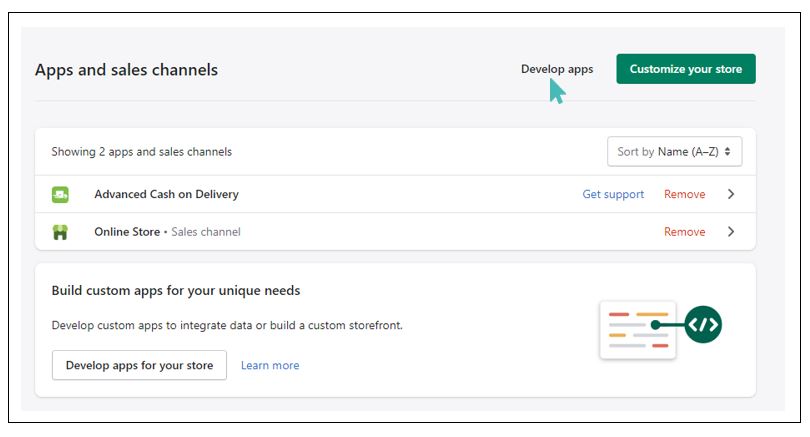
- Under the apps and sales channels section, click on Develop Apps near the top right part of the screen
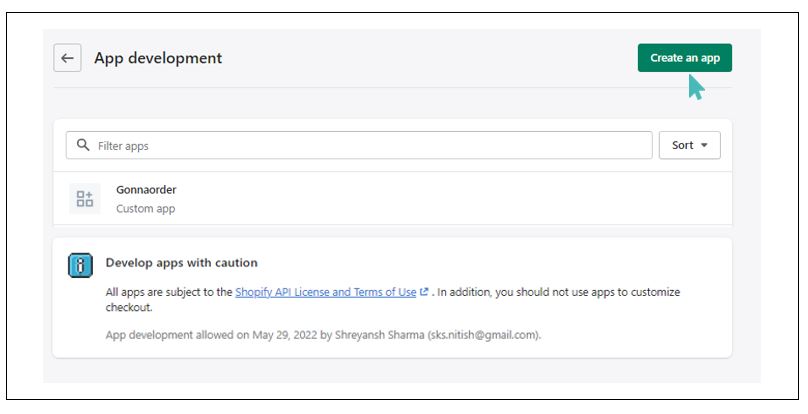
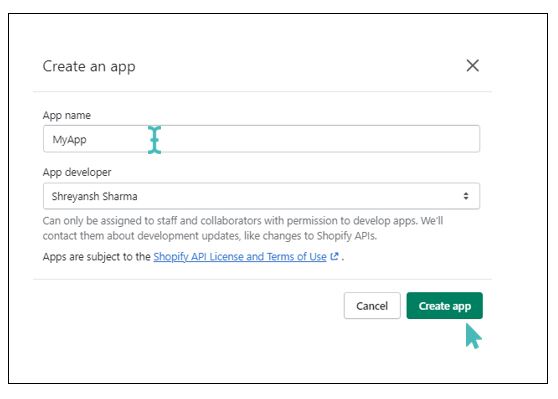
- From the App Development page, click on the Create an app button and provide the name of your app on the popup screen that comes up
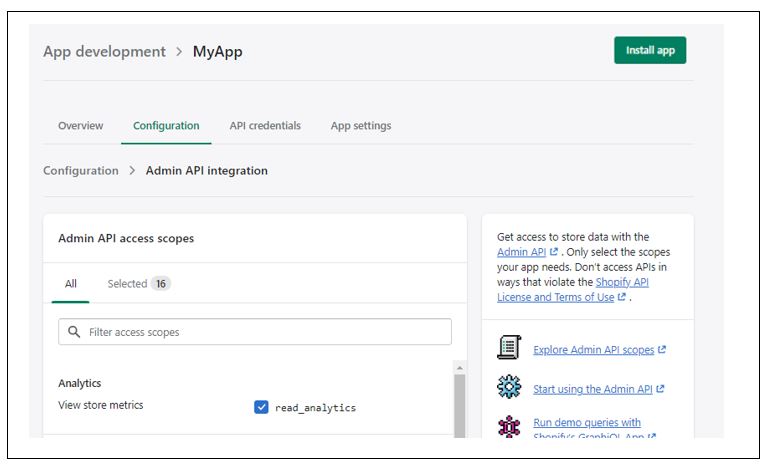
- When the app is successfully created, navigate to the app configuration settings and mark the checkboxes for the following admin API access scopes:
- read_analytics
- write_assigned_fulfillment_orders
- Read_assigned_fulfilment_orders
- write_draft_orders
- read_draft_orders
- write_files
- read_files
- write_fulfillments
- read_fulfillments
- write_inventory
- read_inventory
- read_locations
- write_merchant_managed_fulfillment_orders
- read_merchant_managed_fulfillment_orders
- write_orders
- read_orders
- read_products
- write_content
- read_content
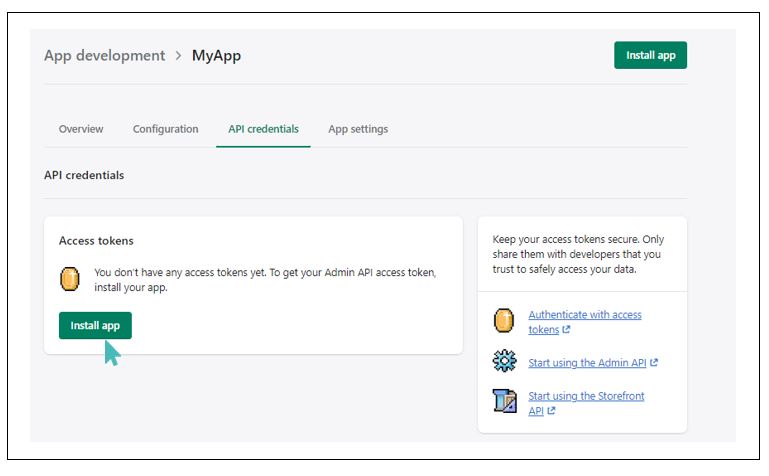
- Switch to the API credentials tab and click the Install button to add the app to your store. On successful installation, an auto-generated Admin API access token should be available under the same tab for you to copy
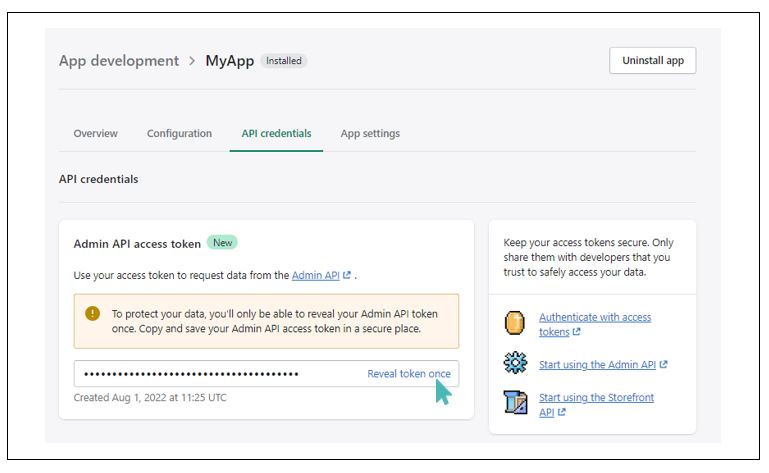
- A masked Admin API access token is displayed in the API credentials section. Notice that you can only view the access token once, as indicated on the page. Click Reveal token once and copy the long string of characters to use in the next section
Location ID
To obtain your location ID, navigate to Settings >Locations

Choose the location you would like to associate with your GonnaOrder store and click on it to open the details. While viewing the location details, the location ID is displayed as a trailing number on the URL bar.
Connect Your Store to Shopify
After obtaining your Admin API token and location ID from Shopify Admin, you can connect your GonnaOrder store to Shopify POS and start managing orders from a central point.
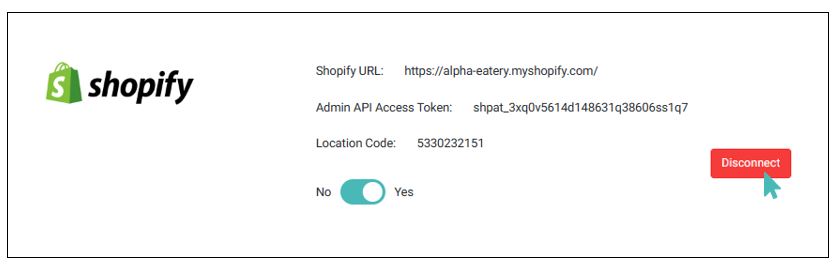
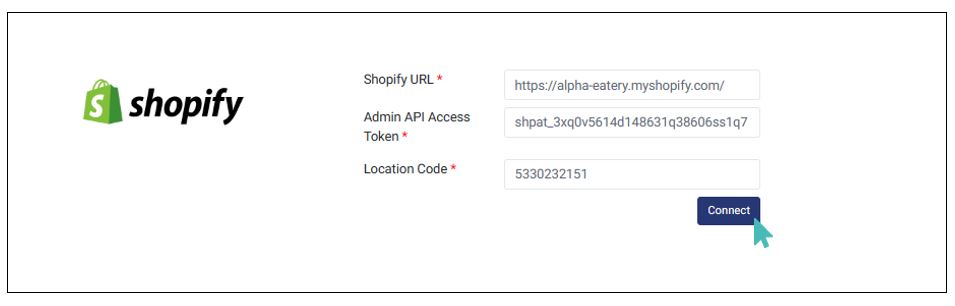
Log in to your store and navigate to Settings >Integrations. Under integration settings, find the Shopify section and click the Connect button to proceed.
Enter your Shopify URL, Admin API Access Token, and Location Code as obtained in the previous section and click Connect.
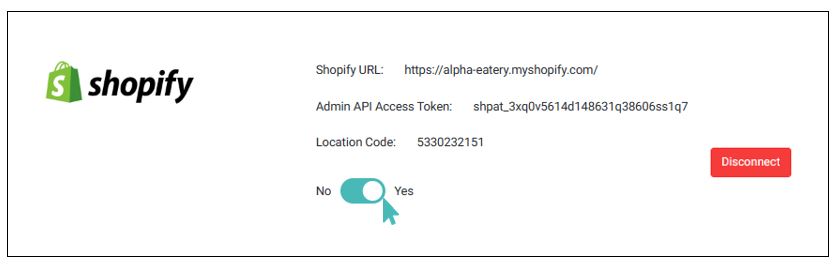
On a successful connection, a message appears on the screen indicating that your settings have been updated. Notice that Shopify integration is disabled by default. Therefore, to start receiving orders on your POS, click the toggle button under the Shopify section to turn it to yes.
Add Required Webhooks to Shopify
A webhook is a way for different applications or services to communicate with each other in real-time. Webhooks are usually part of an external application that monitors certain events or triggers and informs or sends data arising from the event to another app.
In the case of GonnaOrder and Shopify, the events and triggers occur in your Shopify store. Whenever an event occurs, Shopify will send a notification message to your GonnaOrder store. To successfully receive the notification messages and data from Shopify, you must configure a webhook for each of the events/triggers you would like to monitor.
GonnaOrder can track two types of events in your Shopify store:
Inventory level updates: This event keeps track of inventory level changes for each product in your Shopify store that is connected to a GonnaOrder product using an external product ID. When set up, Shopify will send a message to your GonnaOrder store whenever the stock level of an item is updated in Shopify either because of a new order or through manual stock level change.
Product updates: This event tracks changes in the product details e.g., a change in prices and item status. When configured, your Shopify store will notify your GonnaOrder store to update the relevant details. This way, you can keep item prices and statuses in sync at all times.
Webhooks are optional
Webhooks are optional and you may choose to skip them altogether. However, failure to add webhooks will deny you the opportunity to always keep your inventory levels, prices, and item status (visible/non-visible) in sync between Shopify and GonnaOrder.
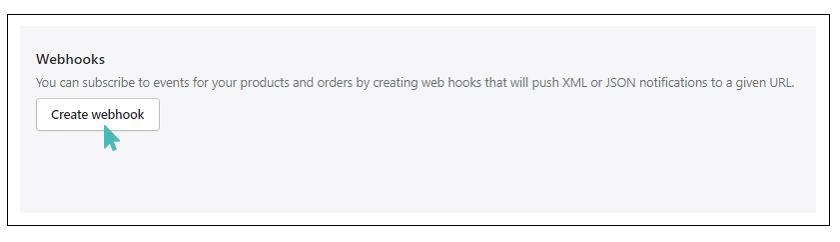
From your Shopify admin dashboard, navigate to Settings >Notifications. Scroll to the bottom of the page and click Create webhook button.
At this stage, you must select the respective event type you would like to monitor. GonnaOrder supports the Inventory level update, and the Product update events. Both of these are optional and can be configured together for the same store.
To proceed, select Inventory level update or Product Update and leave the format as JSON. Next you will enter the webhook’s callback URL and select the latest Webhook API version.
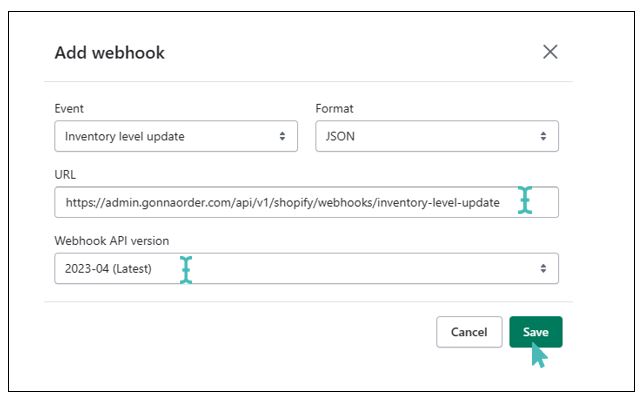
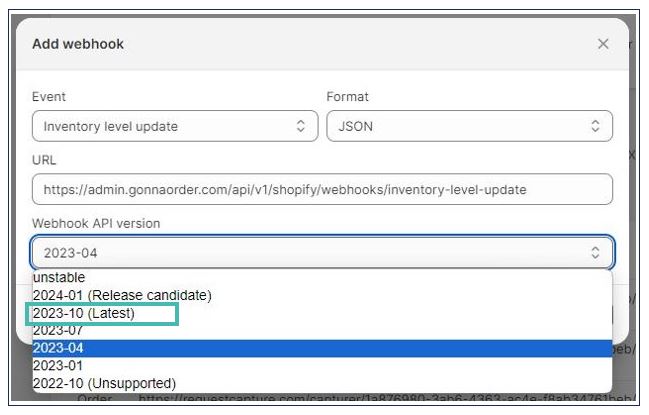
Webhooks API Version
Always ensure that the latest API version is selected for both Product and Inventory level updates.
Callback URL Values Inventory Level and Product Update webhooks
Inventory level update and product update are two different webhooks. Please confirm and copy the correct webhook URL below.
Inventory Level Update: https://admin.gonnaorder.com/api/v1/shopify/webhooks/inventory-level-update
Product Update: https://admin.gonnaorder.com/api/v1/shopify/webhooks/product-update
Automatically Fetch Updates From Shopify
Automatically Fetch Stock Level Updates From Shopify
Automatically Fetch Stock Level Updates From Shopify
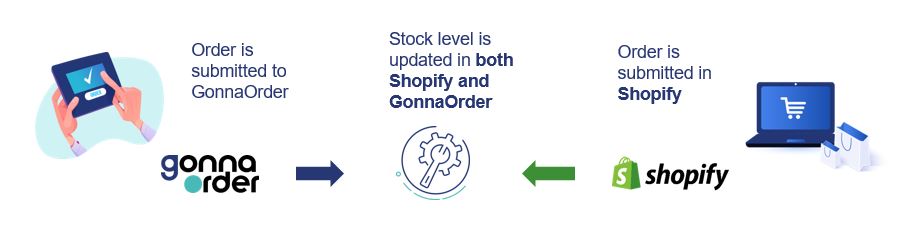
The inventory level webhook enables your store to sync all stock level changes from your Shopify store. This way, both your GonnaOrder and Shopify stores will always have the same stock/inventory level for any properly configured items.
When you update the inventory level in Shopify for a product or variant, GonnaOrder will automatically update the stock level for the corresponding item, price variant, or option. This means you don’t need to manually update the stock level on both platforms. Simply update the inventory level on your Shopify dashboard, and GonnaOrder will automatically fetch and update the stock levels in your store. This is especially useful when you have to add new inventory for multiple items e.g., at the beginning of a new business day.
Besides fetching the manual inventory updates, your GonnaOrder store will also fetch inventory level updates resulting from orders being submitted through your Shopify online store or Shopify POS.
Required Configuration for Automatic Stock Updates
Automatic stock updates from Shopify to GonnaOrder will only work properly if you have fulfilled these two requirements:
Set up the inventory level webhook
Set the correct external product IDs for all items that appear in both GonnaOrder and Shopify
Automatically Fetch Item Price Updates From Shopify
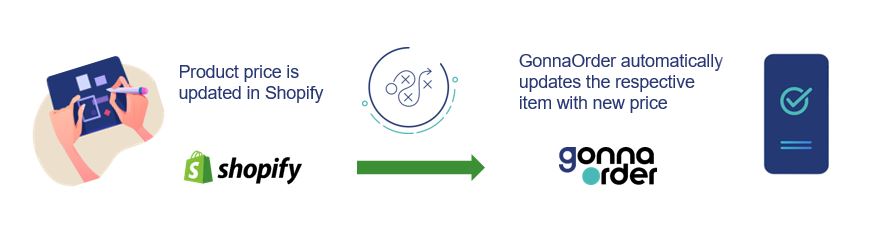
Your GonnaOrder store will have the ability to automatically fetch item prices directly from your Shopify dashboard. This means that whenever you make changes to the price of an item on Shopify, your GonnaOrder store will seamlessly reflect the updated price for the corresponding item, price variant, or option.
This feature enables you to maintain consistent pricing across platforms and eliminate the need to manually change prices on your GonnaOrder products. Automatic price updates are useful especially when you need to update prices of multiple items. Simply update the prices in Shopify and your GonnaOrder store will update all changes in real time.
Required Configuration for Automatic Price Updates
Automatic price synchronization from Shopify to GonnaOrder will only work properly if you have fulfilled these two requirements:
Set up the product update webhook
Set the correct external product IDs for all items that appear in both GonnaOrder and Shopify
Automatically Update Item Statuses
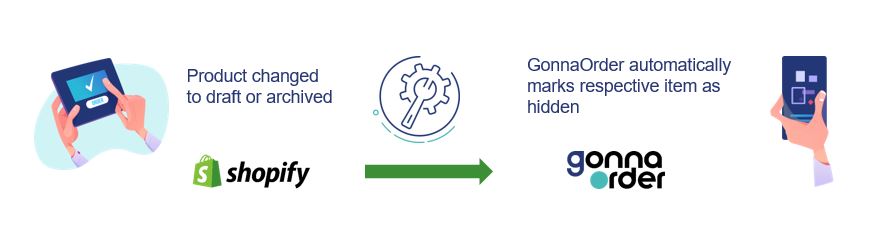
Shopify products can either have the Active, Draft, or Archived status. In your GonnaOrder store, the Shopify product statuses corresponds to the item visibility status where an item can either be visible on the customer menu or hidden.
When you change the status of an item on Shopify, GonnaOrder will fetch the new status and update the corresponding item’s visibility setting. For example, if an item was active on Shopify and you updated its status to “Draft”, then your store will automatically update it to non-visible. The item will no longer appear on your GonnaOrder customer menu unless you manually update the status. Archiving a Shopify product will also hide the corresponding GonnaOrder item from the customer menu.
For the best experience, we recommend that you only update product statuses from the Shopify dashboard. Status changes made to GonnaOrder items will not automatically reflect on the corresponding Shopify products or variants.
Required Configuration for Automatic Stock Updates
GonnaOrder will automatically fetch item status updates from Shopify only if you have met the following requirements:
Set up the product update webhook
Set the correct external product IDs for all items that appear in both GonnaOrder and Shopify
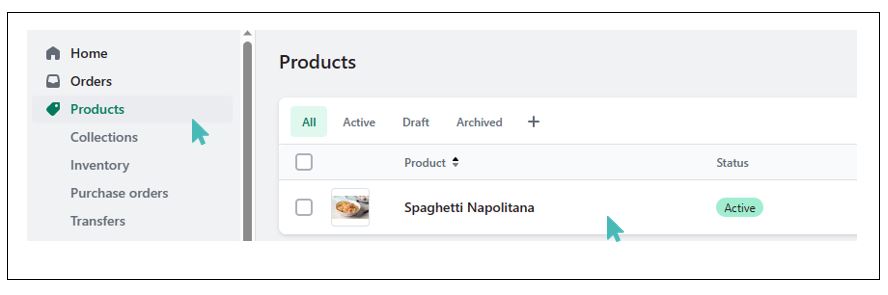
Set the External ID for Products, Price Variants, and Options
The external ID field will be available when you edit the details of a primary store product, a price variant, or an option.
The field can be filled with a numeric ID obtained from the corresponding item in your Shopify store. External ID fields enable GonnaOrder to match products included in online orders to items in your Shopify catalog.
To get the external ID for a product, navigate to your Shopify dashboard, choose Products, and select the desired item.
After opening the selected item, the Shopify URL (in the browser URL bar) changes to include the item type and the item ID.
Copy the item ID and open your GonnaOrder store catalog in a new browser tab.
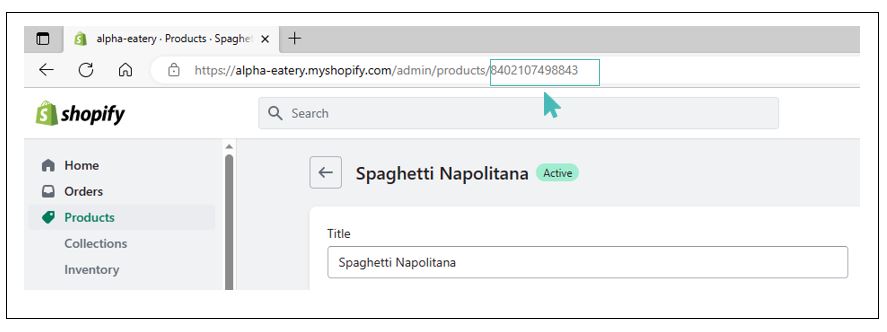
In your GonnaOrder store catalog, open the corresponding product that you would like to match with the Shopify item. Find the external product ID field and fill it with the Shopify item ID in the following format:
Shopify product: gid://shopify/Product/XYZ
Shopify product variant: gid://shopify/ProductVariant/XYZ
Here, XYZ represents the trailing numeric value displayed on the URL bar in your browser.

Remember To Set External Product Ids in GonnaOrder
- To ensure that stock levels are automatically updated in real-time after every order, it is essential to set external product IDs for all items that are present in both GonnaOrder and Shopify catalogs. The external product ID allows GonnaOrder to identify the correct product and update its stock level accordingly.
- You can find the external product ID of multiple Shopify products by signing into your store and visiting the following URL: https://example-store.myshopify.com/admin/variants.json and replace “example-store” with your store URL. You may want to install the JSON view browser extension to your browser to make the output more readable.
Navigating the Shopify Order Dashboard
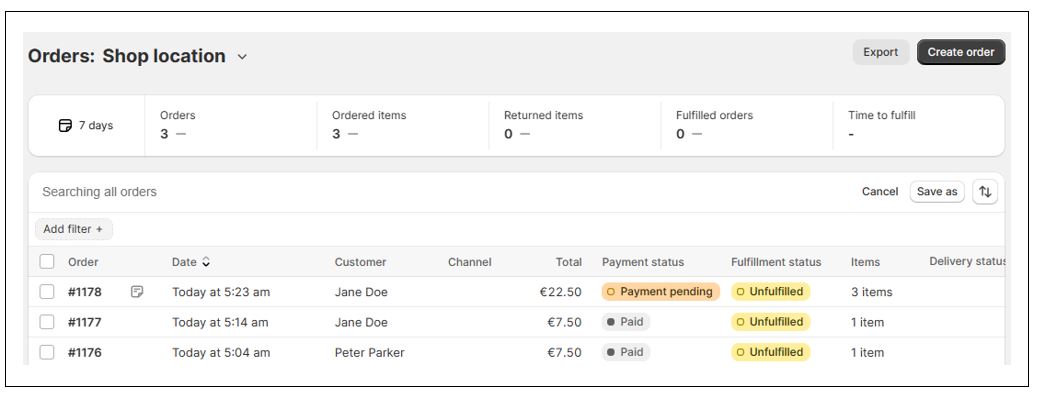
GonnaOrder is defined as a sales channel on your Shopify settings. As such, orders sent to your Shopify store from GonnaOrder have the identity of your app.
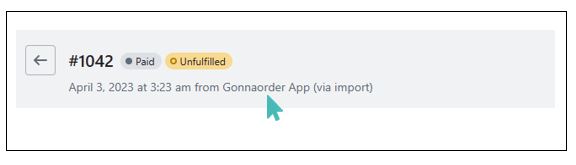
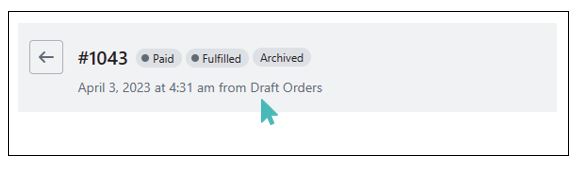
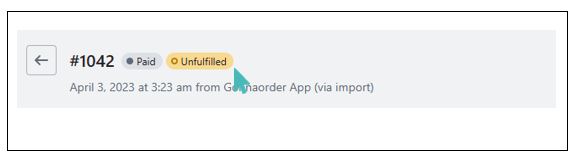
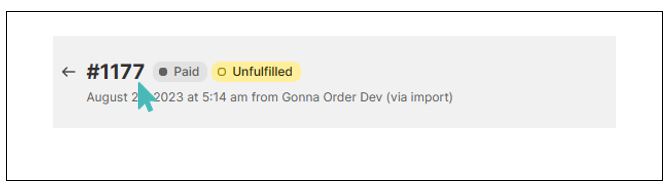
The Shopify order dashboard is simple and easy to navigate. When you first log in and select Orders from the main menu, Shopify shows you a list and high-level summary of orders submitted/created in your store. All orders displayed in the list look the same way. However, orders sent from Gonnaorder have the name GonnaOrder on the Tags column.
You can also identify orders sent from GonnaOrder by opening the order details. If an order is sent to Shopify by GonnaOrder, then it will show the name you gave your app. Refer to this section. Otherwise, the order shows that it came from draft orders which essentially means it was submitted through Shopify.
The order fulfillment status for orders sent through GonnaOrder is always marked Unfulfilled. You can update the fulfillment status manually on the Shopify dashboard.
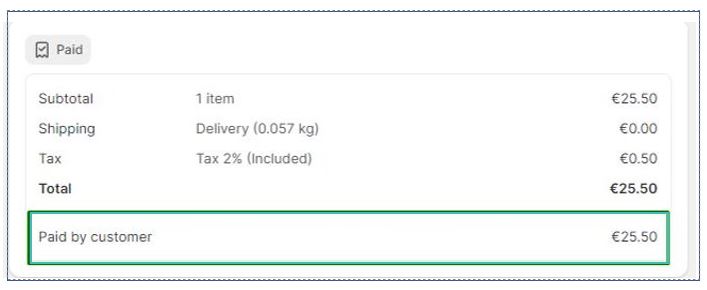
Besides the fulfilment status, a Shopify order has apayment status. The status can either be pending payment or paid. GonnaOrder will send the appropriate status for each order along with the order details. For upaid orders, the status will remain pending payment even if the customer pays later with GonnaOrder’s pay later feature. Both of these statuses are visible on the order list and the order details in Shopify.
For each new order, Shopify will decrement the stock level for every item included.
Each order that your store sends to Shopify will automatically get the Shopify order ID copied back to the order details in your store. This makes it easy to cross check orders on both platform if there’s ever a need.

Key Takeaways for Orders Sent From Your Gonnaorder Store
GonnaOrder app is added to your store as a sales channel
Shopify will update stock levels for all items included in new orders
If an order is fully paid online or offline in GonnaOrder, then it will be marked as “Paid” in Shopify. Orders that have not been paid, and those paid partially will be marked as “Payment Pending”
Orders sent from GonnaOrder are marked as unfulfilled and you can manually fulfill them on your Shopify dashboard
Order details synced to Shopify
The following are the order details shared with Shopify when a new order is submitted in your store:
- Order token
- Customer’s first and last names
- Customer’s email address and phone number
- Shipping address filled as the customer’s address, city and country. The country is usually the same value as your store’s country. For pickup orders the shipping address is automatically filled in as the store address
- The latitude and longitude of the shipping address
- The post code, sent as Zip
- Payment status sent as financial status. GonnaOrder’s payments statuses “Paid Offline” and “Successfully completed” map directly to “Paid” in Shopify. Otherwise, the financial status is set to “Payment Pending”
- The order wish time is sent as “Wish Date”
- The discount voucher applied to the order. The discount voucher code, discount type – whether the discount is a percentage of the total order amount or a fixed amount, and the discount amount for the order
- Delivery fee sent in two parts as “Price” and delivery method that is sent as “Title”
- List of order items where each item can have the following sub-fields
- Shopify Product or Variant ID
- Quantity
- Discount amount and description
- Order item note
- Tax details where applicable with the “rate” being either the general VAT rate for your GonnaOrder store or the custom VAT rate for the given product. The total VAT amount is sent as “price”, and where applicable, an external VAT ID is also sent
- Order comment added by customer sent as notes
- notify_customer flag always set to true so that your Shopify store always sends configured order notification emails to customers
Tip
The external VAT ID should be configured for each item, price variant, and option that appears on both GonnaOrder and Shopify. This ensures the validity of the tax information sent to Shopify for orders.
Watch this short video to learn how orders appear in both GonnaOrder and Shopify:
Disconnect Shopify
If you no longer need the Shopify integration in your store, you can either disable it or disconnect it totally.
When you disable the integration, your Shopify connection data will remain saved in GonnaOrder. However, by disconnecting the integration, your Shopify store information is removed from GonnaOrder, and you will need to re-enter it if you ever need to restore the integration.
You can disconnect Shopify by clicking on the Disconnect button under the same section.