Option Groups can be used if you wish to present products with multiple options in your store. Therefore, a store item can be associated with one or more option groups, where each Option Group contains two or more options for the user to choose from.
For example, the item “Toast” can have an option group as “Choose your bread” where the options can be “White bread” and “Brown bread”. Additionally, options can add value to the main item and therefore can have an associated price.
An option can also be considered as a store item where an optional price can be configured. Option groups can be used for upselling, promotions, and for ingredients or type selection.
On This Page
- Add Option Groups
- Types of Option Groups Supported by Gonnaorder
- Import or Update Catalog Options Via Excel
- Dealing with Errors in Your Catalog Options Excel File
- Add Options to an Option Group
- Edit Option Groups or Options
- Mark Option Groups as Available, Out of Stock, or Hidden
- Mark Options as Preselected
- Reorder Option Groups
- Reorder Options
- View All Options and Related Options
- Delete Option Groups or Options
Add Option Groups
Option groups are an excellent way of differentiating your products or adding value to store items. In the case of product differentiation, you can use options to sell the same product differentiated by the sizes and ingredients among other things. And about adding value, you can choose to package your product with additional items that usually go along with the specified item and assign a price to each of the additional items.
There are two ways in which you can add an option group:
- On the Item Details Page
- On the Option Groups Tab
Adding Option Groups on the Item Details Page
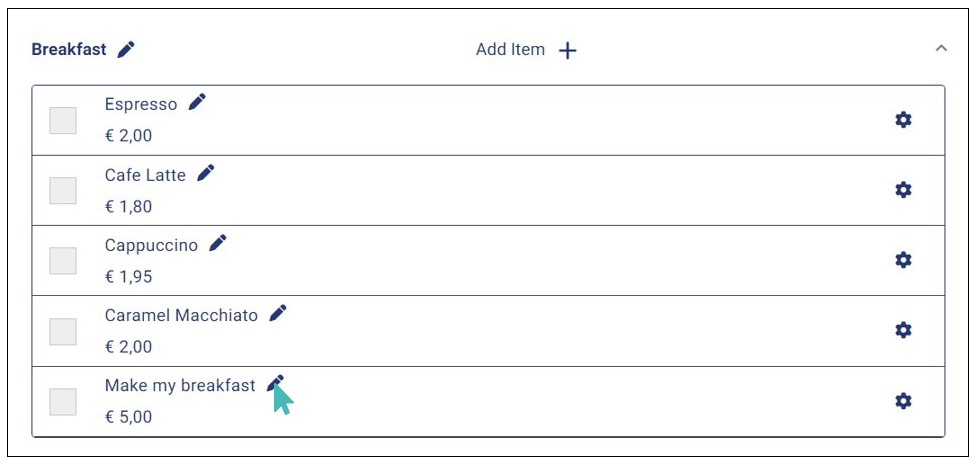
To add an option group to an item, click on the name of the category to which that item belongs and pick it from the list.
Click Edit on the name of that store item in which you want to Option Group to view and edit its details.
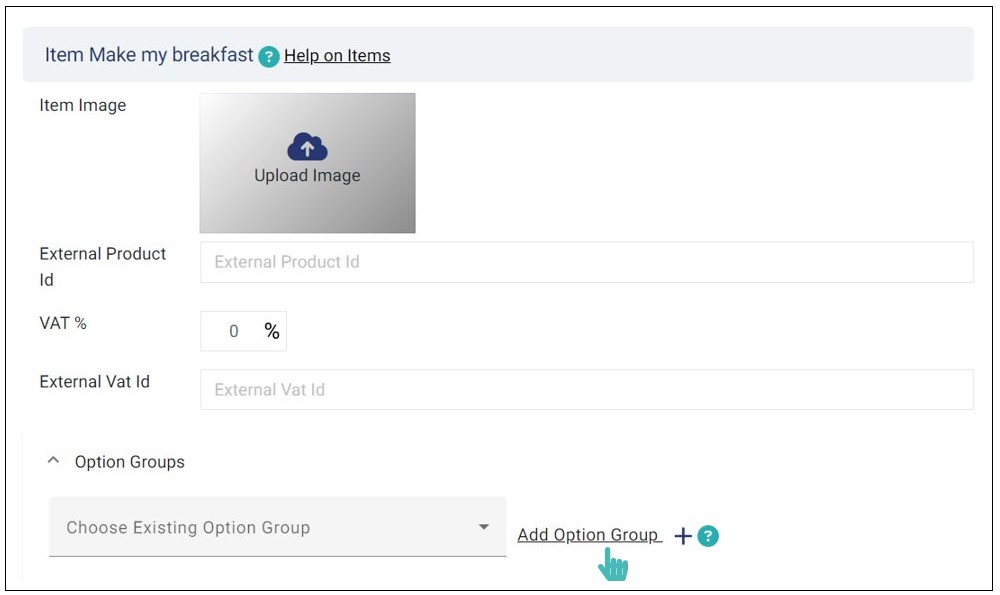
On the item details page, scroll down to the Option Groups section and click Add Option Group. At this point, you should have chosen a name for the option group.
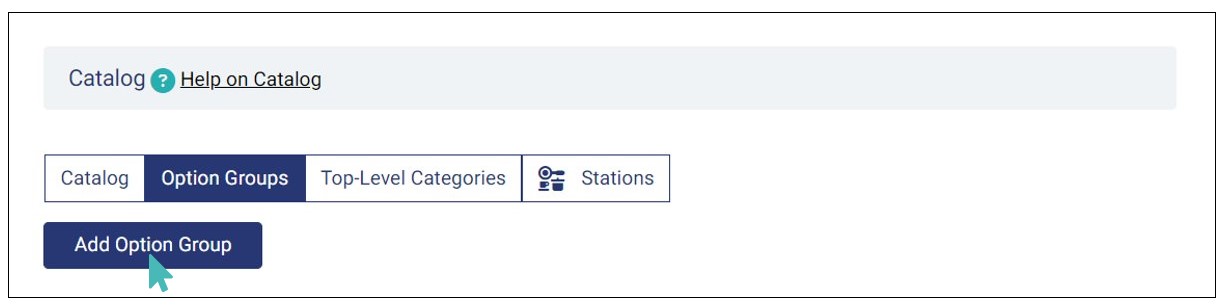
Add Option Groups Via the Option Groups Tab
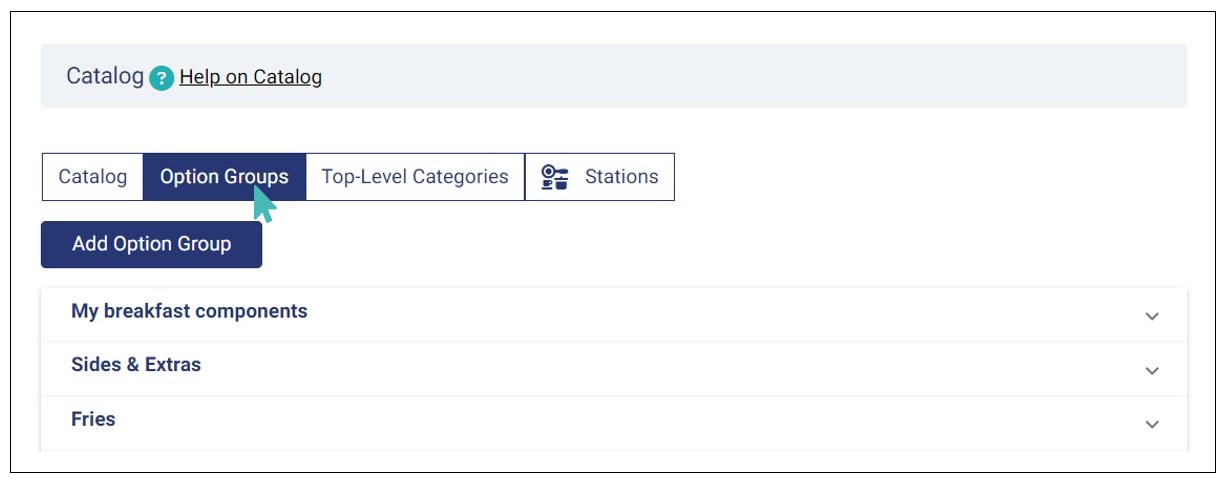
To create an option group using this approach, select Catalog on the left menu and navigate to the Option Groups tab. Click the Add Option Groups button and enter the desired option group details.
The next step is to enter your option group details.
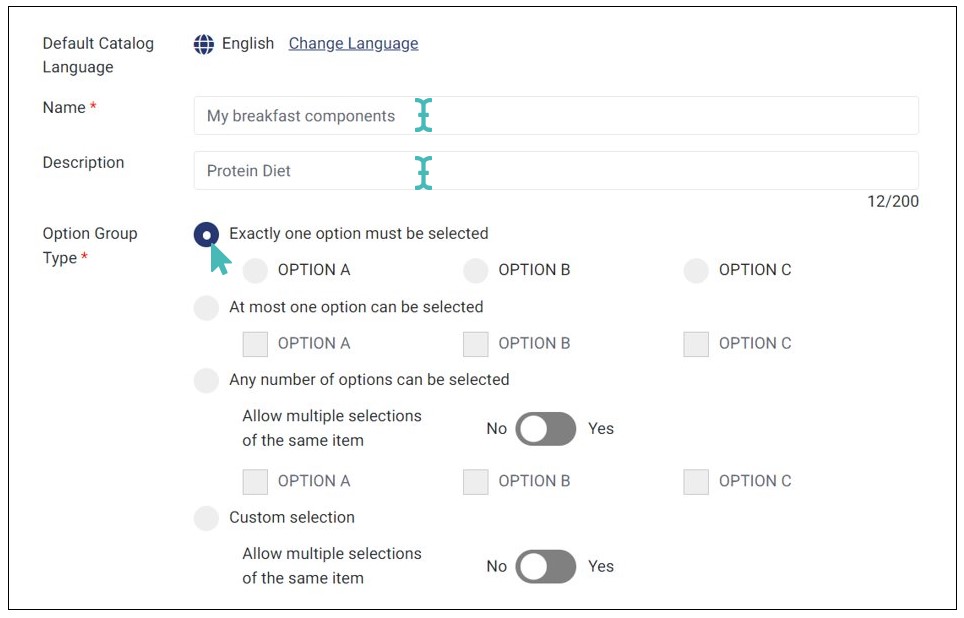
The name of the option group may depend on the store item to which you are adding options, but it should be something people can easily identify and understand. You can also include a description (optional), usually a few words or short phrases. The description is not displayed anywhere on the customer menu but is shown in parenthesis beside the group name on the selection dropdown. Option group descriptions are usually helpful if you have more than one group sharing the same name. For example, if you have two coffee option groups where one is white, and the other one is black (or iced and hot).
Other than the name and description, you also need to choose how customers select the provided options by choosing the appropriate option group type as discussed in next section. When done, confirm the details you entered and choices selected and finally click any of the three saving options below.
Types of Option Groups Supported by Gonnaorder
GonnaOrder supports four types of option groups, namely:
Exactly one option must be selected
At most one option can be selected
Any number of options can be selected
Custom selection
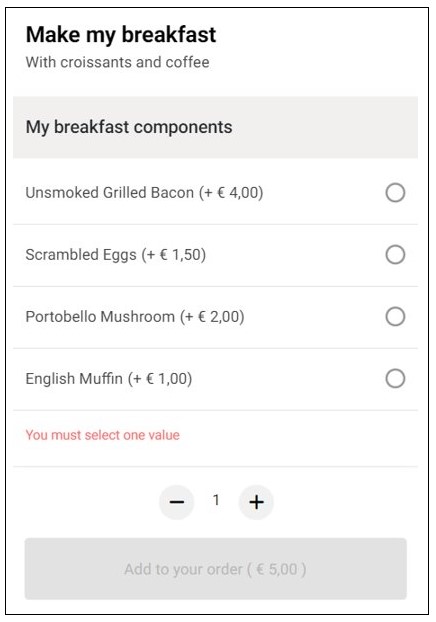
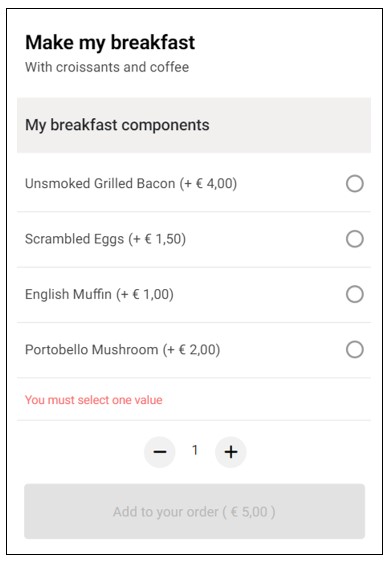
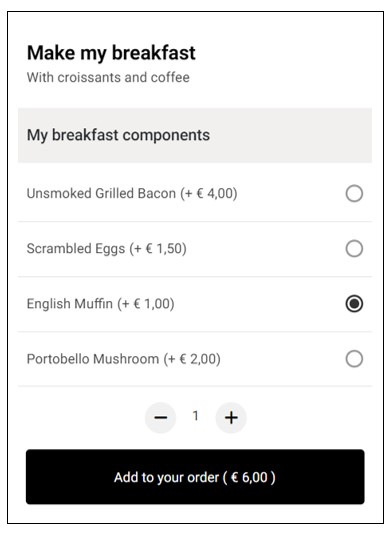
Exactly One Option Must Be Selected
When you choose this option group type, then customers see an interface with your options from which it is mandatory to select one option and not more.
Here is how your customers will view the options.
At Most One Option Should Be Selected
This means a customer can either choose one or none of the options provided. The difference with the first option group type is that in the first case, the user must select one option while in the second they can opt for none.
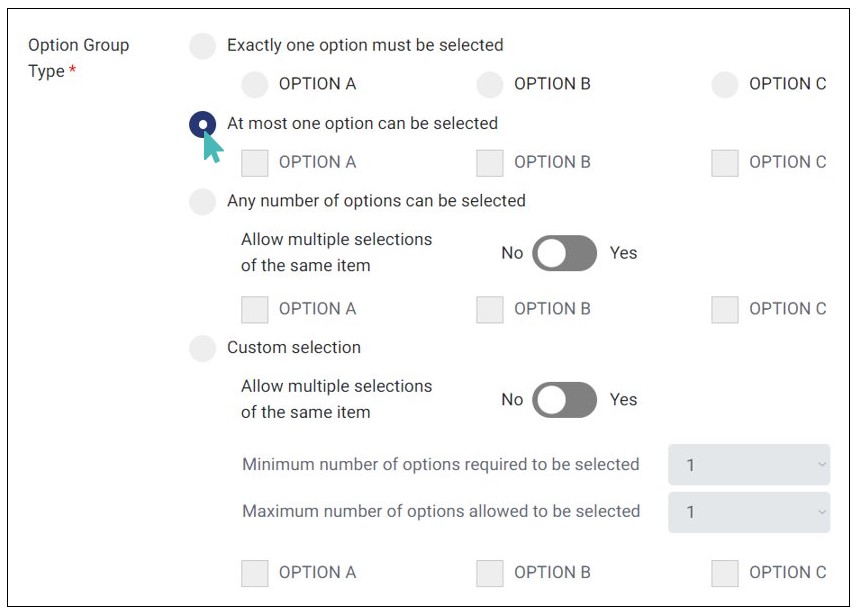
Here is how the options appear on the customer’s interface.
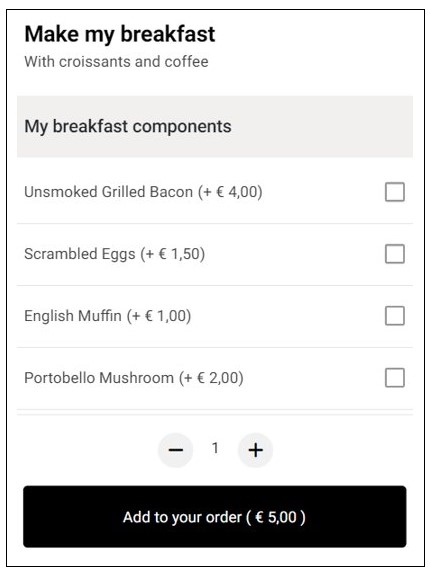
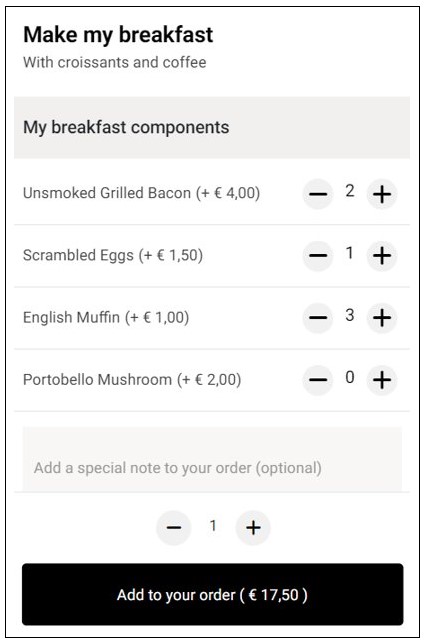
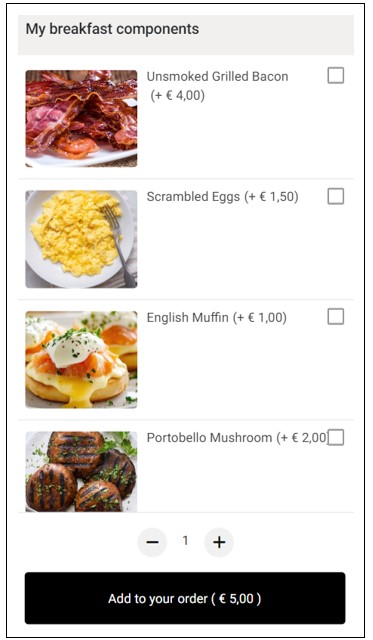
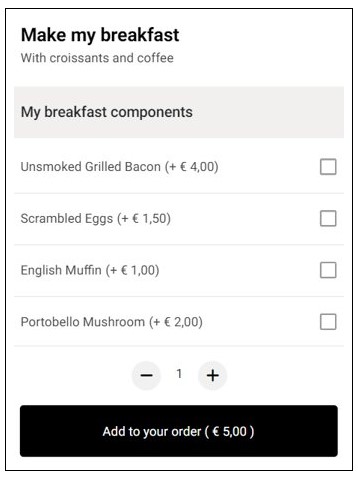
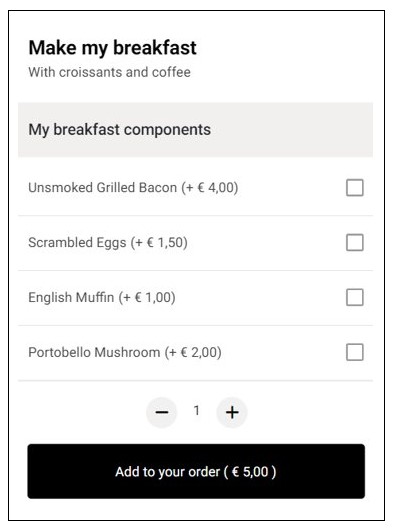
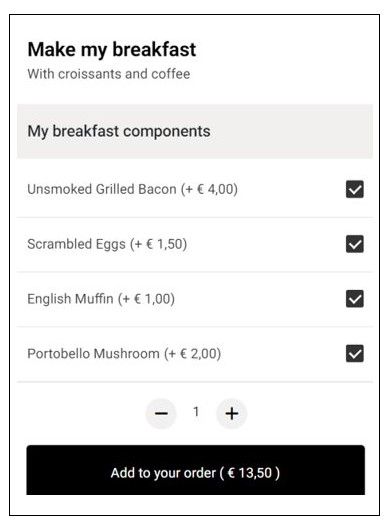
Any Number of Options Can Be Selected
When you choose this setting for your option group type, a customer can choose none, one, or more of the options provided therein. This is a good choice when you have options that can go together and customers can choose without restrictions. Furthermore, for this option, you can choose to allow customers to add more than one instance of every optional product.
Here’s how your customers will view your options:
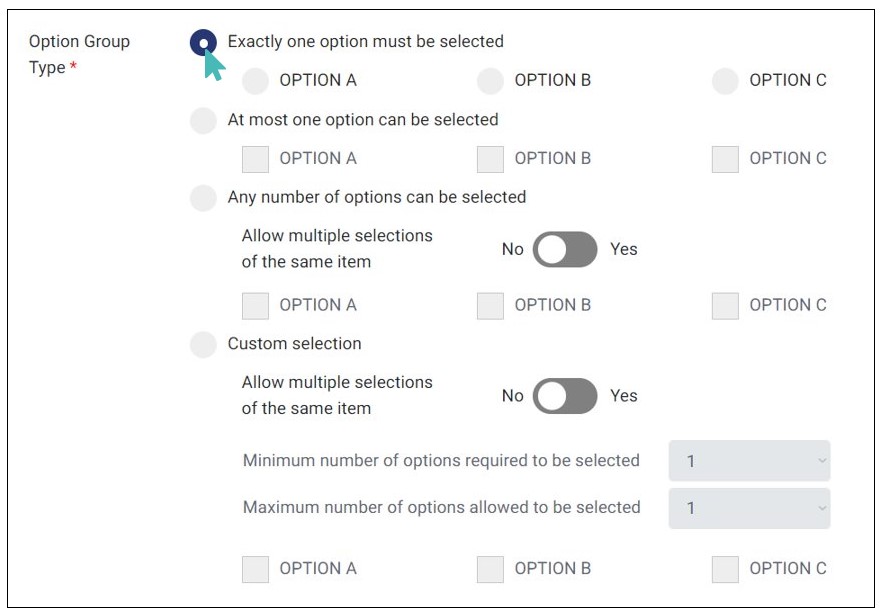
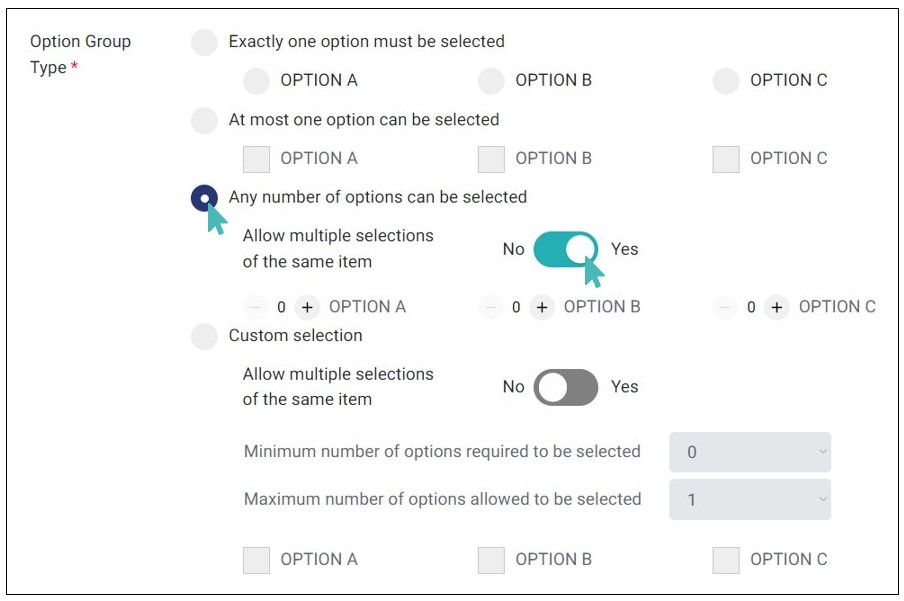
Custom Selection
This option lets you set a custom range between 0 and 10 for the minimum and maximum choices a user can make. Selecting “Any” as the maximum removes the upper limit, allowing the user to select all available options in the group.
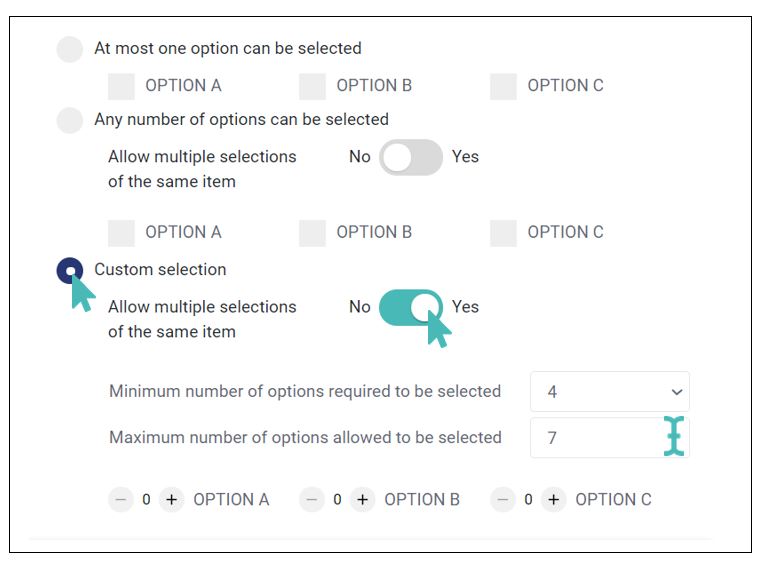
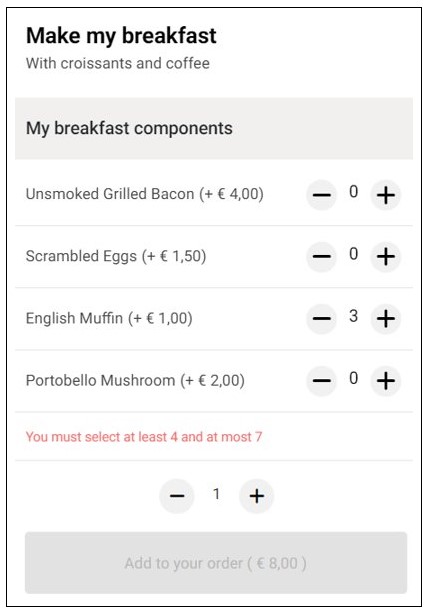
Customers can add multiple units of an optional product to their order. However, if minimum and maximum limits are set, GonnaOrder enforces them. For example, customers cannot select more than three items or leave the selection empty. The limits apply to the total number of items, whether multiple units of the same product or different ones are chosen.
Even though we have used this option group to explain all the types, you may use a single group with just any type. For instance, it is clear that a customer can choose none, one, or any number of ingredients from the breakfast components. Therefore, the Any number of options is more befitting for this case.
After you select the desired type of option group, then click Save for the changes to take effect in your store.
Import or Update Catalog Options Via Excel
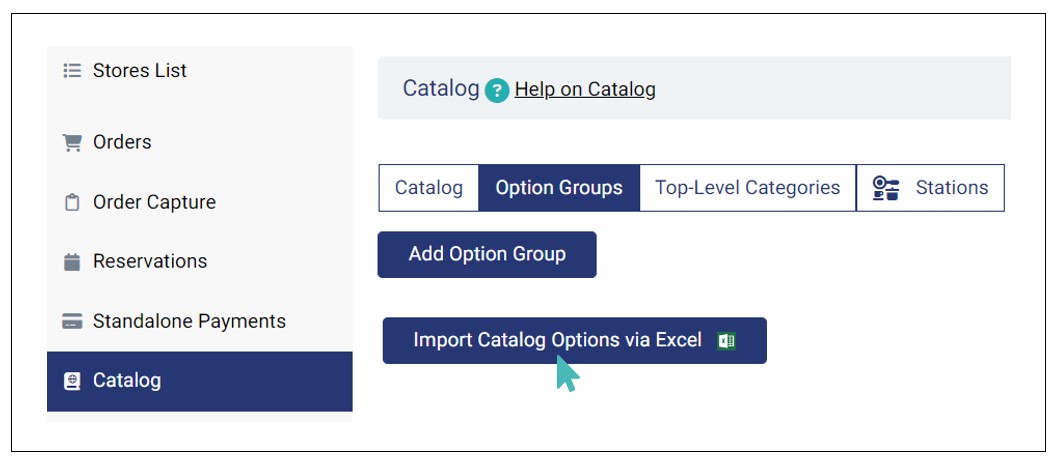
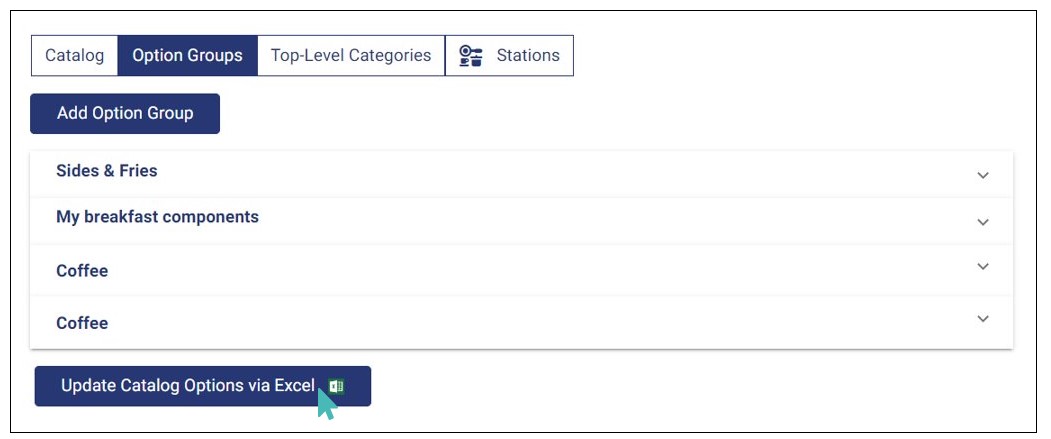
Instead of creating catalog options one after the other on GonnaOrder, you can import or update them via excel to save time. To upload options via excel, navigate to Catalog on the left menu and select the Option Groups tab. Next, click the Import Catalog Options via Excel button (if you have not created any catalog options).
For stores with existing catalog options, click the Update Catalog Options via Excel button located under the option groups you’ve already created.
Download the excel sheet that contains template to fill the columns with data.
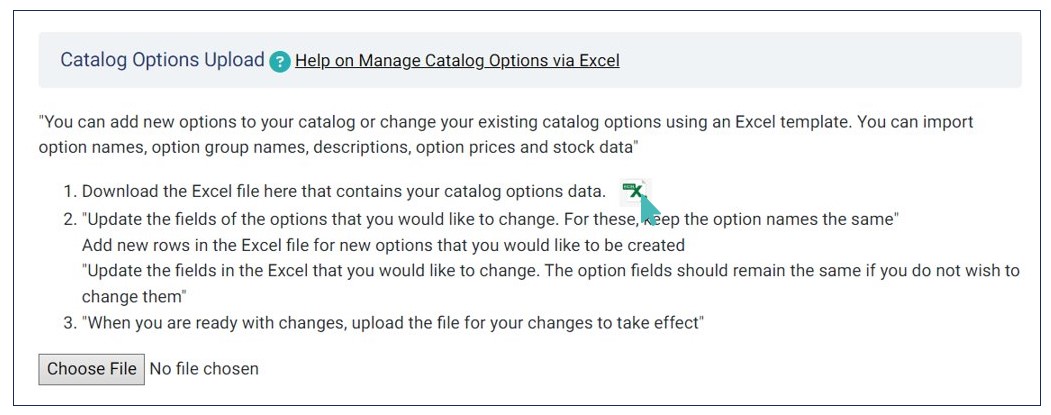

Once you have filled in your options catalog, the next step will be to upload it to the store for the items to appear in the menu. We have populated the catalog with several categories and products for the example case. To upload the new catalog, you select the file you just edited by clicking on the Choose File button, as shown below.
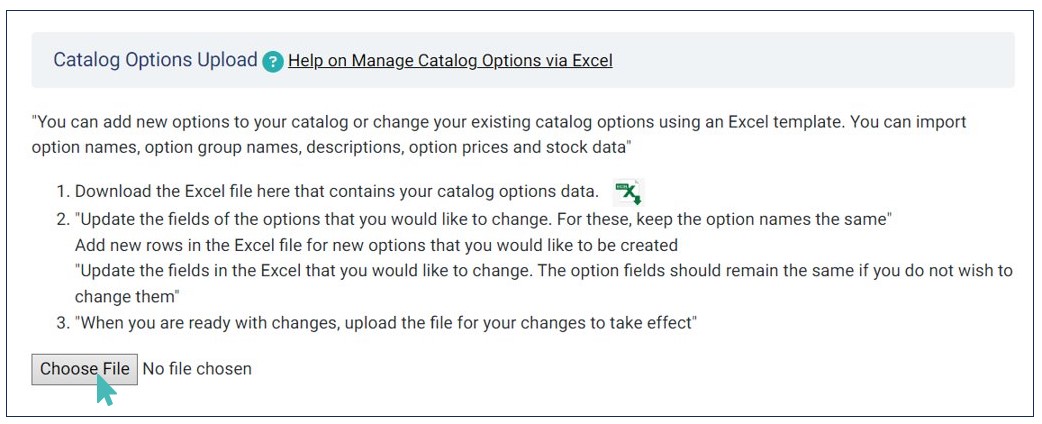
GonnaOrder will read your catalog file and present the categories and store items the same way they appear in your store. This step allows you to verify that you have the correct information in the catalog. Once the details are correct, click on the Accept and Import Catalog to save your products.

Note
You can update catalog options with similar names as long as the combination of the option group name, option group description, and option name is unique.
Dealing with Errors in Your Catalog Options Excel File
You may encounter several errors when updating your catalog options via excel, especially if you have many options. While some errors are easy to notice, some may be difficult to identify with your naked eye.
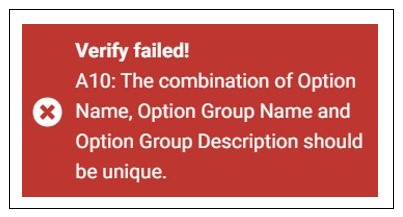
However, you have nothing to worry as GonnaOrder runs an efficient data verification mechanism, enabling you to spot even the most intricate errors, such as options with a non-unique combination of option group name, description, and option name. It notifies you the error and also identifies cell where the error is, allowing you to easily rectify it. Here are some common errors when updating catalog options via Excel:
Shared Option Group Name, Option Group Description, and Option Name
If you’re dealing with many options, you can easily have multiple options with the same name but different option group names and descriptions. Also, it’s possible to have several options sharing a name and an option group name but a different option group description.
Due to the ability to share these names and descriptions, you may mistakenly update multiple options with the same option name, option group name, and description when updating the catalog options via excel. In this case, GonnaOrder will display an error message, informing you that the combination of option name, option group name, and option group description is not unique. Therefore, you can easily find and remove or update the duplicate options from the cell highlighted in error message.
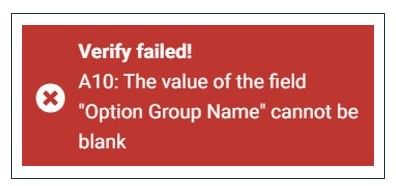
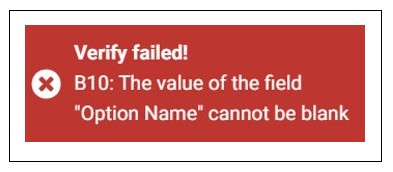
Error Due to a Blank Catalog Option Field
If you mistakenly leave a compulsory field empty, you cannot upload the catalog options excel file. Instead, you will get an error message informing you that a specific field (cell) is empty.
Add Options to an Option Group
An option group must have options for it to live up to the name. Options are usually products that you want to bundle together for a specific reason or purpose. For instance, options can be items that can add value to the main store product. They can be items you want to offer to customers for free.
Like creating option groups, you can add options to option groups in two ways:
- On the item details page
- On the Option Groups tab
Adding Options to Option Groups on the Item Details Page
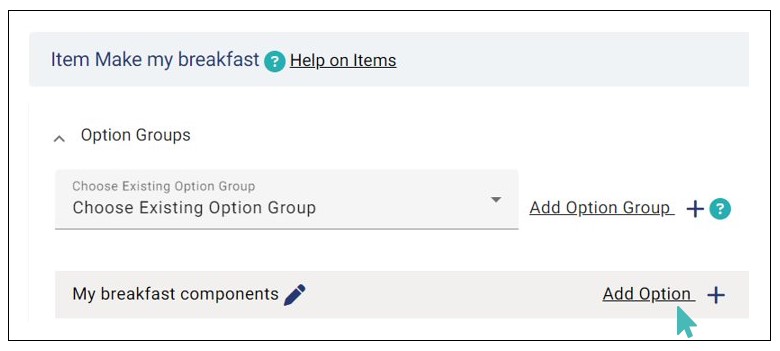
This method involves adding an option to an option group associated with a specific item. To add an option to the option group you previously created, scroll down to Option Groups in the item details page and click Add Option to the right of the option group name.
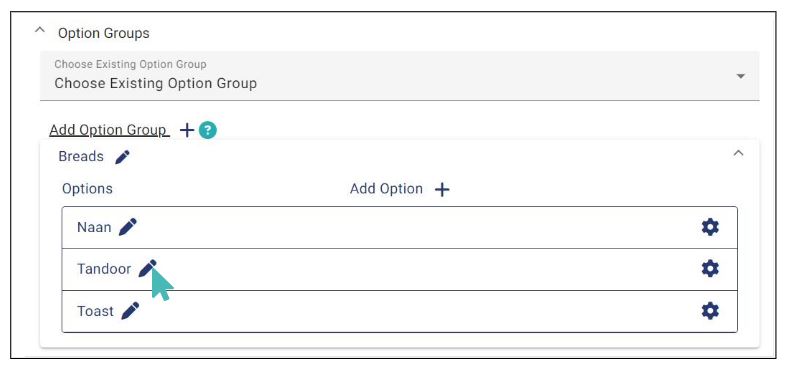
Adding Options to an Option Group on the Option Groups Tab
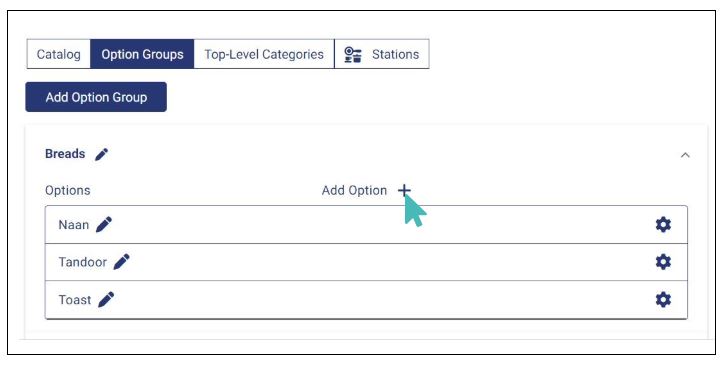
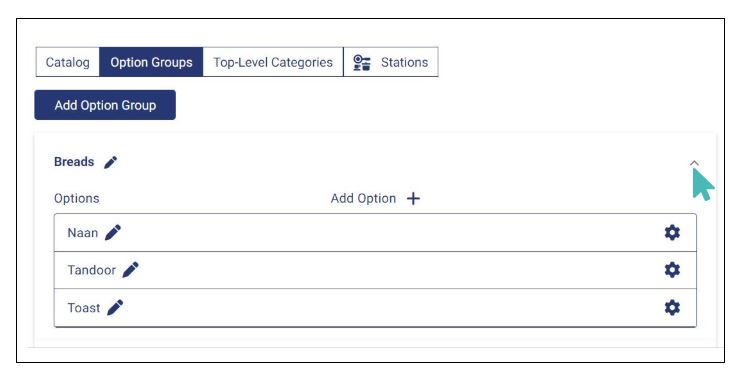
To add an option to an option group using this method, navigate to the Option Groups tab and select the option group you want to add an option. Click the Add Option button to proceed.
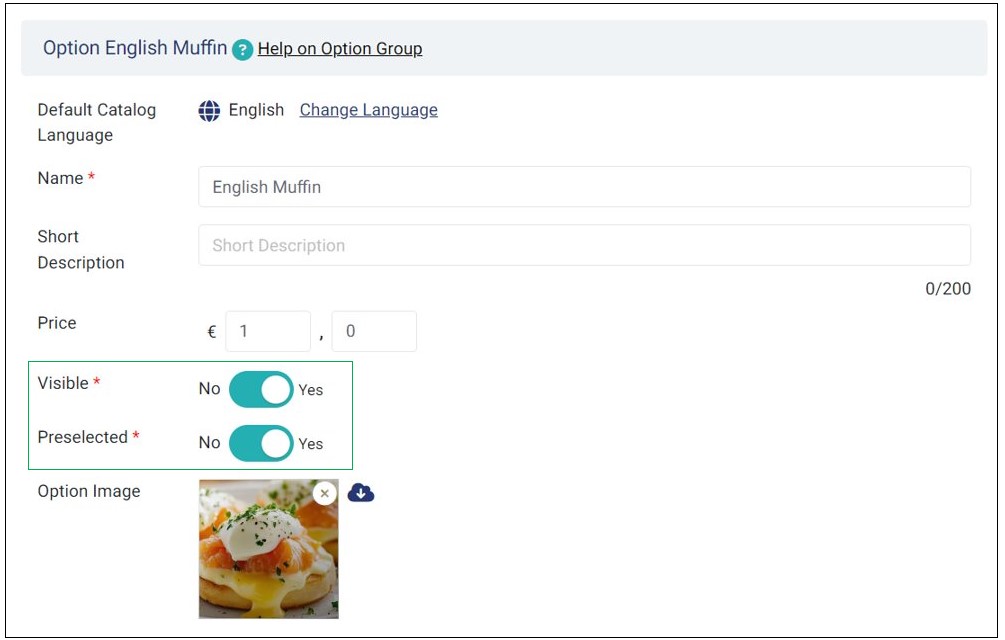
On the option page, provide the following detail:
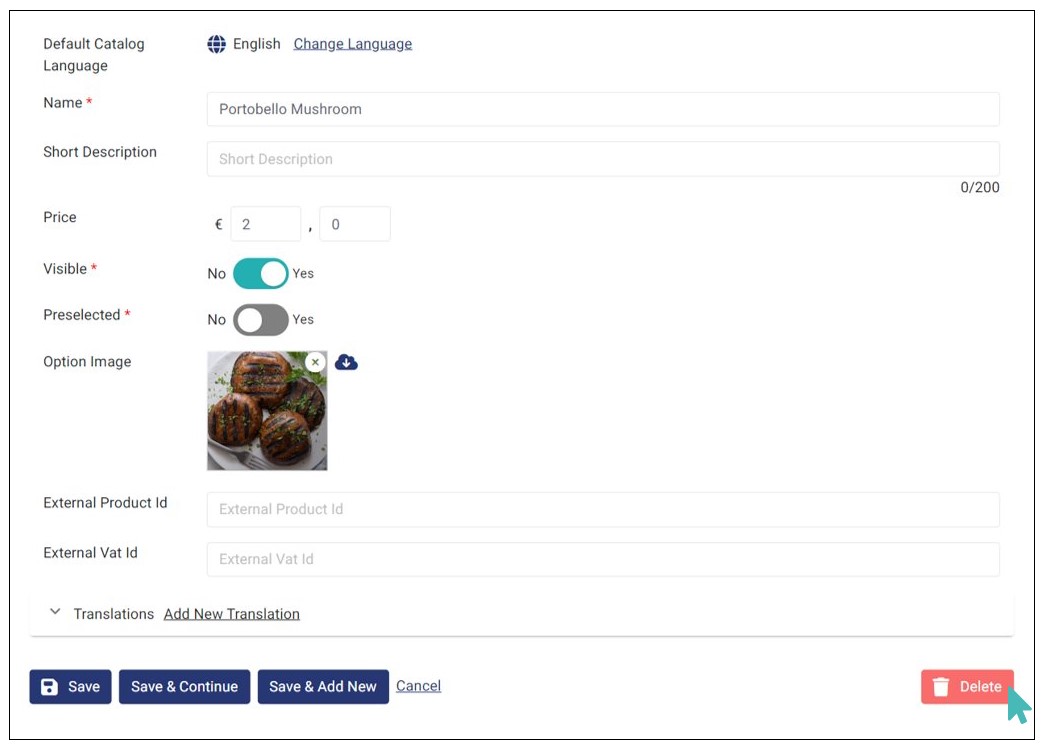
- Name (mandatory): This is the name of your option. Use a name that easily resonates with the customer.
- Short Description (optional). Here you can provide a brief of the option.
- Price (optional): Enter the price of the option. It can be zero for free offers, negative for discounted options, and positive for options intended to increase the value of the order.
- Visible: This button determines whether your option will be visible to the customer. Toggle the button to Yes to make the option visible to the customer and set it to No if you want to hide it from the customer interface.
- Preselected: The preselected button determines whether the option is automatically selected when clicks the offer. If you toggle it to Yes then it is preselected by default when a customer clicks on the offer. Otherwise, the option will not be selected by default. See more about marking options as preselected.
- Option Image: Here is where you can upload an option image to help customers understand the option better.
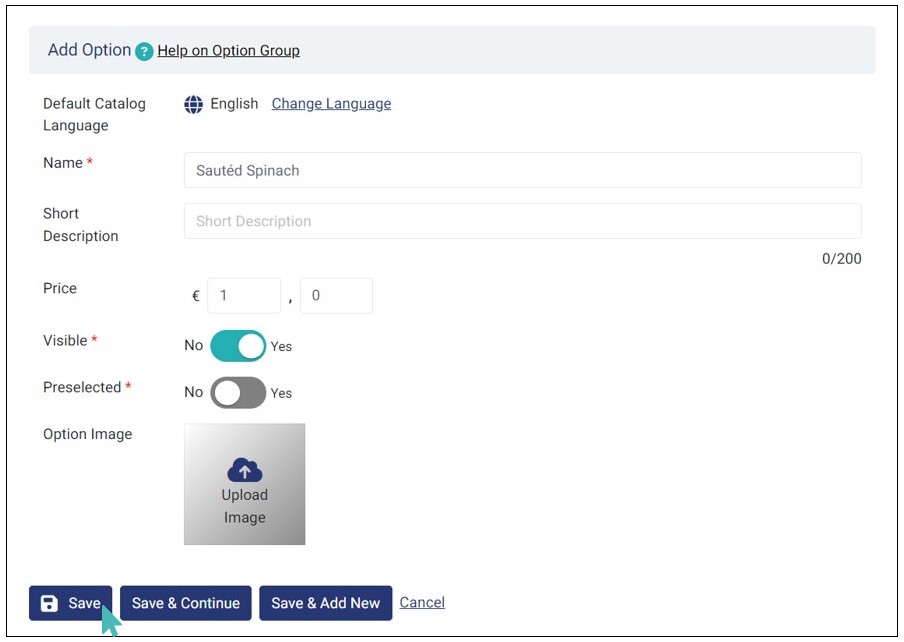
Confirm the details you just entered and then select one of the three options to save your option:
Save: save the option and go back to the main item.
Save & Continue: save the option and continue editing its details.
Save & Add New: to save the option and add a new one.
The different ways to save an option helps you add as many options/details to your store with a few clicks.
Add Images to Options
GonnaOrder allows you to add images to options. This feature is designed to help promote your options by giving customers a glimpse of what to expect, encouraging them to add these options to their selection. This increases the overall order value, boosting your business revenue.
To add an option image, click the Upload Image square and select the image you want to upload from your device.
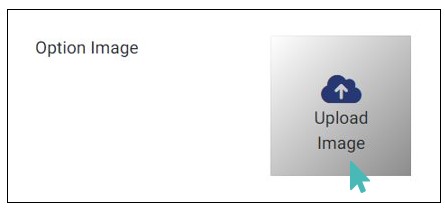
Once the upload is complete, click any of the three saving options to save the image. This option image will appear on the customer’s interface when they browse the offer related to that option.
Here’s how options with images compare with those without images.
Notes
- It is highly recommended that you upload an option image as it helps customers better understand what exactly they’re about to order.
- Options Can Have Negative Prices. The price of an option can either be positive or negative. While positive prices increase the value of the order, negative prices decrease the order value. Essentially, negative prices can be used with options that customers can exclude from their orders. For example, you can have an option Without bacon, or Do not include mushrooms with negative prices.
To add a negative price to an option, add the minus sign (–) before the whole number part of the price.
Every option has two important settings:
- Visible: This defines the visibility of the option in the customer menu. Every option will be visible and customers can view and add it to their order by default. When the visibility is deactivated (toggled to No), the option will remain available under the parent option group, but will not be displayed to customers on the order page.
- Preselected: This setting is disabled for all new options and no option will be selected when the order page loads. Therefore, customers will have to independently decide which option to choose. You can enable this setting for any option in an option group to have it selected when the order page loads. This may encourage customers to go with the selected option instead of picking others. This applies to all types of option groups and means that you can also have multiple options preselected depending on the type of option group you have chosen. Find a more detailed explanation under the preselected options section and remember to save the changes when done.
You can add more options to your option group using the same process. The short description and price fields are optional. You can have options without prices especially if you would like to offer your customers free gifts. For the example case, all the options used have a price but no short description.
Edit Option Groups or Options
From time to time, you may want to edit either option groups or the options included therein. Given that option groups are associated with individual items, you will need to know which store item has an associated option group and then decide what you need to change.
To edit options or option groups, scroll down to the Option Groups section in the item details page and click the edit icon next to that option or option group name.
For the case of an option group, you can change its name, option group type, add/edit options, or add translations. You can change the name of an option, update the option’s short description, update the price, change the visibility of the option, enable stock control or add translations. Essentially, you can update every field you filled when creating an option or option group. See the images from the Add Option Groups and Add Options to Option Group to see all the details you can update.
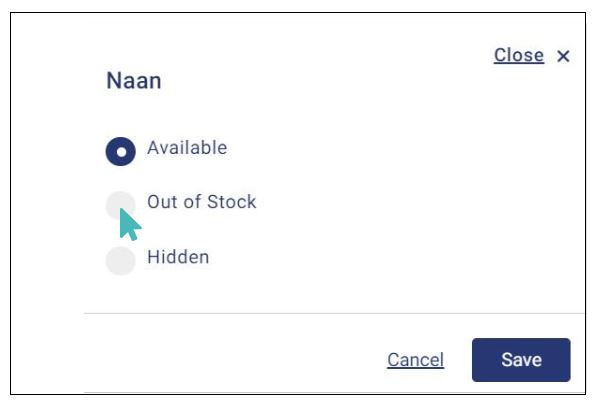
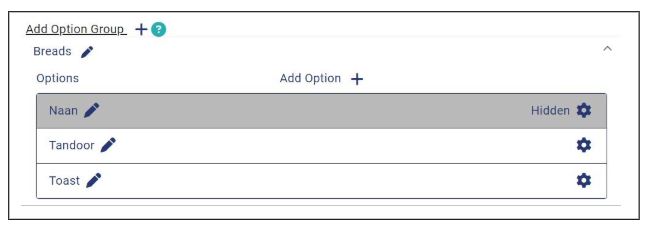
Mark Option Groups as Available, Out of Stock, or Hidden
You may want to mark option in the options groups as either Availble, Out of Stock or Hidden from the customer menu. To edit options, scroll down to the Option Groups section in the item details page and click the Settings next to the option.
The dialog box appears, click either Available, Out of stock, or Hidden radio button. Click Save.
The items that are marked Out of stock will be highlighted as a light shade of red color on the catalog.
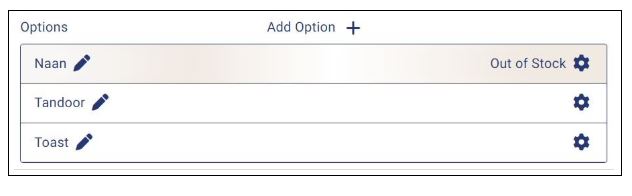
The items that are marked Hidden will be highlighted as a grey color on catalog.
Mark Options as Preselected
Preselected options can be a good way to suggest to a customer the best option to take with a given item. And by the best, it could be what many people would choose or that which adds significant value to the price of the main product. Having preselected options in option groups may mean fewer clicks for most of the customers and hence a better customer experience.
This section will show you how the customer will see your option groups when there are preselected options.
Exactly One Option Must Be Selected
When you choose this to be your option group type, and as we previously stated, the customer should be reminded that they must select one option. However, with preselected options, the product page will appear with preselected options already marked and thus the notification of having to select one option will not be displayed to the user. See the images below.
Any Number of Options Can Be Selected
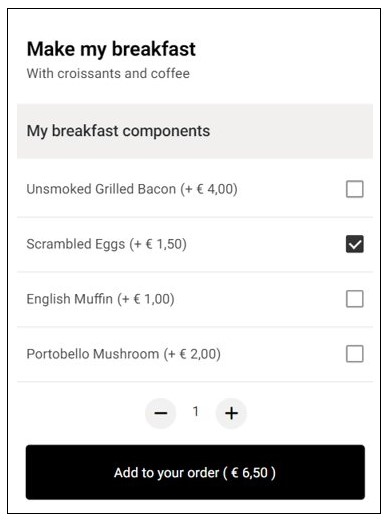
Any number of options can be selected type of option group allows the user to select between zero (zero included – meaning none) and the maximum number of options in the option group. The customer may therefore submit the order without choosing any option. This type of option selection can be useful when you want the customer to choose ingredients that should or should not be included in their product. See how preselected options appear on the customer menu as presented in the images below. In the second image, the customer must deselect what they don’t want to be included in their order.
At Most One Option Can Be Selected
This type of option group limits your customer to either select one option or none. If you do not choose a pre-selected option, then the customer may be tempted to submit the order without adding any option. And if these options had associated prices, then you would be losing value as a store. Adding preselected options may encourage the customer to submit the order with the option selected thus increasing the order value.
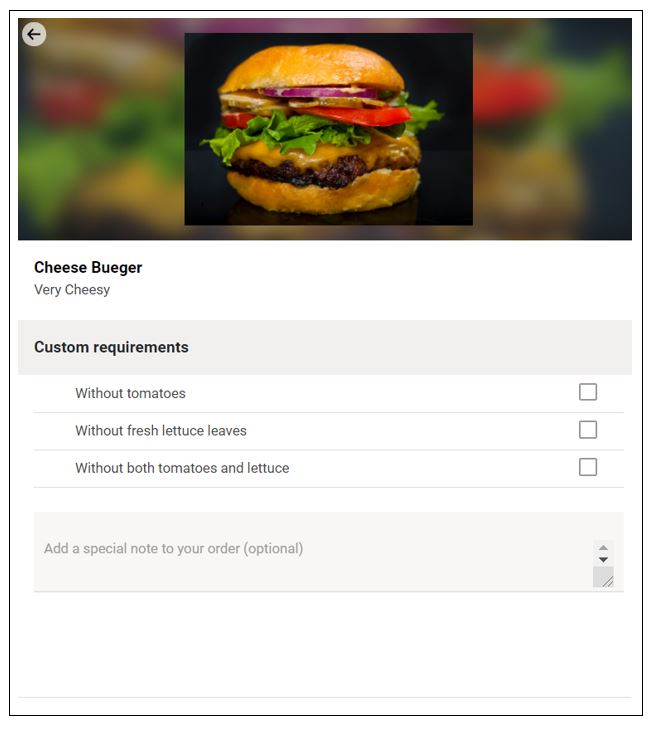
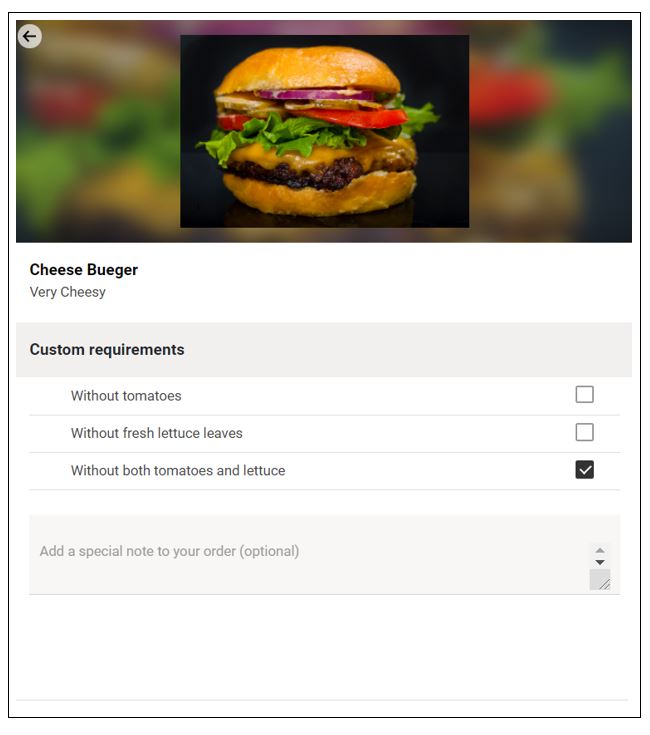
Custom Selection
Option groups that allow custom selection are a bit different from the rest in that they give you more flexibility in deciding how customers choose the available options. Further, they allow you to create custom rules for option selection.
If you knew some of the options customers ask for when buying a particular item, then you might as well use these options for a custom selection. Say, for instance, that customers have been requesting to get a cheese burger but without tomatoes, without fresh lettuce leaves, or without both for personal reasons. In that case, it would be appropriate to add an option group for these additional requirements to the cheese burger. This is one of the many logical scenarios where custom selection is applicable and we hope you will be imaginative enough with your store. For the example case, we have three custom options and we have set the custom rule to say that a customer can either select none or one of the options available.
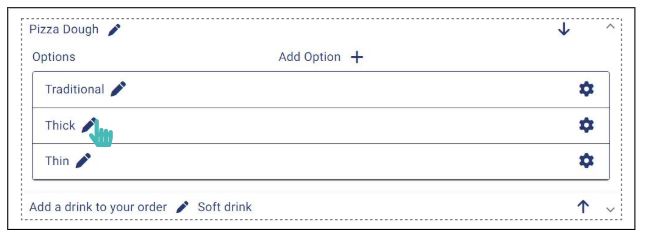
Reorder Option Groups
Option groups appear on the customer menu in the same order they appear in your store dashboard. However, this order is not permanent and you can change it at any time.
To rearrange option groups in an item, head over to its detail page and scroll to the option groups section. We will assume that you have at least two option groups in your store. And if that is the case, you will see directional arrows to the right of the name of every option group saved in your store. Using these arrows, you can move an option group either up or down.

Click on the downward pointing arrow on the first option group to move it below the second group.
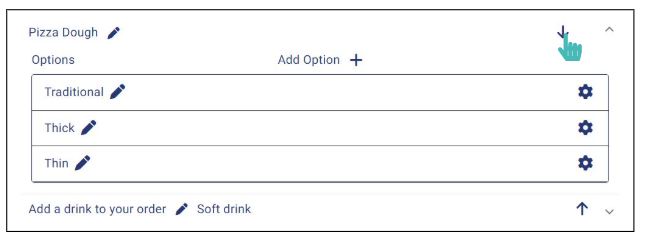
After the above operation, the customer interface will change and now the Sides & Extras option group will appear above the Fries. As we mentioned before, the order of option groups in your store may influence which options the customers choose. Therefore, it is advisable to switch the order of the option groups from time to time. Also, always ensure your option groups have descriptive names and a reasonable number of options.
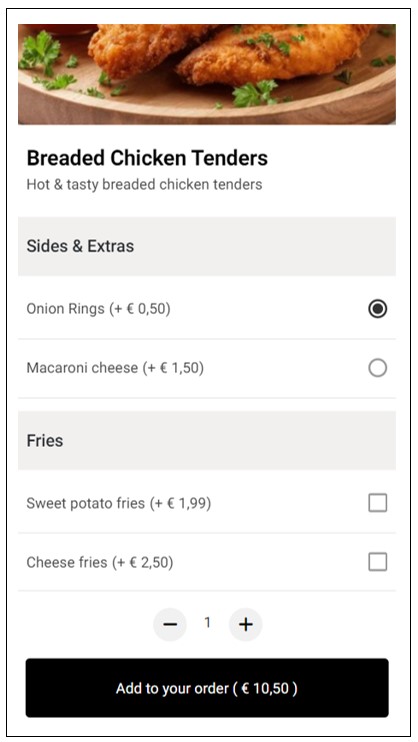
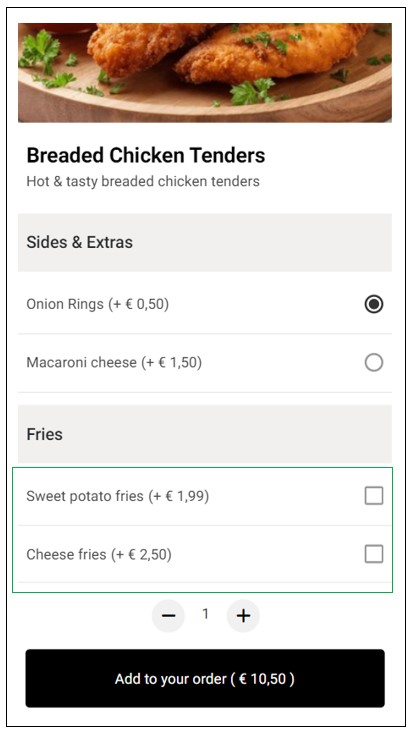
Reorder Options
Like with option groups, you can change the order in which your options appear on the customer menu. Changing the order of items allows you to experiment and understand how the order affects customers’ choices. For example, you may want to change the order of options listed under an item if they are more than four.
To change the order of options, go to the specific store items under which they are listed and find the option groups section. Find the respective option group in which the options you would like to rearrange are listed and use the up and down directional arrows to move items higher or lower in the group. The new order will be used when customers view the item on the menu.
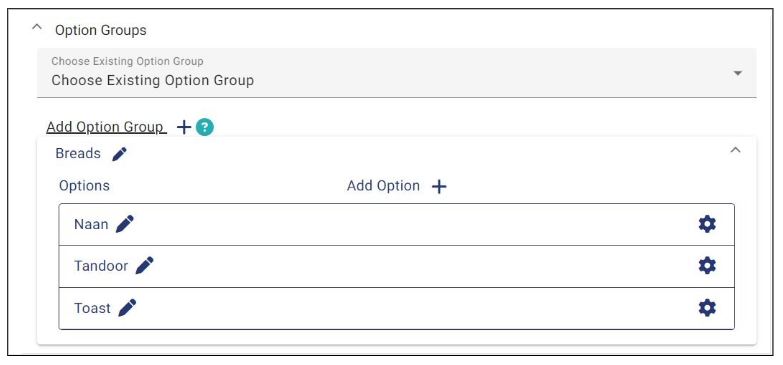
View All Option Groups and Related Options
Instead of viewing specific option groups under an item, you can quickly view all the option groups in your store with a single glance.
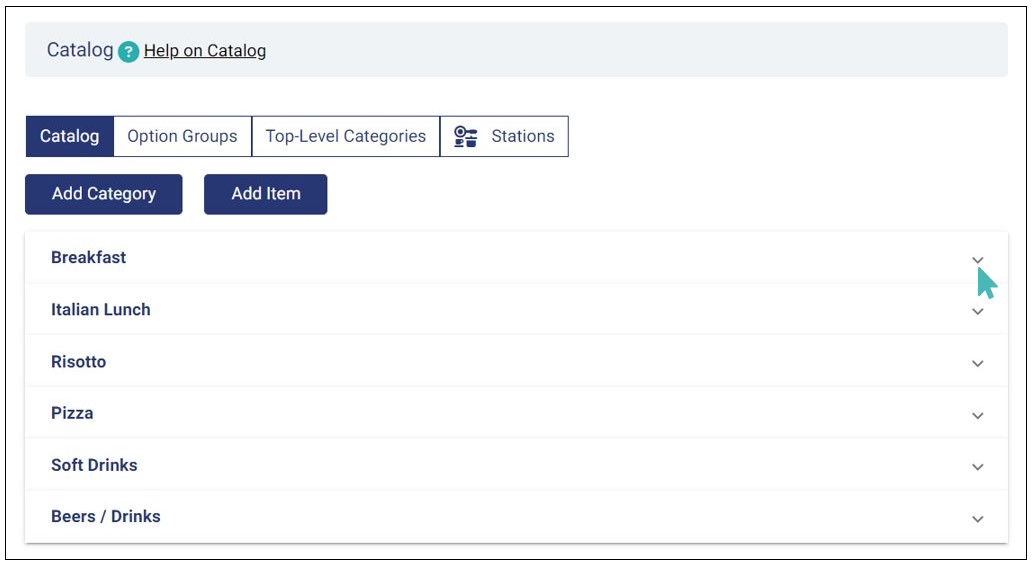
Simply click Catalog on the side menu and navigate to the Option Groups tab. Here, you can view a list of all option groups.
To view the options listed under a specific option group, click it on the list and a dropdown list of all options under that option group will appear.
Delete Option Groups or Options
There probably will be a time when you no longer need to have an option group or an option for a certain store item. Say, you no longer have the capacity to offer the options or you no longer wish to offer options as gifts. Then, you would have to permanently delete the group or option in question.
To delete options or option groups, find the item with which the option group or option is associated and click to edit. Option groups and options are part of an item’s details page.
For this example case, we will delete one of the options in an option group.
Scroll down to to the Option Groups section and choose the option you want to delete. Click on the Edit icon next to the name of the group or option to load its details page.
On the details page, click Delete and then click Ok on the pop up that appear to confirm that you actually want to delete the option. Notice that the process described here applies to both options and options groups. However, you will need to delete all options listed under an option group before removing it.