Customers are the backbone of every business. In the digital era, businesses can leverage customer data for targeted marketing, discounts, and personalized communication. GonnaOrder simplifies customer management with a 360-degree dashboard that consolidates individual customer profiles, order and reservation stats, loyalty points, and purchase details. This comprehensive view helps you tailor offerings and enhance customer service.
On This Page
- View Customer List
- Search Customers
- Add New Customers
- Add or Update Customers Via Excel
- View Customer Dashboard
- View and Manage Customer Details
- View Customer Login Information
- Manage Customer’s Order Statistics
- Manage Customer’s Reservation Statistics
- Manage Customer Loyalty Points
- Update Customer Loyalty Points
- View Order Item Statistics
- Download the Customers Summary
- Filter Customers
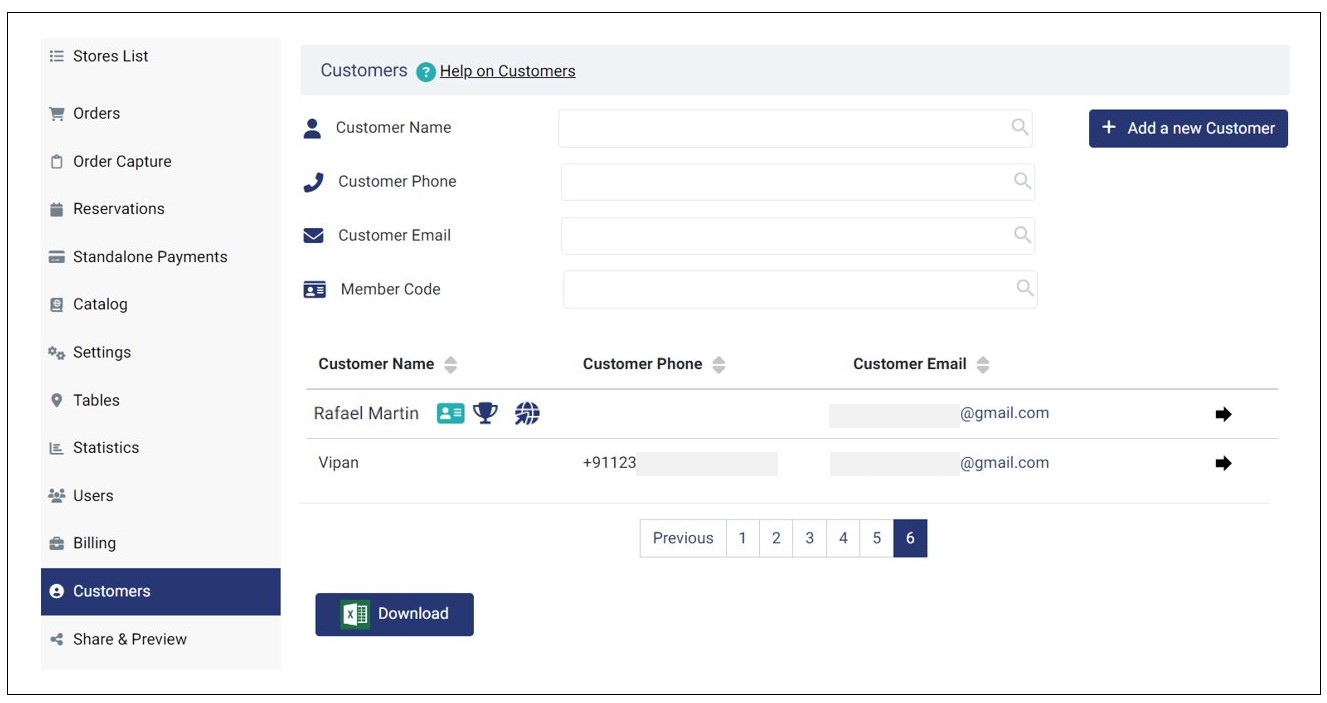
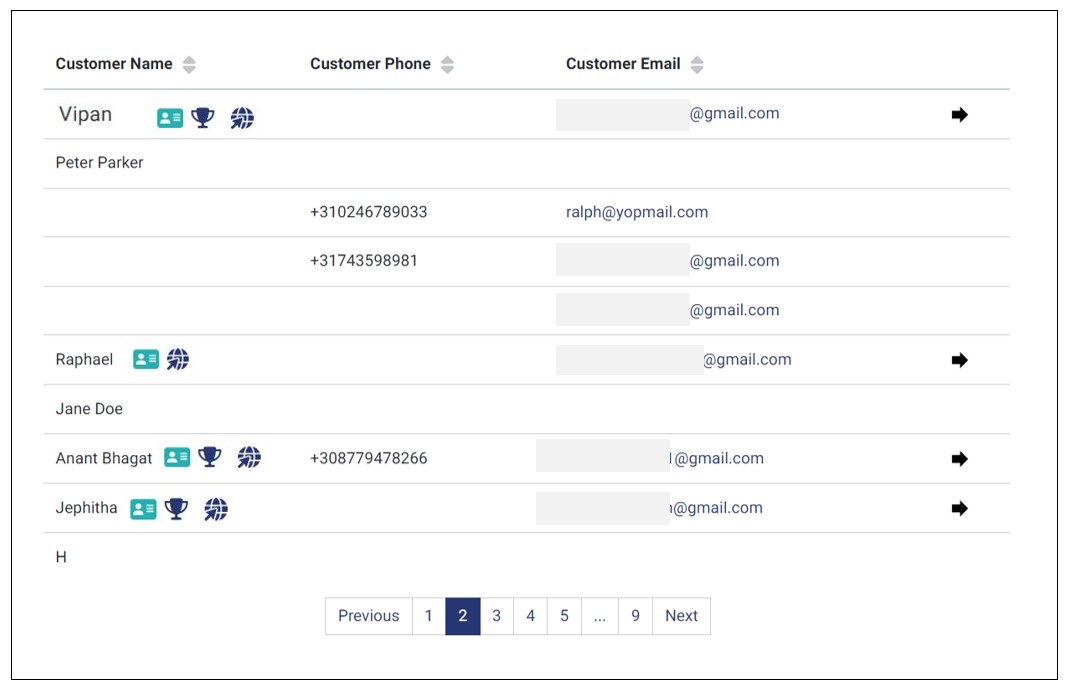
View Customer List
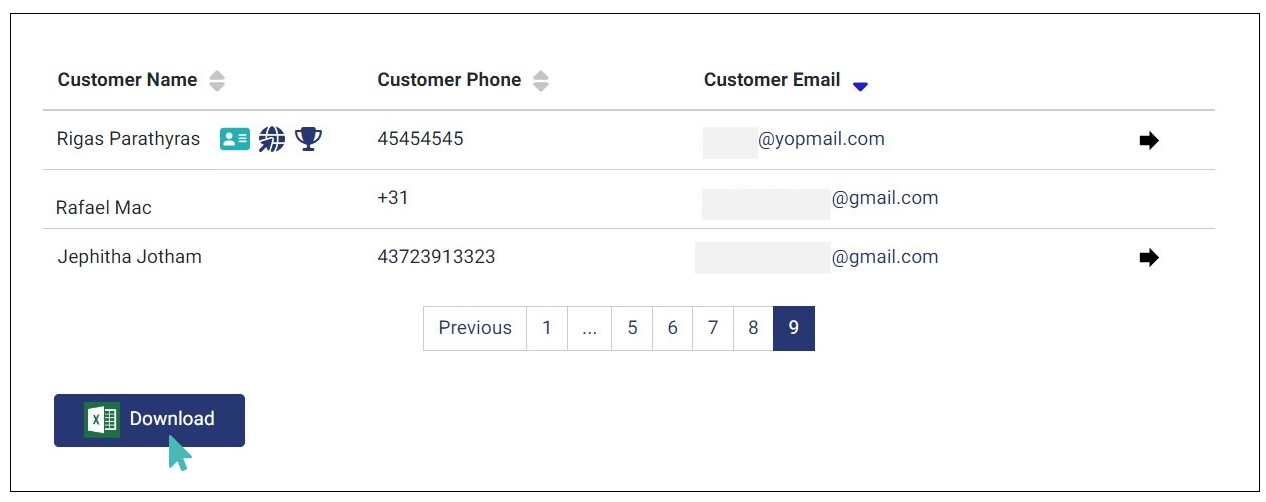
You can access a complete list of customers who have shared their information while interacting with your store, whether it’s when placing orders or making reservations. This list displays customer names, phone numbers, and email addresses. To view the customer list, navigate to Customers on the side menu and scroll to the customer list section. Use the pagination controls to browse through additional pages of customers.
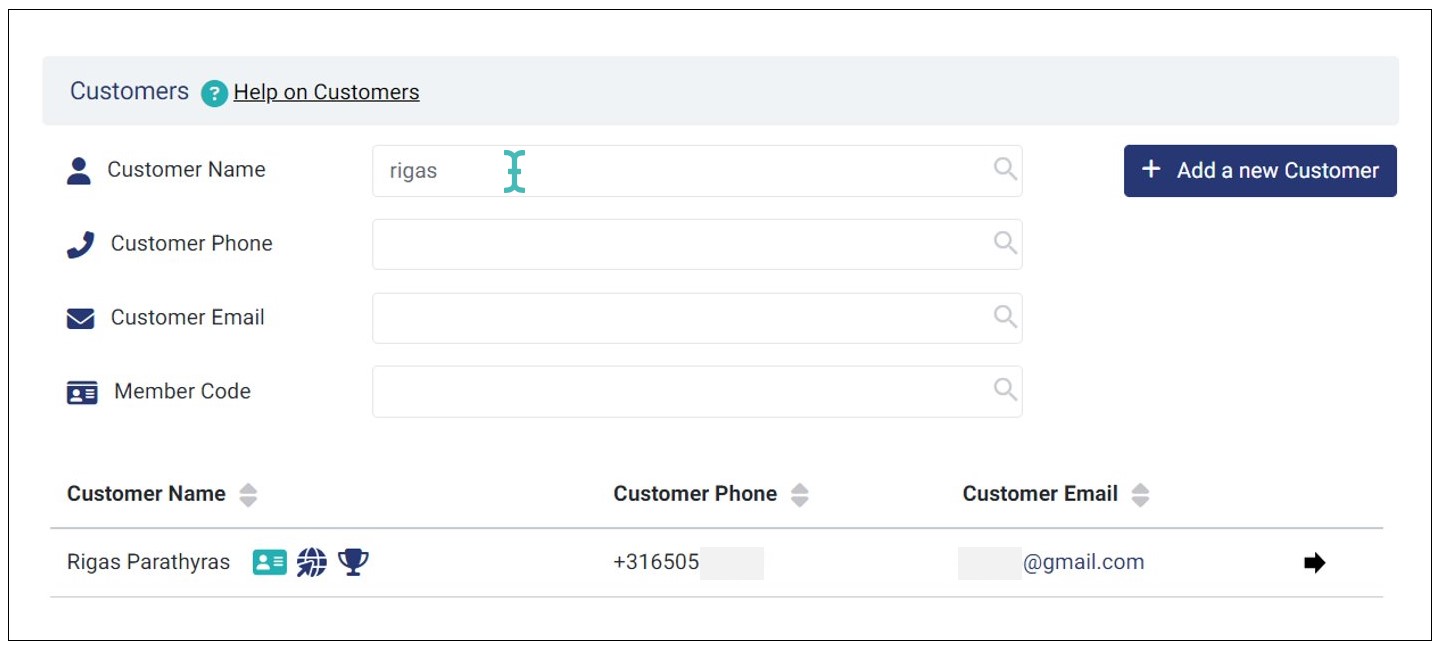
Search Customers
GonnaOrder makes it easy to find specific customers, even in a long list of customers that have interacted with your store. You can search for a customer by their name, phone number, email, or member code. This feature helps you quickly locate the customer you need with minimal effort.
When searching by name or phone number, GonnaOrder provides partial matches as you type, making it easier to find customers without knowing the exact details. However, searching by email requires you to provide the exact address for accurate results.
To search a customer, navigate to your store and select Customers on the side menu. Search the customer using any of the four options provided to find the customer you’re looking for.
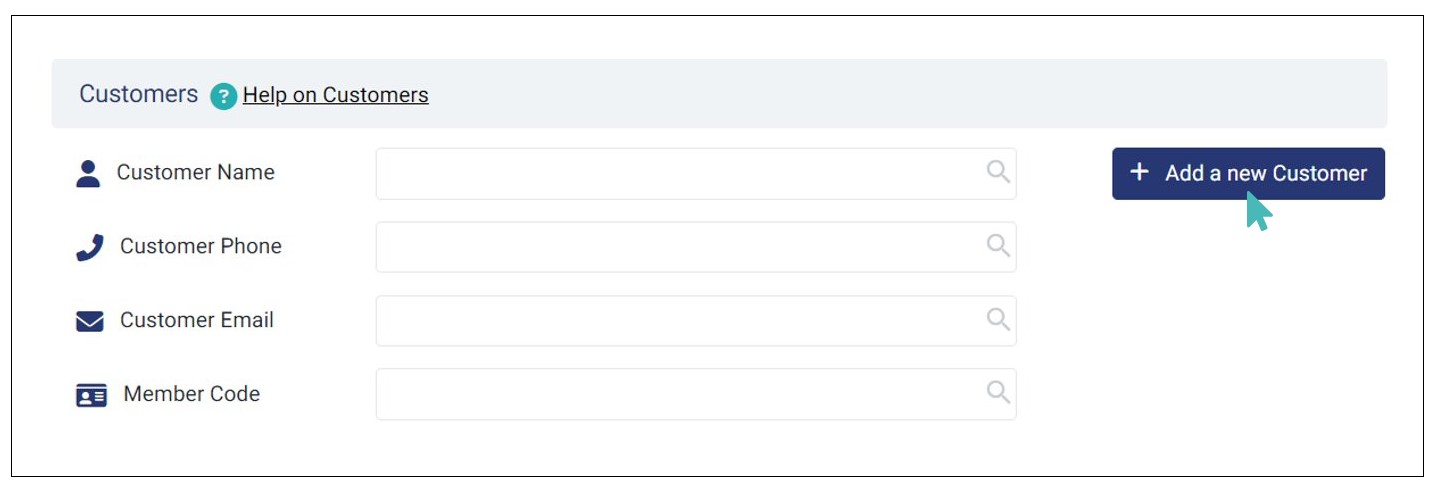
Add New Customers
GonnaOrder allows you to add new customers to your store. Navigate to Customers on the side menu and click the Add New Customer button to proceed.
Next, provide the following customer information:
- First Name
- Last Name
- Mobile Number
- Member Code
- Country
- Preferred Language
- Gender
- Birthday
- Instagram Username
Note that some of these fields are mandatory while others are optional. Once done, click Create to complete the customer creation process.
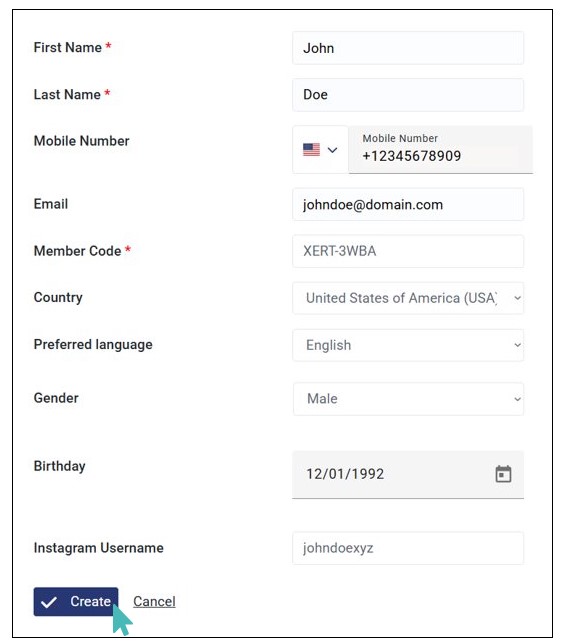
The customer is successfully added to your customer list. You can search them by their name, email, phone number, or the member code.
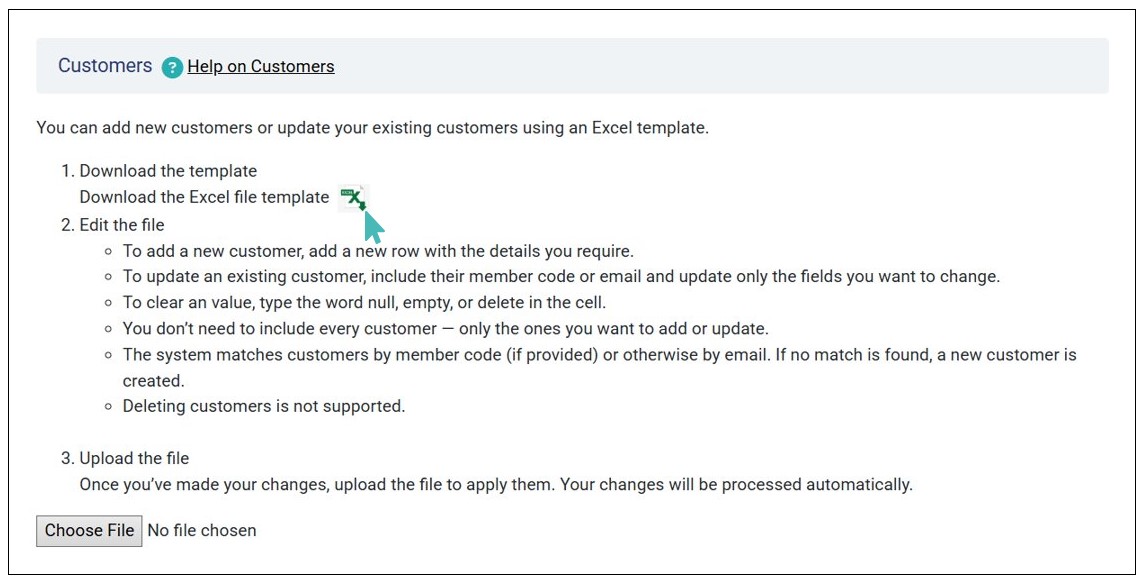
Add or Update Customers Via Excel
Instead of adding customers one at a time, you can import them in bulk via Excel. Also, you can update existing customers via the Excel file. This saves time and effort needed to add or update customers in bulk. Here are the steps to follow to import customers via Excel.
- Navigate to Customers on the left pane and click Import customers via Excel.
Import Customers Via Excel 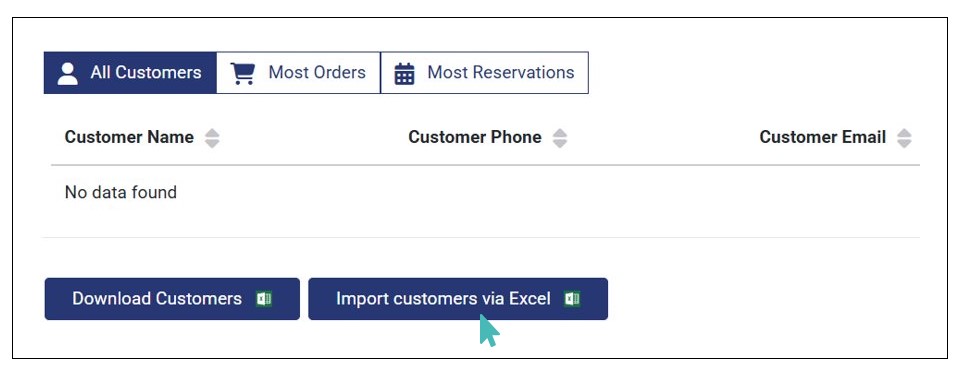
- Next, download the customer list Excel template.
- Fill in details of the customers you would like to add/update to your store. Here, you need to provide the following details:
- Your store ID
- Amount available to redeem (loyalty reward)
- Member code
- Phone number (with country code)
- First name
- Last name
- Coupon amount remainder
- Password
- Birthday
- Gender
- Street address
- City
- Post code
- Floor number
- Doorbell name
Note that some fields are mandatory and have a specified structure (e.g., phone number must start with a valid country code and email must have a correct structure i.e., xxx@domain.com).
- Save the changes made on the template and upload the file by clicking Choose File and selecting it. The added/updated customers will appear on your customer list within 15 minutes.
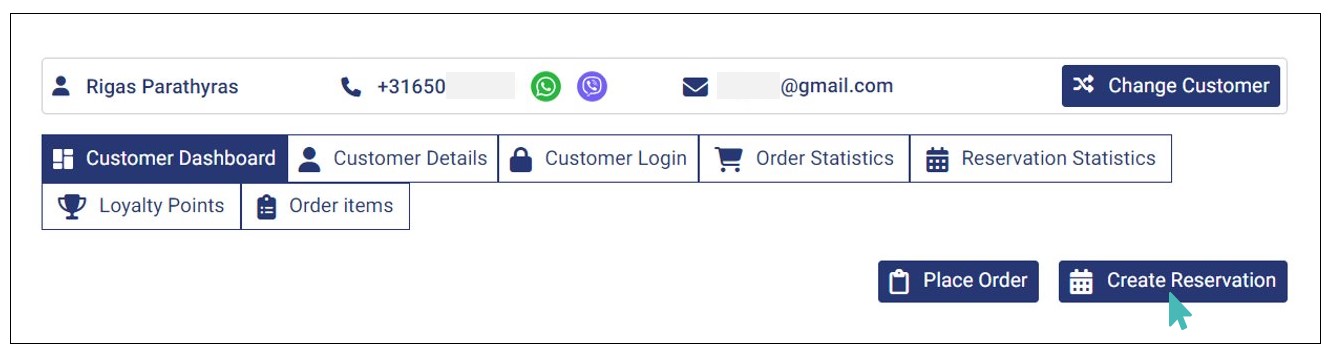
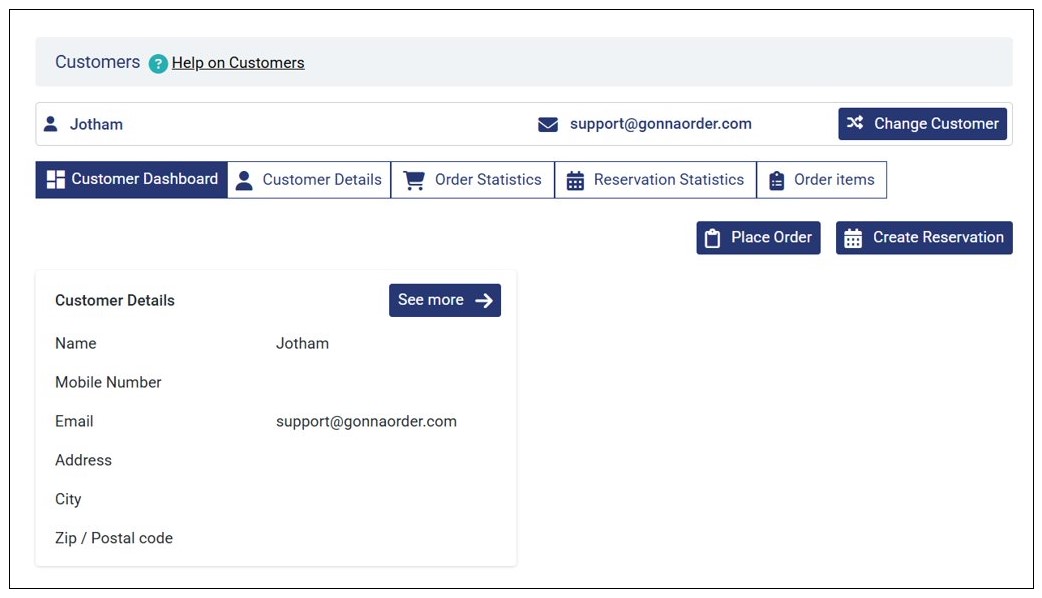
View Customer Dashboard
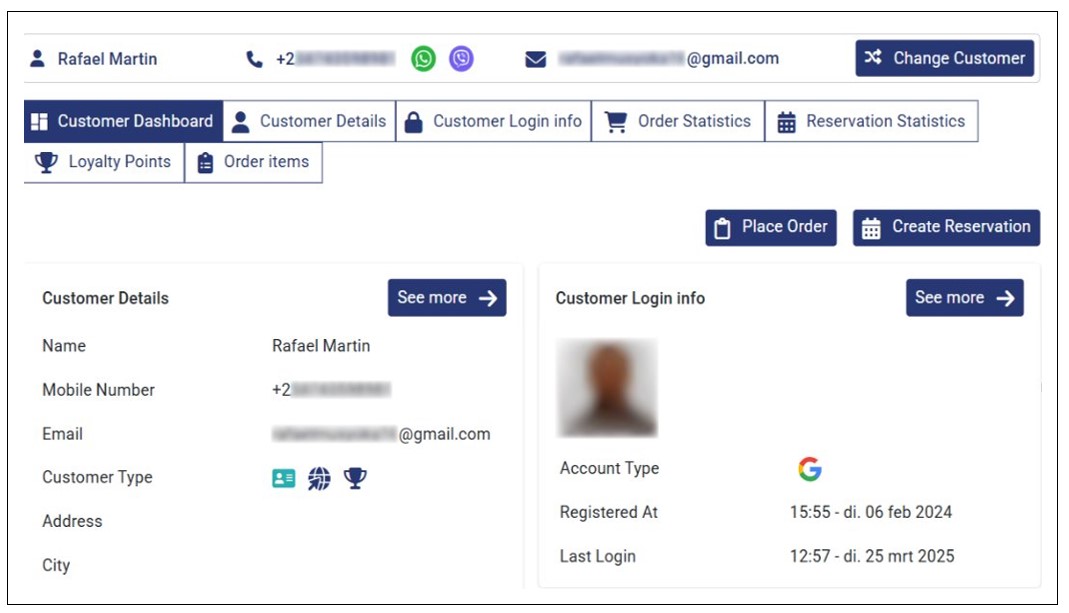
GonnaOrder’s customer dashboard provides a 360-degree view of each verified customer. It offers a quick overview, including their personal details, login information, order and reservation summaries, loyalty points, and frequently ordered items.
To view the customer dashboard, navigate to the customer list and click the registered customer you want to view their profile.
The dashboard contains all the information provided by the specific customer.
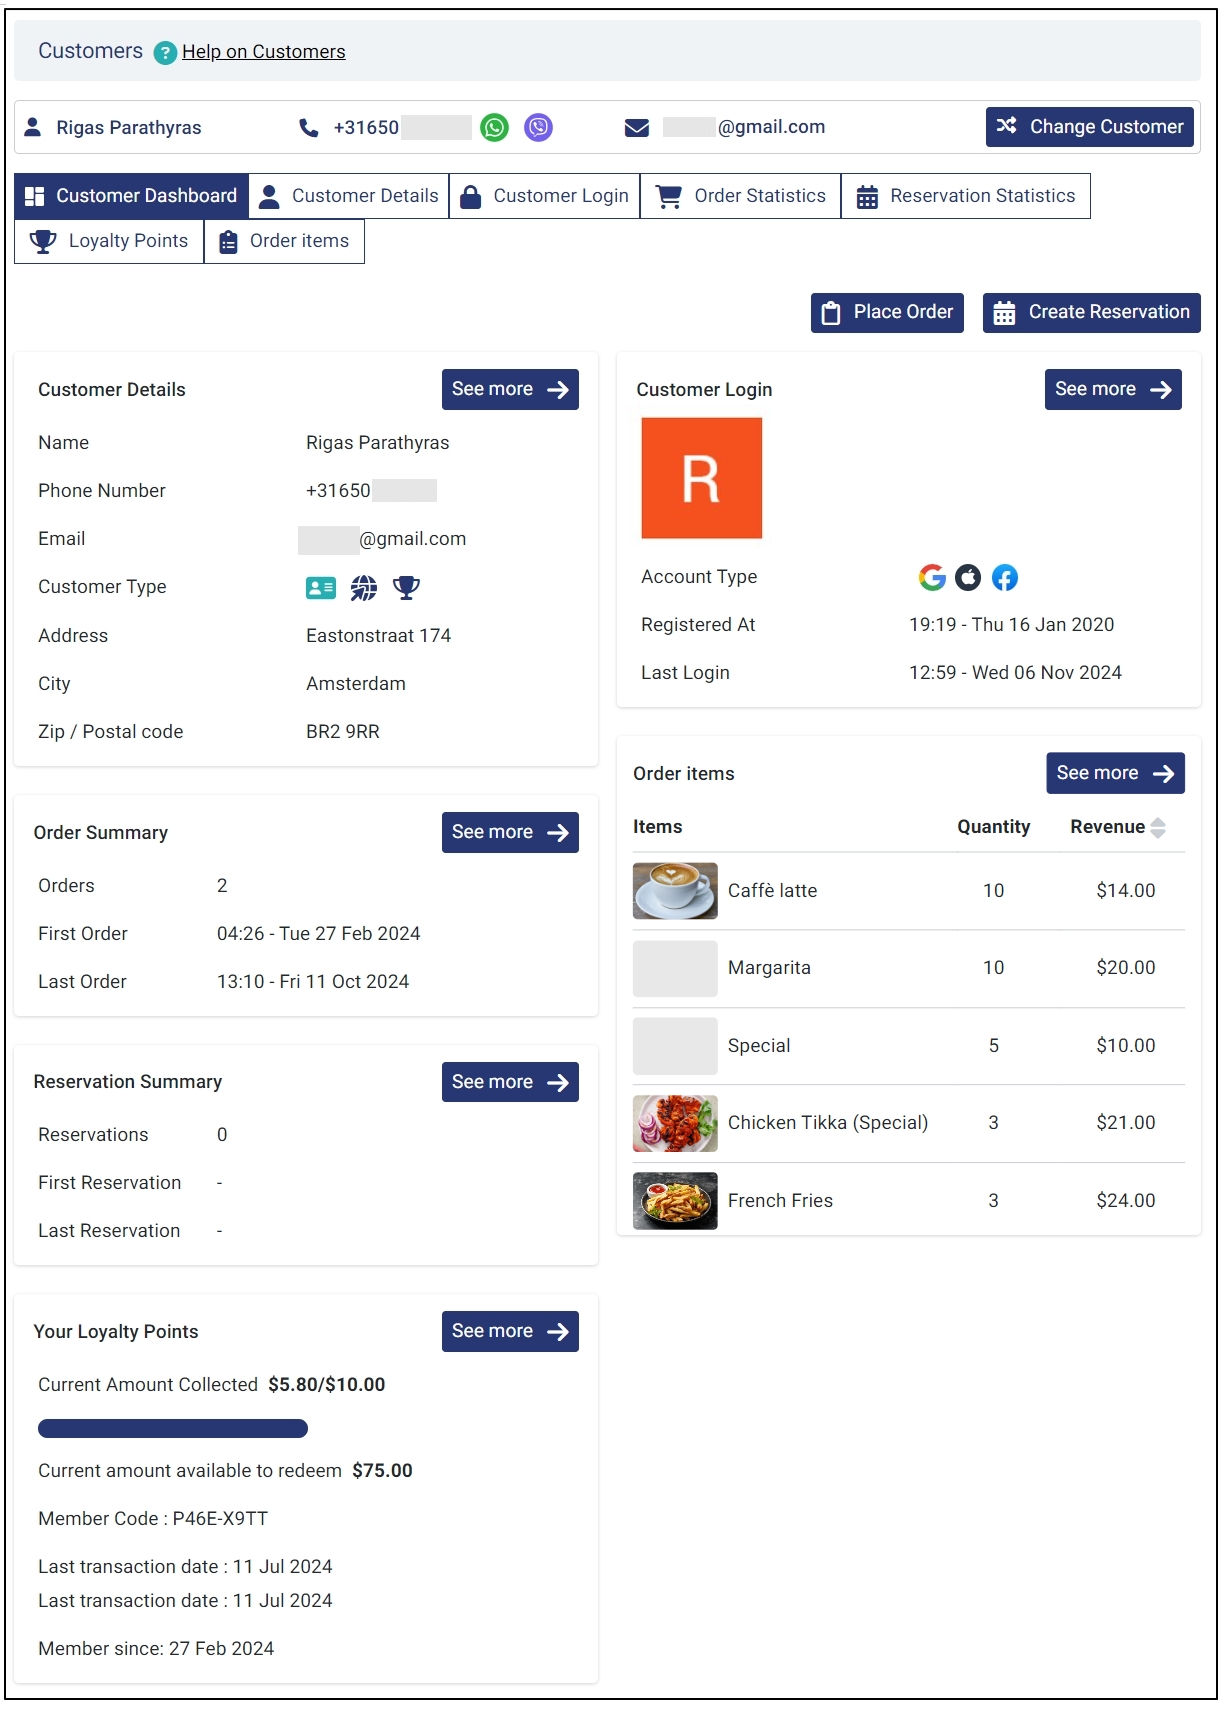
Within the customer dashboard, you can do the following:
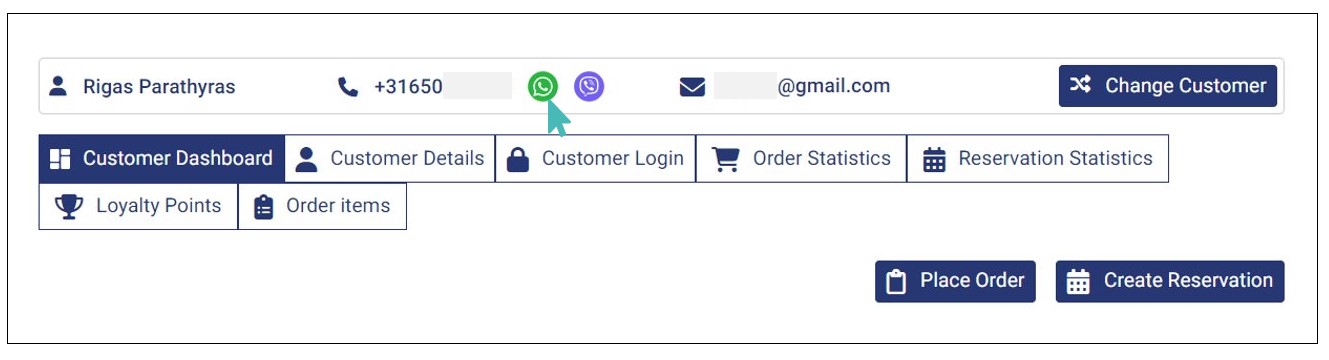
Contact the Customer
You can reach out to the customer if they provided their contact information, like the phone number or email. In this case, click the phone number to call the customer or tap the WhatsApp or Viber icon to send a message via the respective messaging platforms. Alternatively, you can click the email provided by the customer to contact them.
Place an Order for the Customer
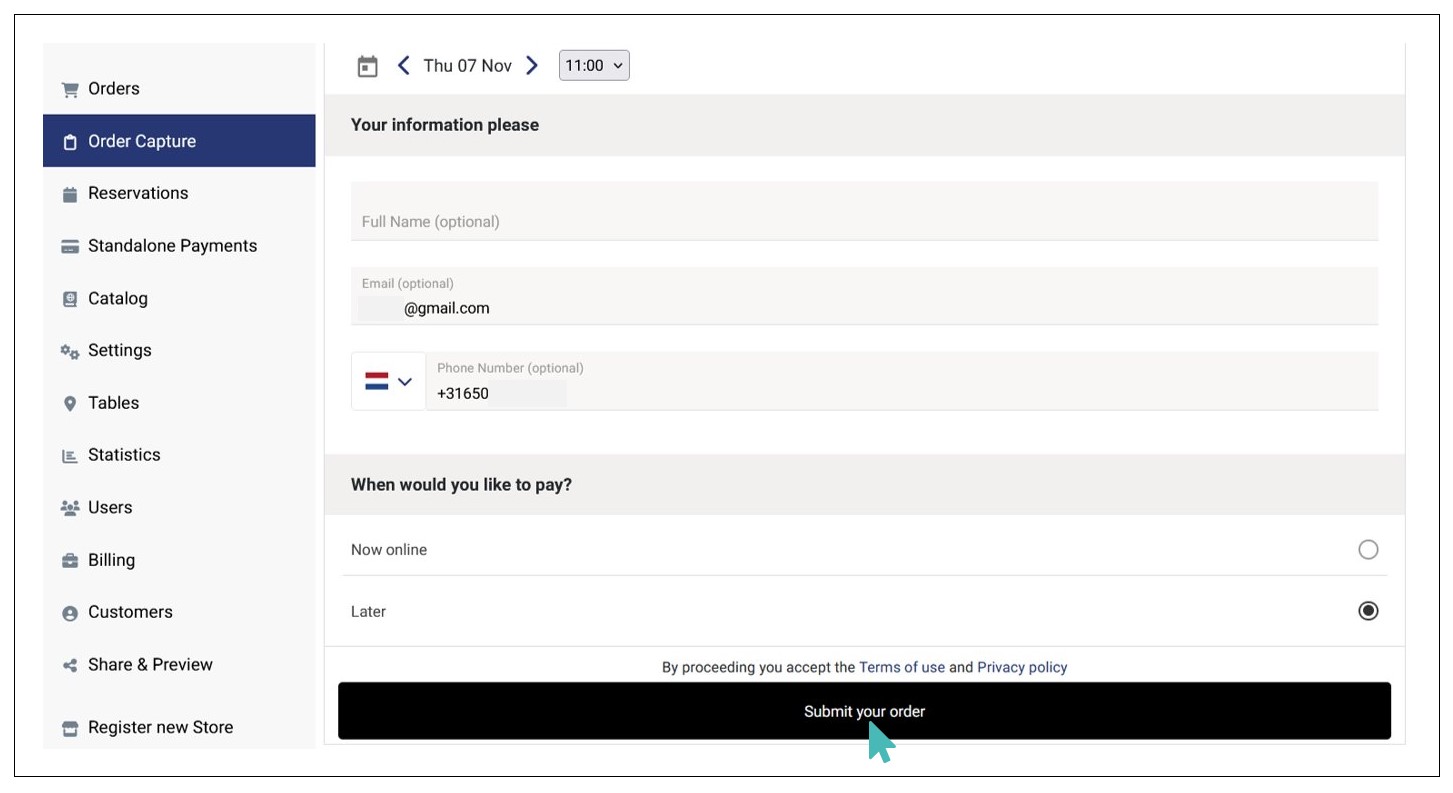
You can take a new order for the particular customer on the customer dashboard. Click the Place Order button to proceed.
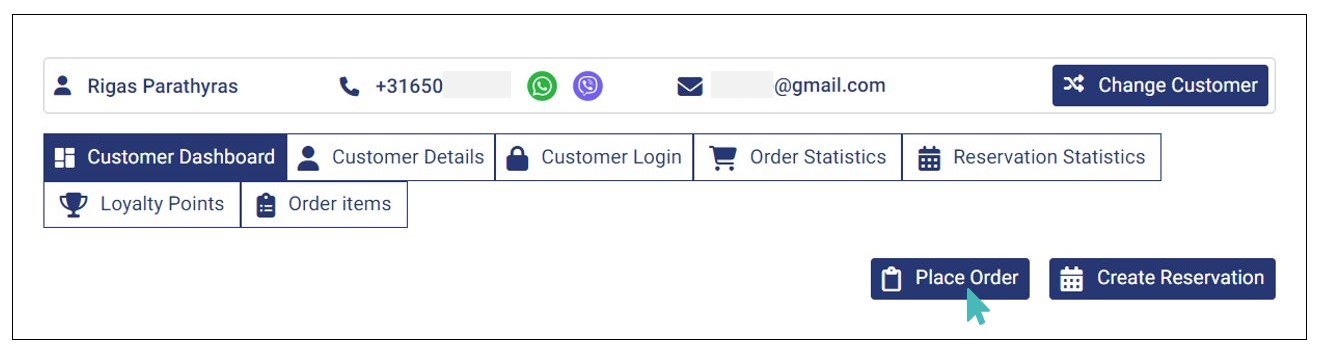
You are redirected to the Order Capture feature, where you can select items and submit the order for that specific customer.
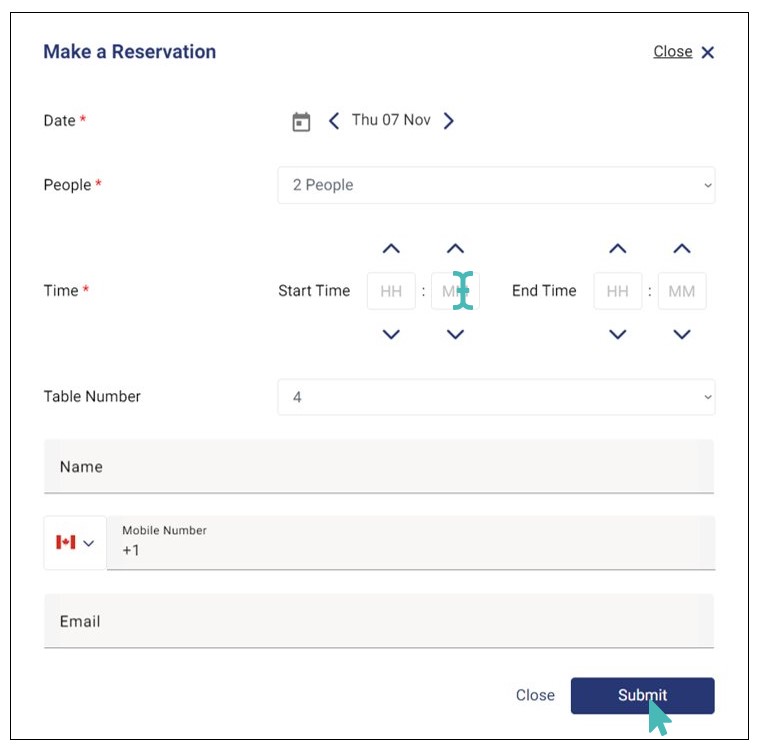
Create a Reservation for the Customer
GonnaOrder allows you to create a reservation directly from the customer dashboard. This makes it easier to reserve a table for a specific customer. Click the Create Reservation button to get started.
Provide the required reservation details, including the date, number of people, time, and table number. Verify the details and click Submit. Learn more on how to Create a Reservation.
View Customer Details Overview
The customer dashboard provides a quick overview of the customer details. You can view the following details about the customer.
- Name: Displays the name of the customer.
- Mobile Number: Displays the customer’s phone number.
- Email:Displays the email ID submitted by the customer.
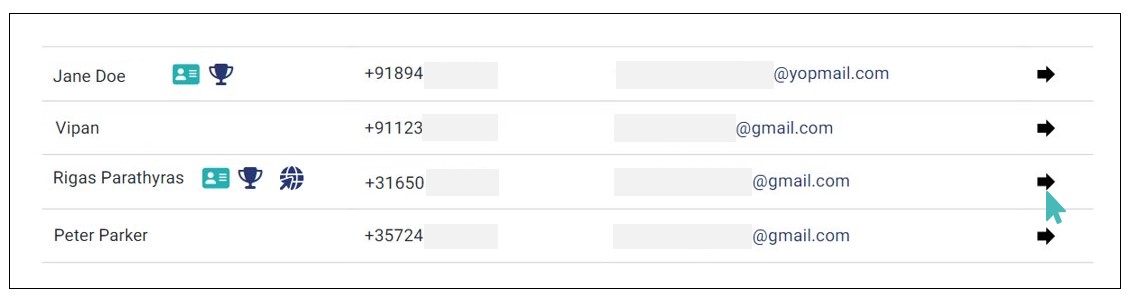
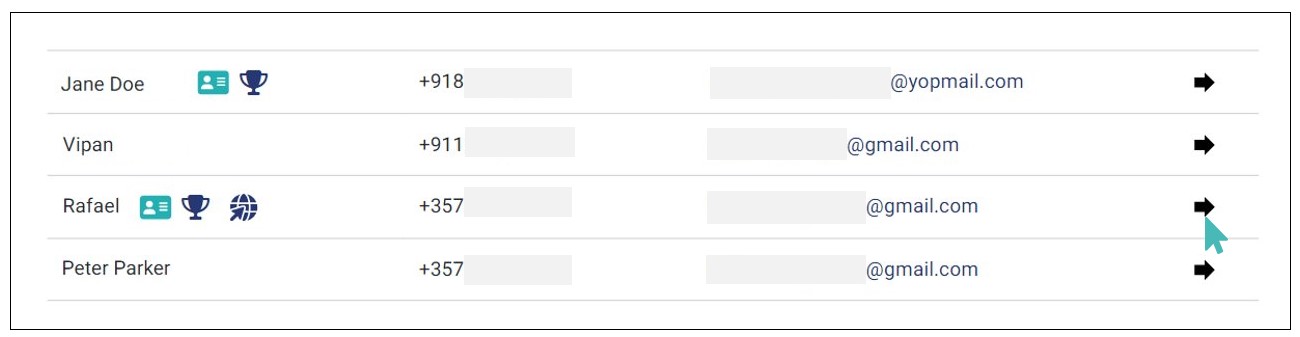
- Customer Type: This section shows up to three badges (icons).

- Identified customer badge(
 ). This icon implies that means has an ID on the store and may have placed an order or not. Also, the customer may be registered on the store and a loyalty profile if the respective icons appear. However, if the identified icon is the only one displayed for the customer, then it means that the store admin is the one who created that specific customer using the Add New Customer feature.
 - Registered customer badge (
 ). A registered customer has an ID and is registered in your store. They may have registered using their social account (Facebook, Google, or Apple ID) or via their email and may have placed an order or not. Also, the customer may have a loyalty profile or not depending on whether they have the loyalty icon.
 - Loyalty profile badge (
 ). This icon implies that the customer has a loyalty profile. For a customer to have this icon, they must be identified or registered. However, they may have placed an order at the store or not.
 - Unidentified customers. These customers are not registered or identified on the store, but may have placed an order. Such customers do not have any of the three icons appearing on the customer type section.
Customer Type Combinations
Here are the combinations of badges that a customer can have and what each combination means:
No badge: The customer submitted an order without registering with the store. They may have provided their name, phone, and/or email or none of the above when submitting the order.
Identified: Any customer with an identified badge alone was created by the store admin via the Add New Customer feature.
Identified + registered: These customers registered themselves on the store, either using their social accounts or via email.
Identified + loyalty: These customers were created by the store admin and the customer has a loyalty profile.
Identified + registered + loyalty: These customers registered themselves and have a loyalty profile on the store.
- Identified customer badge(
- Address: Displays the delivery address provided by the customer when submitting the order.
- City: Displays the name of the city that the customer provided when submitting the order.
- Zip / Postal Code: Displays the customer’s zip or postal address, if they included it when submitting the order.
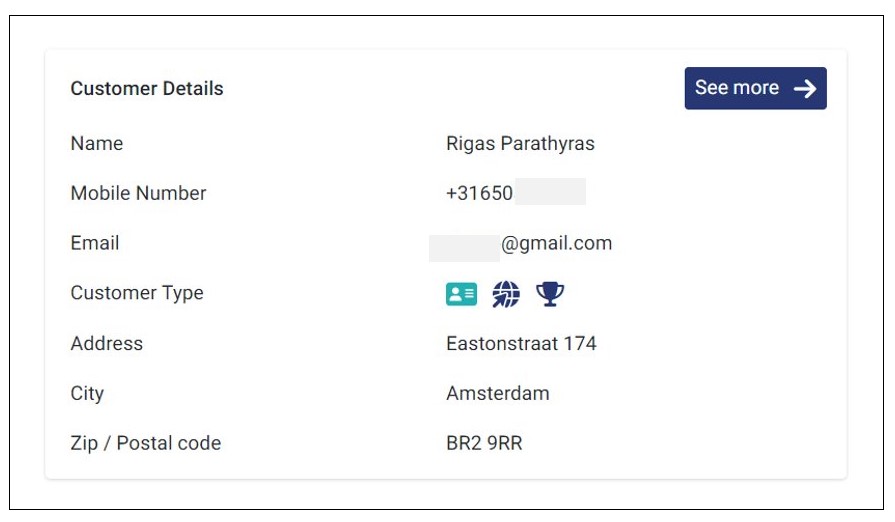
However, if the customer’s Mobile Number, Email, Address, City, and Zip / Postal Code are not provided when creating the profile, the respective fields are hidden from the customer details section. Here is an example of customer details section for a customer who only provided their name and email address.
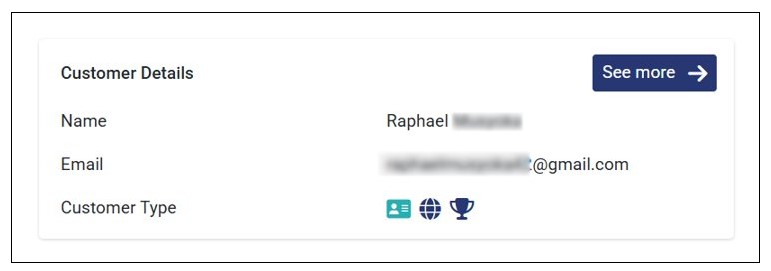
See more on Customer Details
Customer Login Overview
The customer dashboard provides an overview of each customer’s login profile. You can see the account type used for login (e.g., Google, Apple, or Facebook), their profile picture (if available), account registration date, and last login time and date.
See more on Customer Login Information.
View Order Summary on the Customer Dashboard
GonnaOrder allows you to view the customer’s order summary at a glance on the customer dashboard. Here, you can view the total number of orders placed by the customer, when they placed their first as well as their last order.
See more on Order Statistics
View Reservation Summary on the Customer Dashboard
Apart from the order summary, you can also view the customer’s reservation summary on the customer dashboard. You can see the total number of reservations made by the customer and when they made the first as well as their last reservation.
See more about this on the Reservation Statistics section.
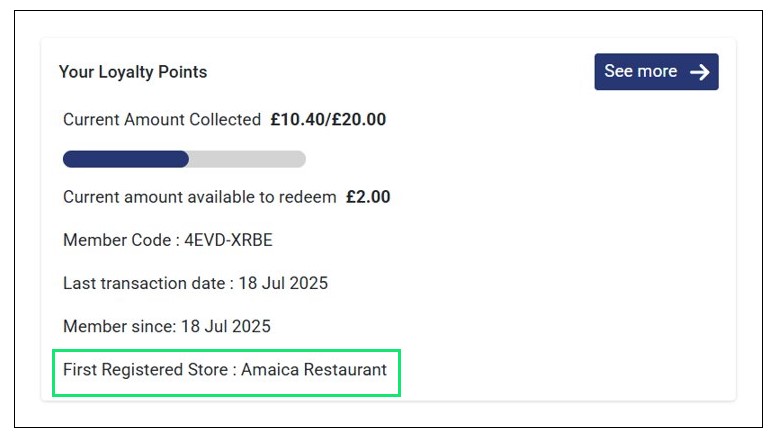
View Loyalty Points on the Customer Dashboard
The customer dashboard gives you a quick overview of a customer’s loyalty profile. You can view the current collected points, amount redeemable, the member code, first and last transaction date, and when the customer became a member.
In cases where a store is part of a multi-store setup (multiple linked stores) and the user views the customer from a different store (other than the one they first registered), they can see the store in which the customer first registered.
See more about the loyalty profile on the Manage Loyalty Points section.
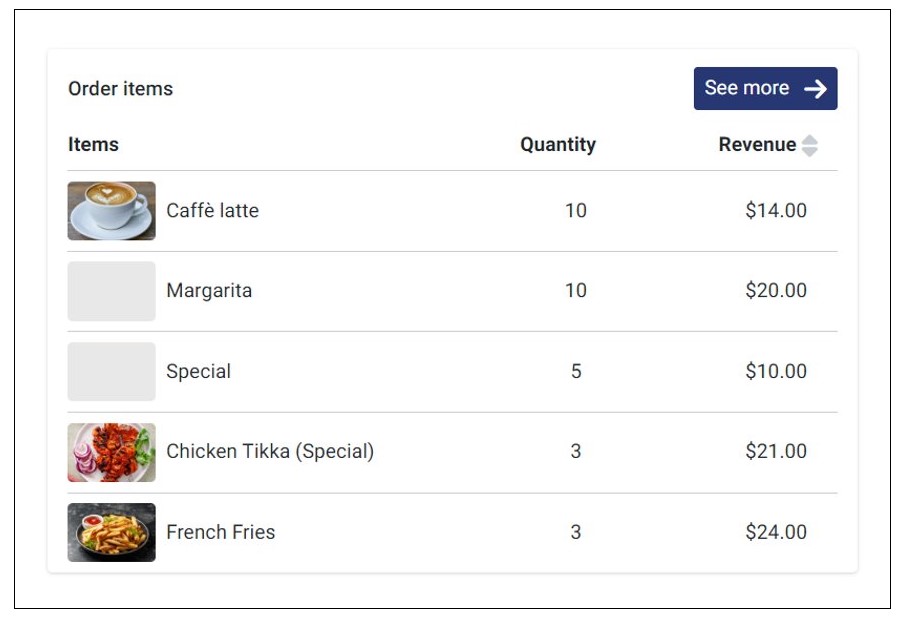
View Order Items on the Customer Dashboard
You can view frequently ordered items on the customer dashboard. Also, you can see the quantity and total revenue generated from each item. This helps you identify the customer’s favorite menu items at a glance and can go a long way in personalizing marketing campaigns.
See more on the Order Items Statistics section.
Change to Another Customer
If you want to view the dashboard of a different customer, you can do so by clicking the Change Customer button.
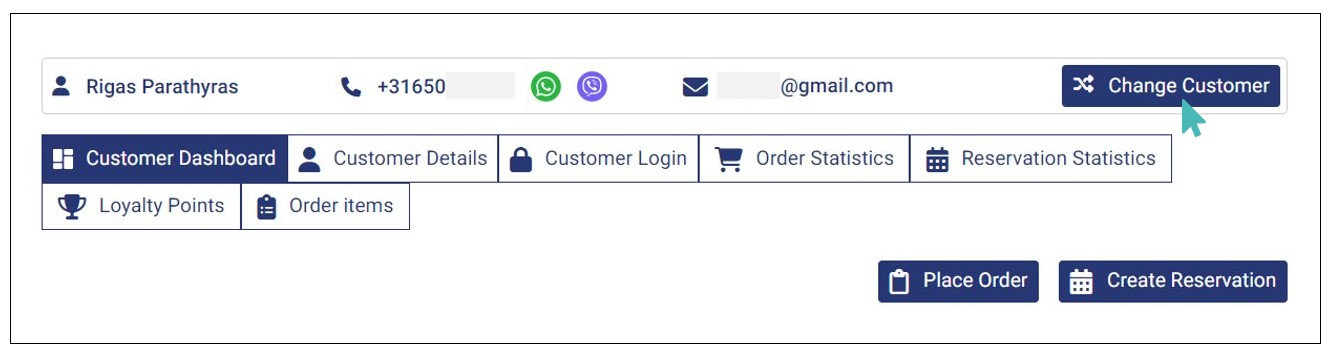
This button takes you back to the customer list, where you can select another customer to view more information about them.
Access Customer Dashboard from Orders Page
You can access a specific customer’s 360 dashboard from the orders page. However, the customer must be an identified customer on the store.
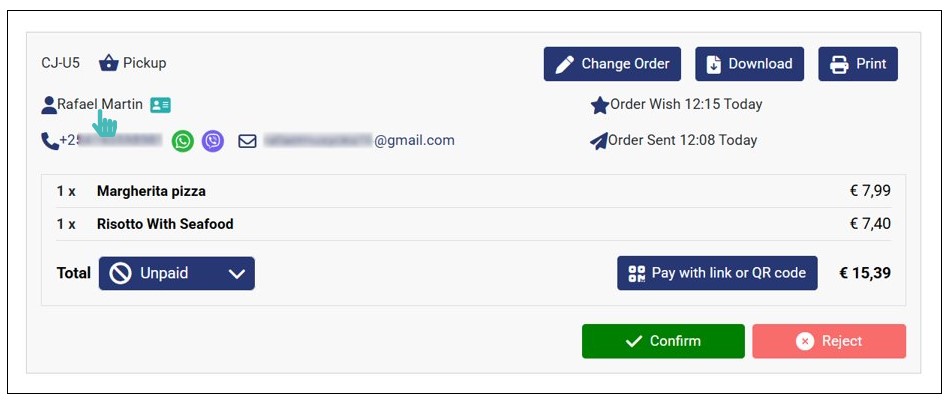
To access the customer’s dashboard from the orders page, open the order and click on the customer name.
Note
You can open the customer’s 360 dashboard from the orders page only if the customer is identified, that is, if you can see the identified icon immediately after the customer name.
View and Manage Customer Details
GonnaOrder allows you to view, manage, and update each customer’s information. This ensures you have up-to-date customer information at all times. To access full customer details, go to Customers on the side menu and select the customer you want to view their full information. Next, click the Customer Details tab.
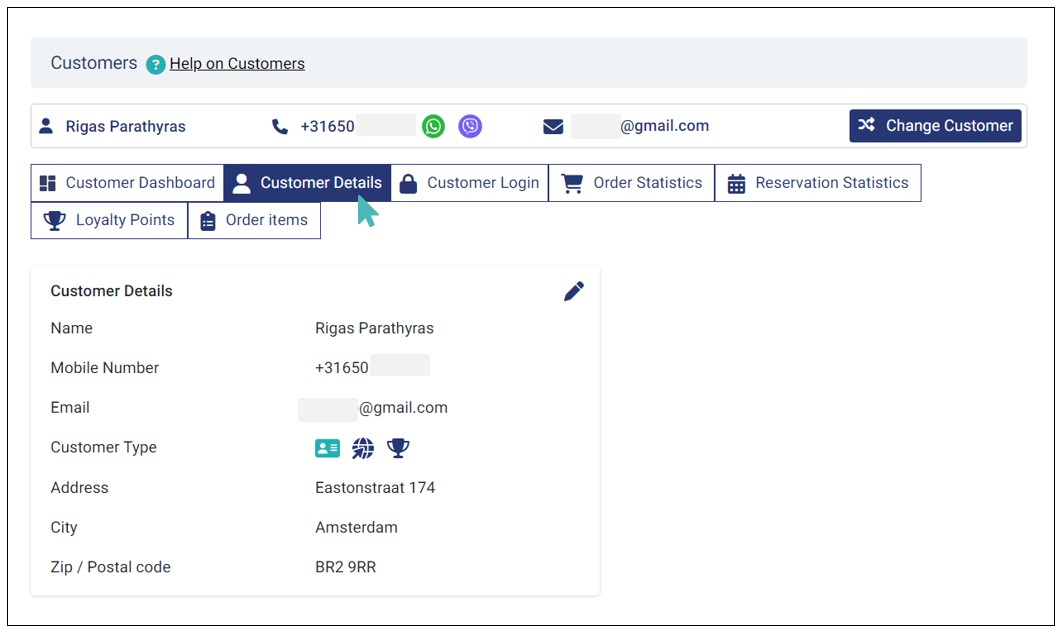
You can also edit the customer details when necessary. To do so, click the edit icon.
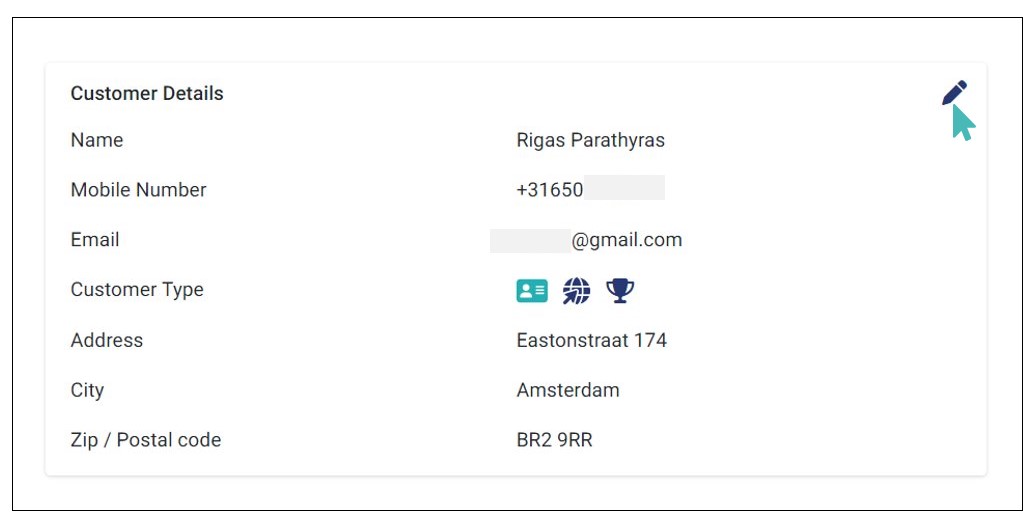
Edit the affected customer details and save the changes by clicking Update. Note that you can edit all fields in the Update Customer page, including the first and last name, phone number, email, country, preferred language, and birthday.
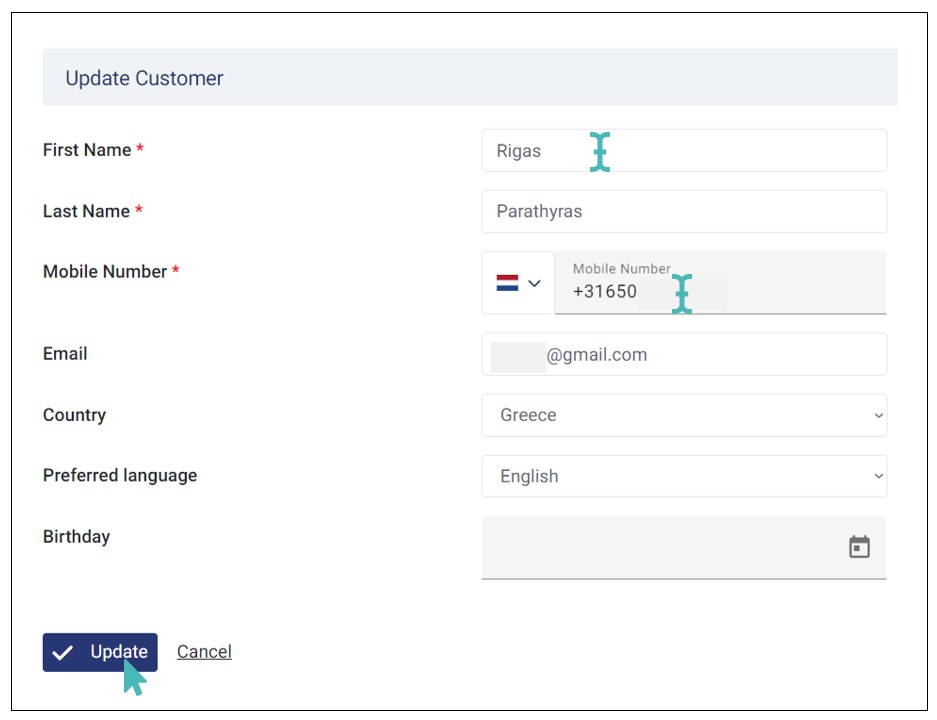
The new details will reflect on the Customer Details tab.
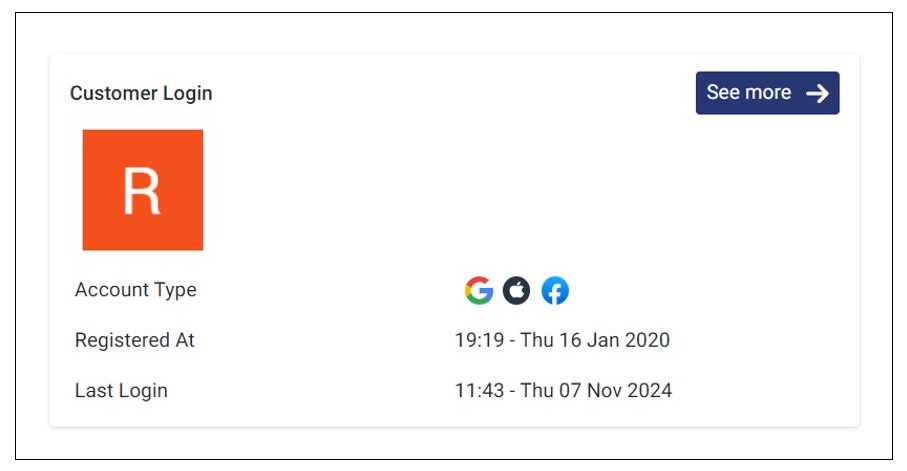
View Customer Login Information
You can view full customer login information on the Customer Login tab. Here, you can view login data, such as the social account(s) (Google, Apple, & Facebook) used by the customer to login. If they used the three social accounts, you will be able to view them as well.
Also, you can view the customer’s first and last names, email, email verification status, and when the customer account was created and last login.
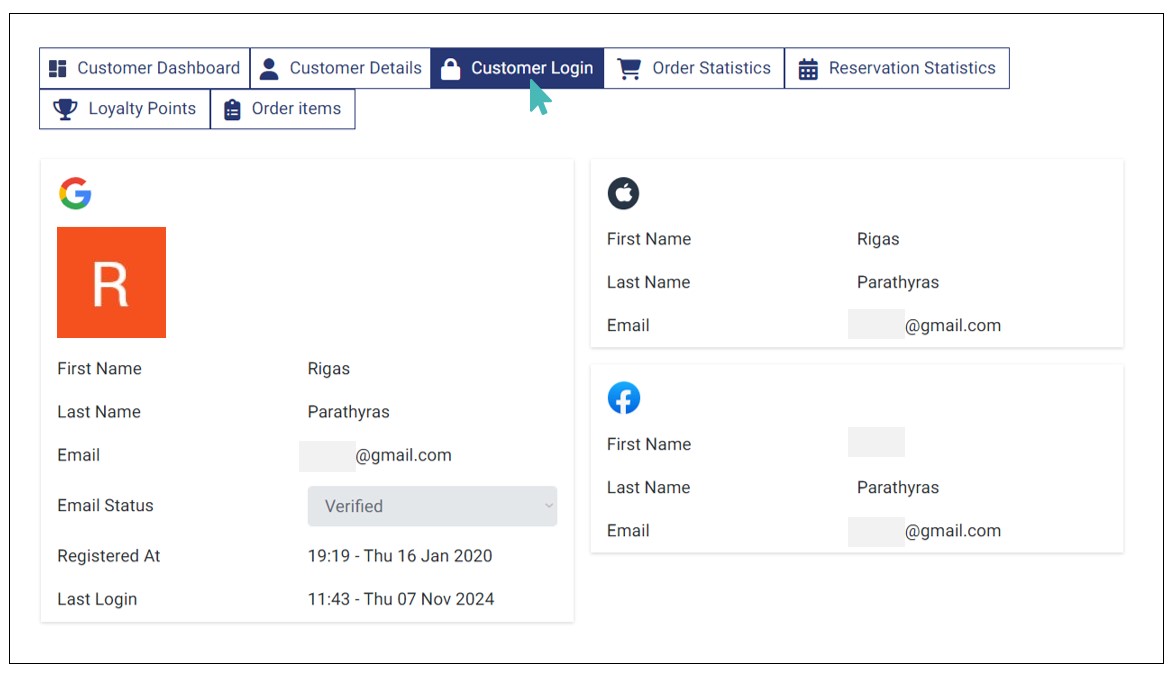
Note that the customer login tab is only available if the customer is identified. For unidentified customers, this section is not displayed on the customer dashboard. Here is a quick overview of how the customer dashboard of an unidentified customers look like.
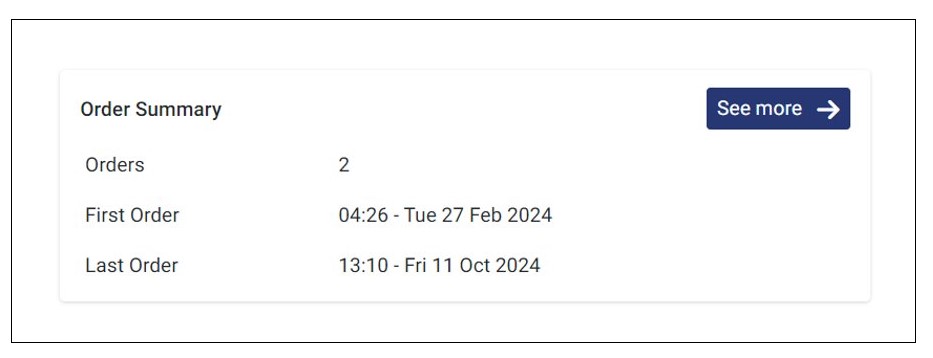
Manage Customer’s Order Statistics
In the order statistics tab, you can view detailed order information for each customer. This includes the total number of orders placed, along with the date of their first and most recent order. You can also review recent orders, displaying the order Identifier, Delivery Mode, Customer Name, Amount Paid, and key dates such as Sent, Wish, and Expected dates.
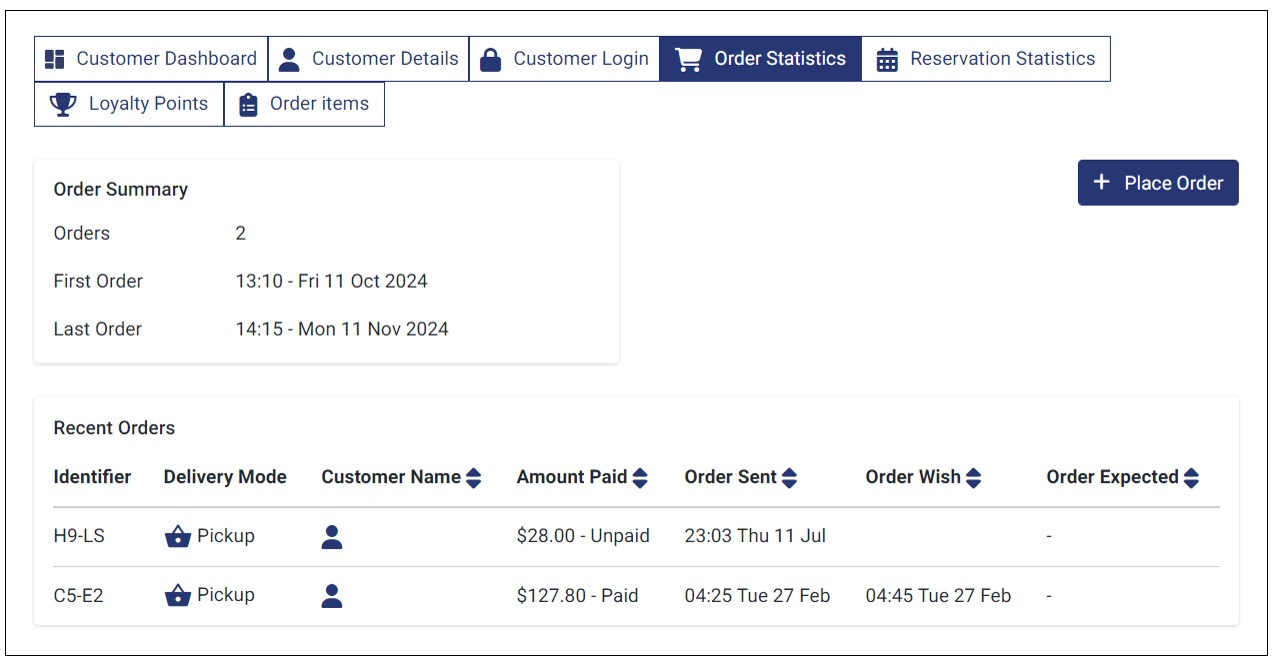
You can also take a new order for the customer by clicking the Place Order button.
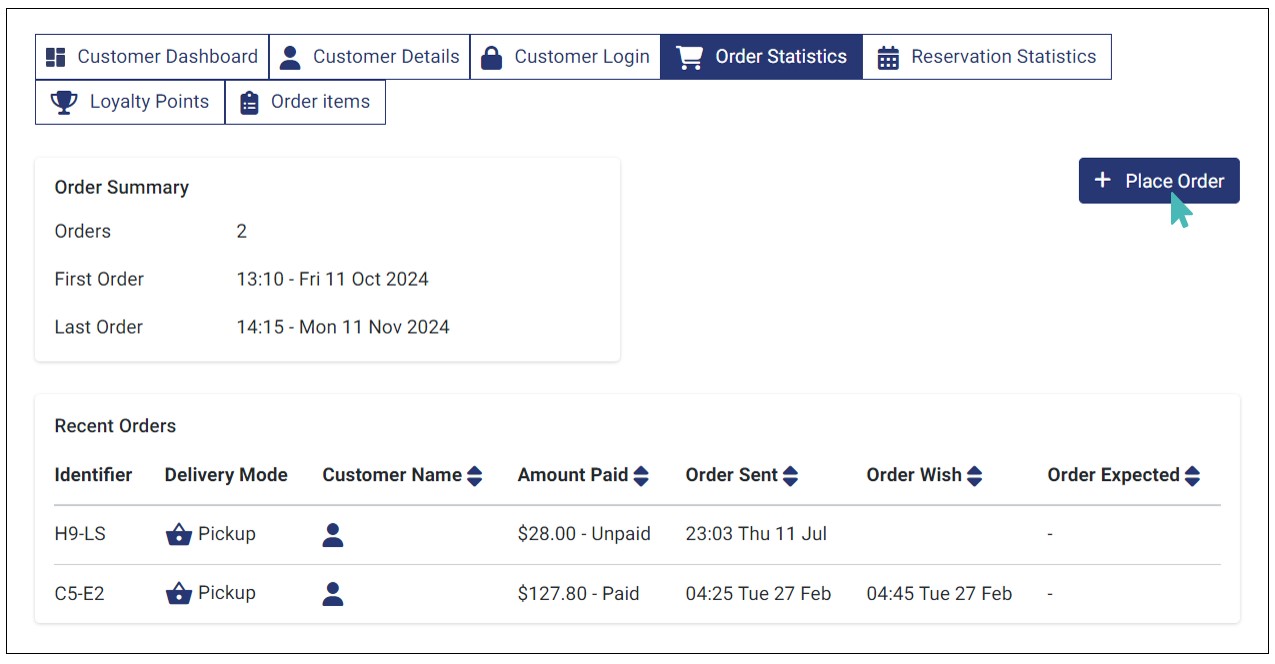
This redirects you to the Order Capture page, where you can select the order items and submit the order for that specific customer.
Lastly, you can view the detailed information about the orders submitted by a customer. Simply click any of the orders listed under the Recent Orders section to view and manage that specific order.

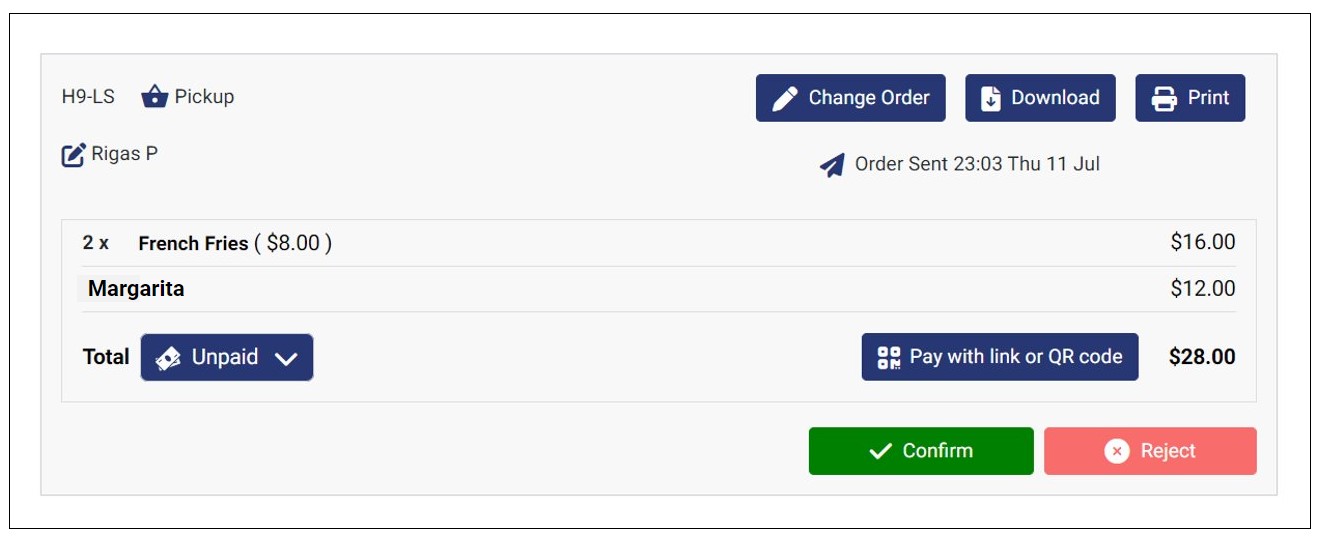
From the order view page, you can change the order details, download or print the order, mark the order as paid (if it’s currently unpaid), view order details, and confirm or reject the order.
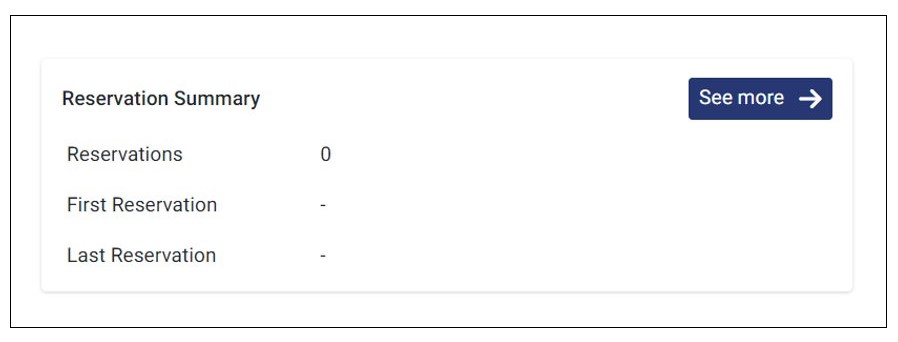
Manage Customer’s Reservation Statistics
On the Reservation Statistics tab, store admins can view and manage the individual customer’s reservations. You can see the customer’s reservation summary, which includes the total number of reservations a customer has made and their first and last reservation.
Like in the order statistics tab, you can also see the customer’s Recent Reservations, including the reservation ID, Name, People, Table, when the reservation was Requested, Start Time and End Time. This gives you an all-around view of the customer’s reservation history.
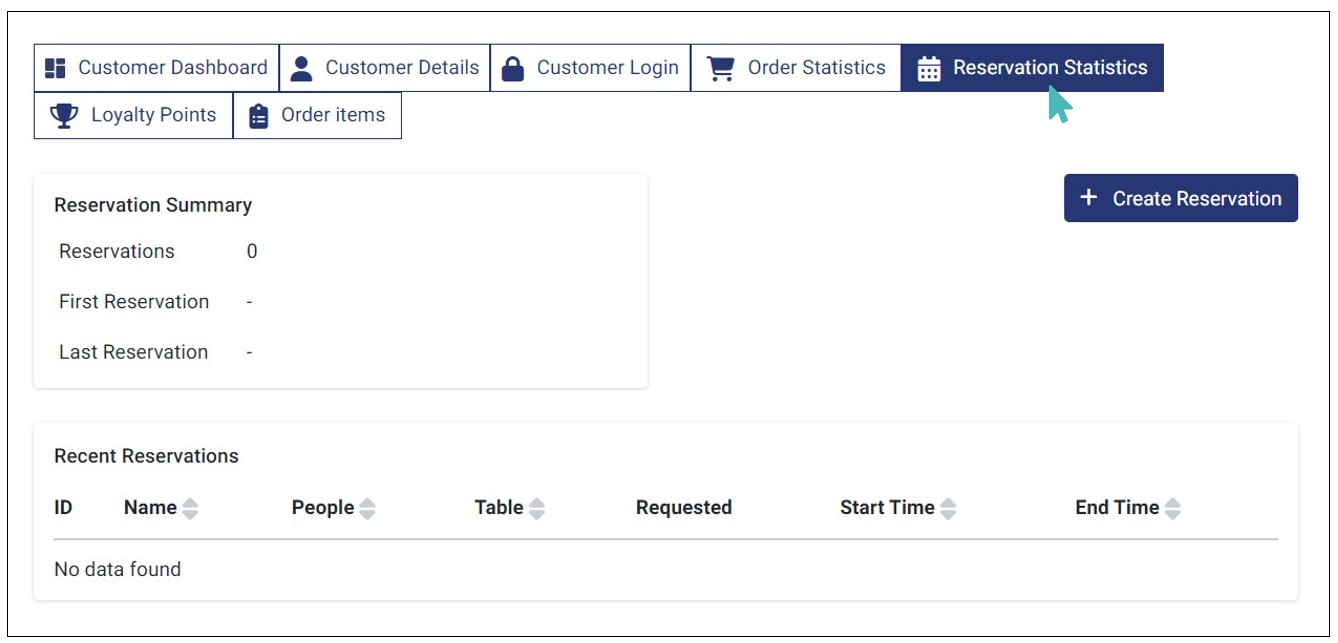
While on this tab, you can also create a reservation for the customer. To do so, click the Create Reservation button to proceed.

Provide the required reservation details and click Submit.
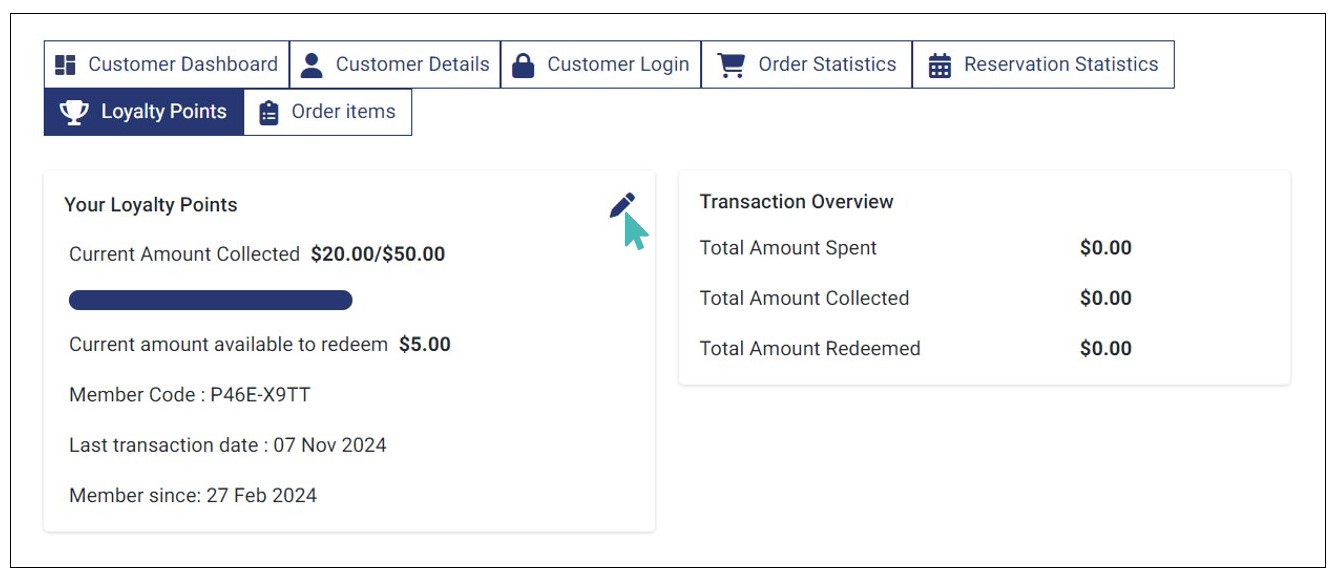
Manage Customer Loyalty Points
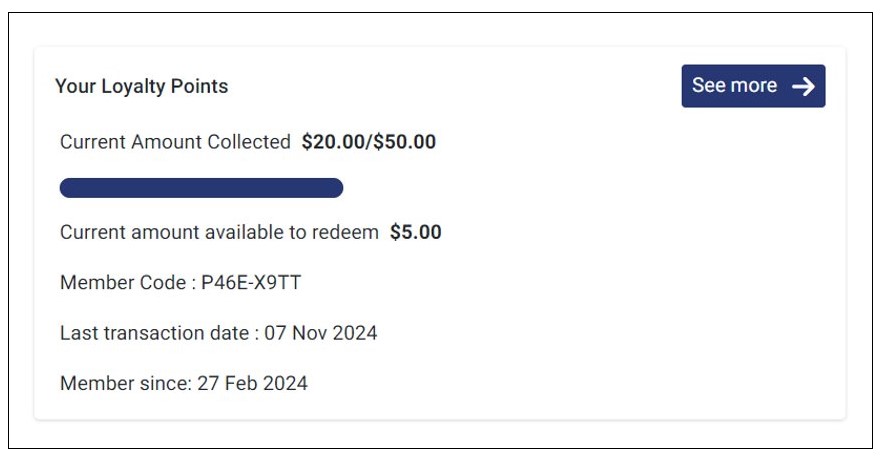
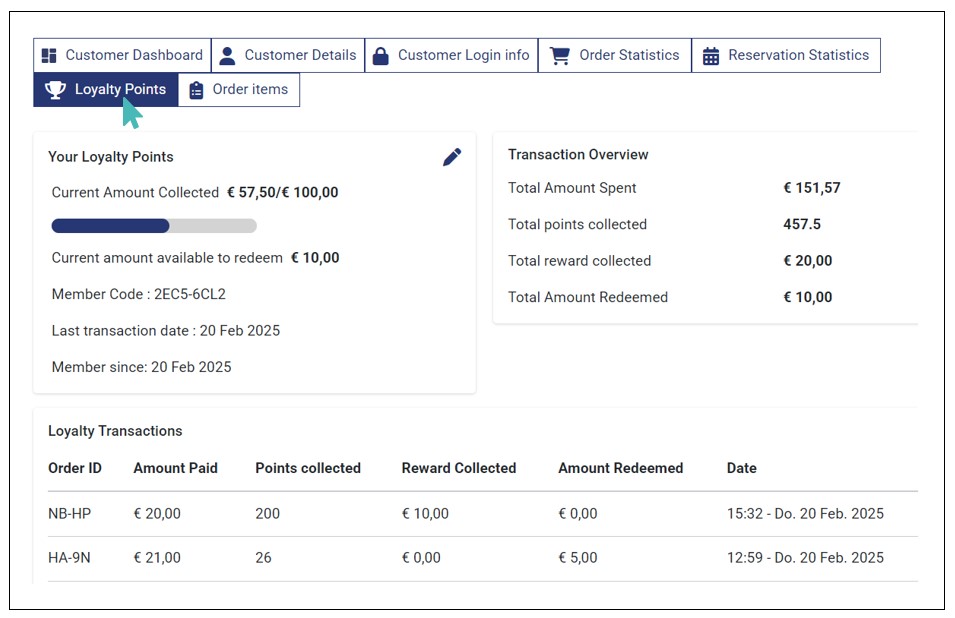
GonnaOrder allows you to view and manage your customers’ loyalty history on the Loyalty Points tab. Here, you can view the following:
Loyalty Points: This section provides an overview of the customer’s loyalty points over time. Here, you can view the number of points they have collected, amount redeemable, member code, last transaction date and when the customer become a loyalty member.
Transaction Overview: This section showcases the customer’s loyalty transaction overview. You can view the total amount that the customer has spent in your store, total loyalty points collected by the customer over time, total reward collected, and the total amount they have redeemed since becoming a member.
Loyalty Transactions: This section displays all the loyalty transactions and their details. For example, you can view the Order ID, Amount Paid, Amount Collected, Amount Redeemed, and Date of each loyalty transaction. Also, you can click the Order ID to open the specific order and view its details. This ensures you have a detailed overview of each customer’s loyalty history.
Update Customer Loyalty Points
GonnaOrder allows you to update customer’s loyalty points when necessary. To do so, select Customers on the side menu and click the customer you want to update their loyalty points. Click the Loyalty Points tab (see the image above) and then tap the edit icon on the Your Loyalty Points section.
Next, enter the new loyalty points parameters, that is, Current Amount Collected and Current amount available to redeem, and click Save.
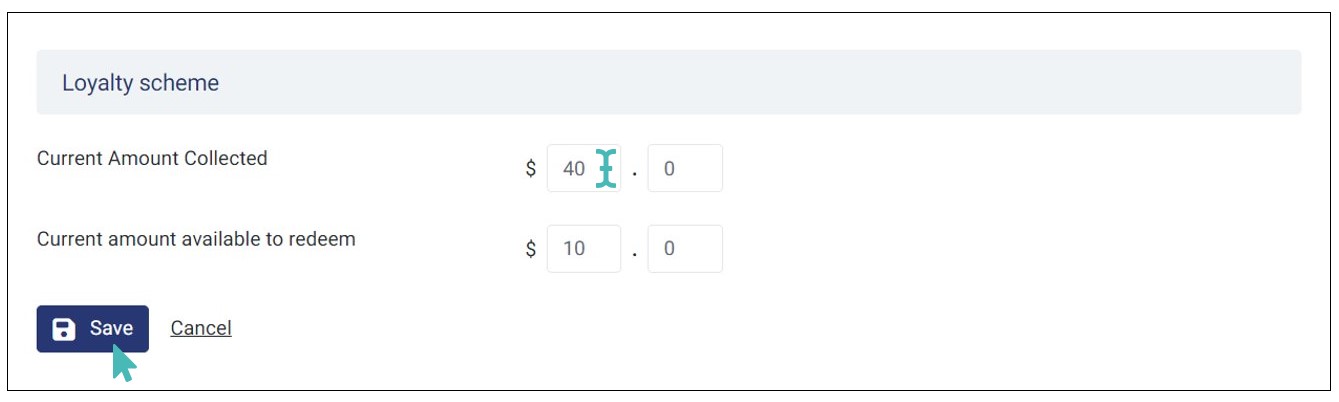
The new loyalty points will reflect on the Loyalty Points section.
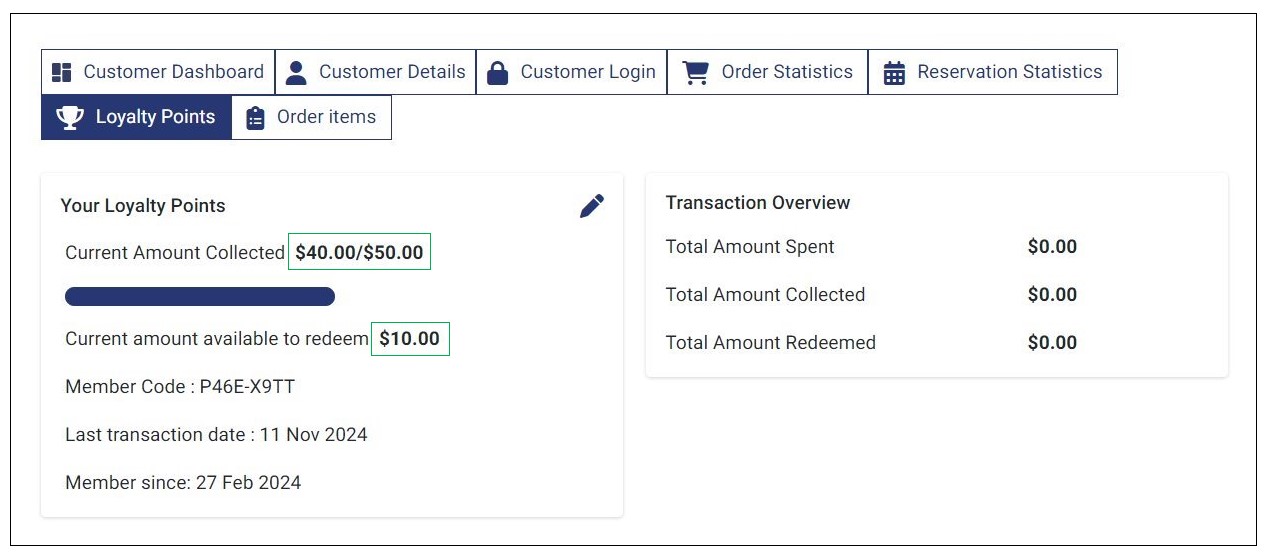
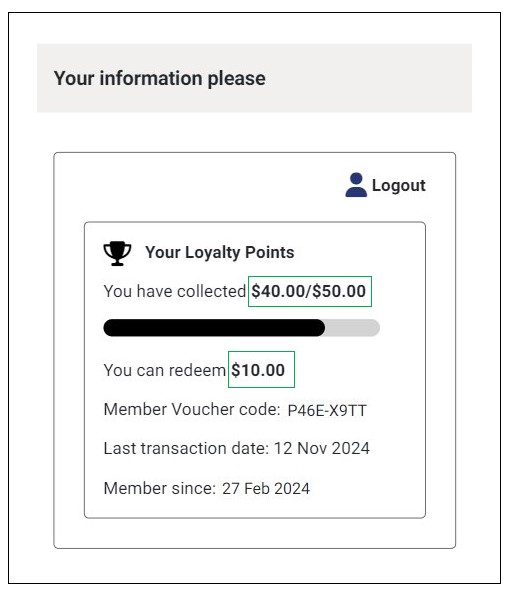
Similarly, the customer can view the newly set loyalty points balance (amount collected & redeemable amount) on the checkout page when they login.
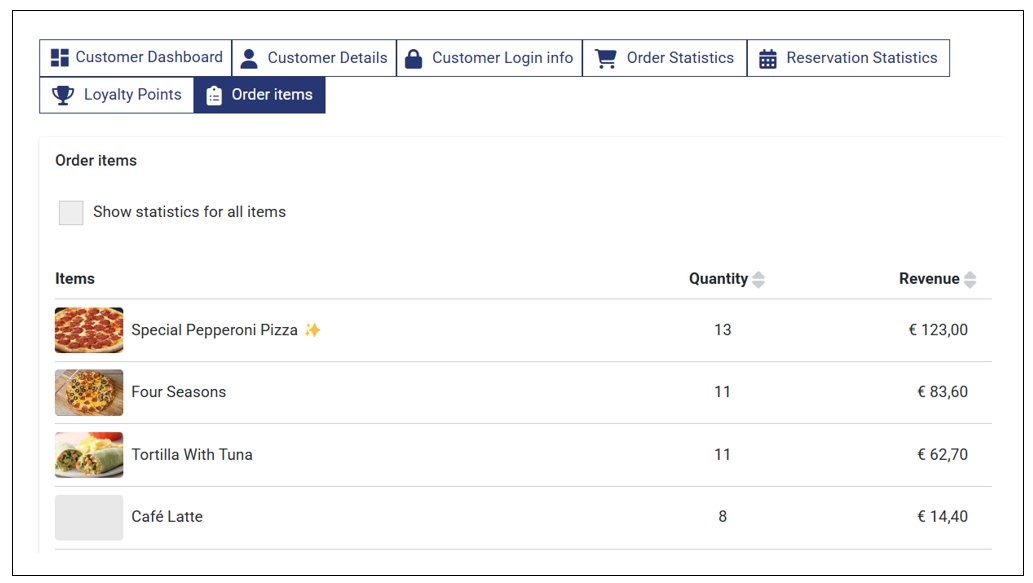
View Order Item Statistics
You can view what items a customer has ordered over time. GonnaOrder ranks the order items based on the quantity – from the most ordered to least ordered. This provides crucial insights into customer’s taste and preferences. Therefore, you can use this information to tailor your marketing campaigns based on the customer’s item preferences.
The Order Item tab displays the following information:
Item: This is the name of the specific store item on your catalog. The name appears next to the item image (if you have uploaded the specific item image). Learn more on how to Add Images to Store Items.
Quantity: Here, you can find the number of times the customer ordered the specific item.
Revenue: This is the total revenue generated from sale of the order item to the specific customer.
Note
You can opt to view the statistics for only primary items or all items, including options. By clicking the Show statistics for all items, you can see all the menu items that the customer ordered over time, including the options.
Download the Customers Summary
You can download the customer’s summary to evaluate or subject it to further analysis. The Excel file you download at any instance contains all the customers’ data displayed on the visual summary. You can extract customer emails and use them for your marketing campaigns or perform targeted promotions.
Tip
You can define mandatory or optional fields in customer information. This lets you determine what information is collected from customers placing orders in your store and hence what will appear in the customer information summary.
The customer name, email address, and phone number are mandatory for all delivery orders.
Filter Customers
You can view all customers in your store from the customers section. However, GonnaOrder also gives you an option to filter customers based on the number of orders or reservations they have made in your store. This gives you a quick glance of the customers who have placed the most orders or reservations in your store. You can use this sorted list to tailor your marketing campaigns or provide customer-specific rewards, such as discount vouchers.
To filter customers by number of orders placed, navigate to Customers on the left pane and click Most Orders tab. This will give you a sorted list of the customers with the most orders.
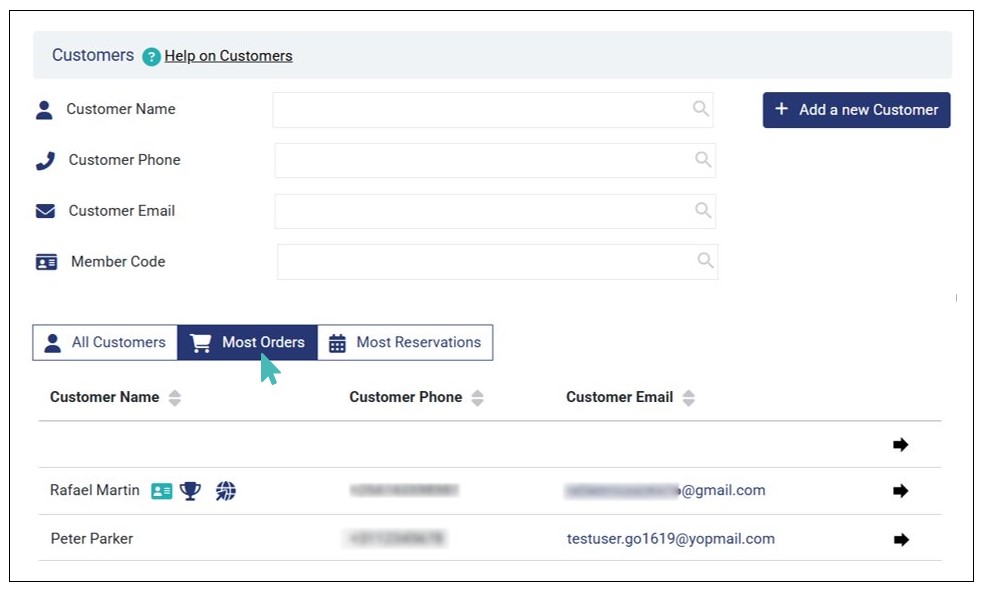
Similarly, you can click the Most Reservations tab to view a customers’ list filtered by the number of reservations made.