Tracking your balance and refunds is crucial in achieving accountability in your online store operations. It helps ensure you have an overview of how your store is performing. GonnaOrder allows you to keep track of your store sales and performance through the Balance & Refunds feature. You can set a starting balance for the day, view the total daily sales (in monetary value) and refunds, and payment method used. The system can also display any discrepancies in the daily sales report, ensuring you’re fully aware of your store’s financial status. For refunds, you can register a refund for a specific order or create a standalone (custom) refund. Without further ado, lets explore in detail what you can do under Balance & Refunds.
Note
We strongly recommend tracking your balance and refunds on a daily basis. Always Start a New Business Day at the beginning of a business day and Save & Close the Day at the end of the day. This way, you can view your daily or monthly balance reports over a given period on the Statistics & Reports section.
On This Page
- Start Tracking Your Daily Sales and Balance
- View Your Daily Sales Report
- Analyze Your Daily Sales Report
- Understanding the Sales Report
- Download Your Sales Report
- Register a Refund
- Ways to Register a Refund for a Customer
- View Customer Refunds
Start Tracking Your Daily Sales and Balances
To begin tracking your daily sales report and balances, follow these steps:
- Log in to your GonnaOrder store.
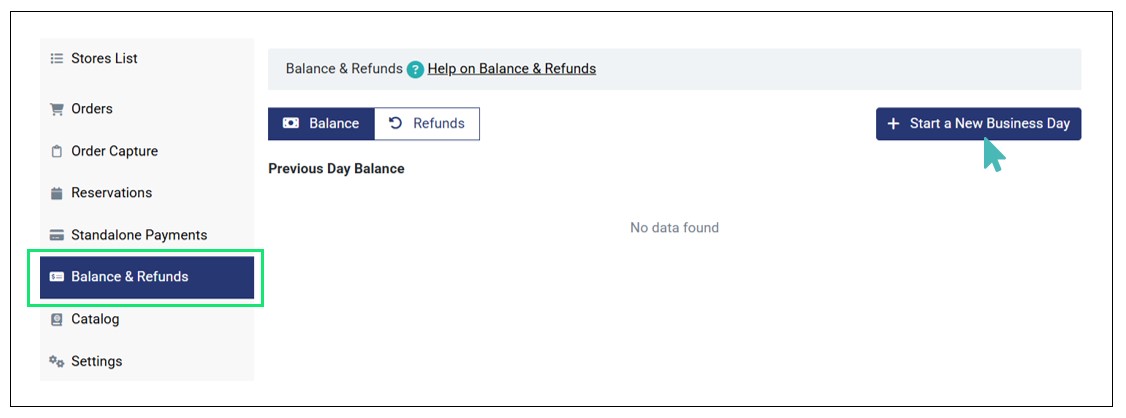
- Click Balance & Refunds on the left pane and then Start a New Business Day. If you had already tracked sales and balances for the previous day, you can see the Previous Day Balance on the Balance tab.
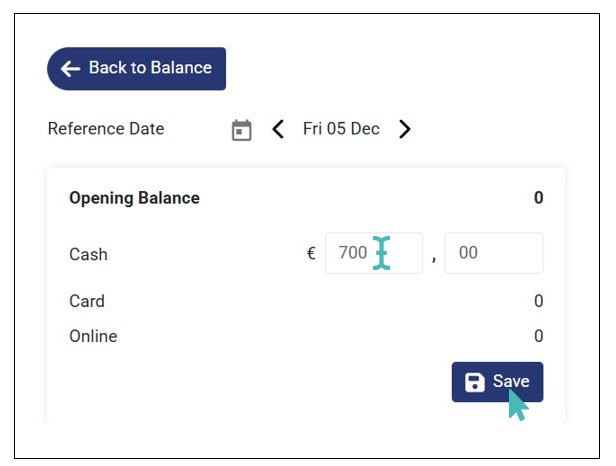
- On clicking Start a New Business Day, input the Opening Balance for the day (usually in cash) and click Save. You are redirected to the balance dashboard where you can view the balances for the new business day.
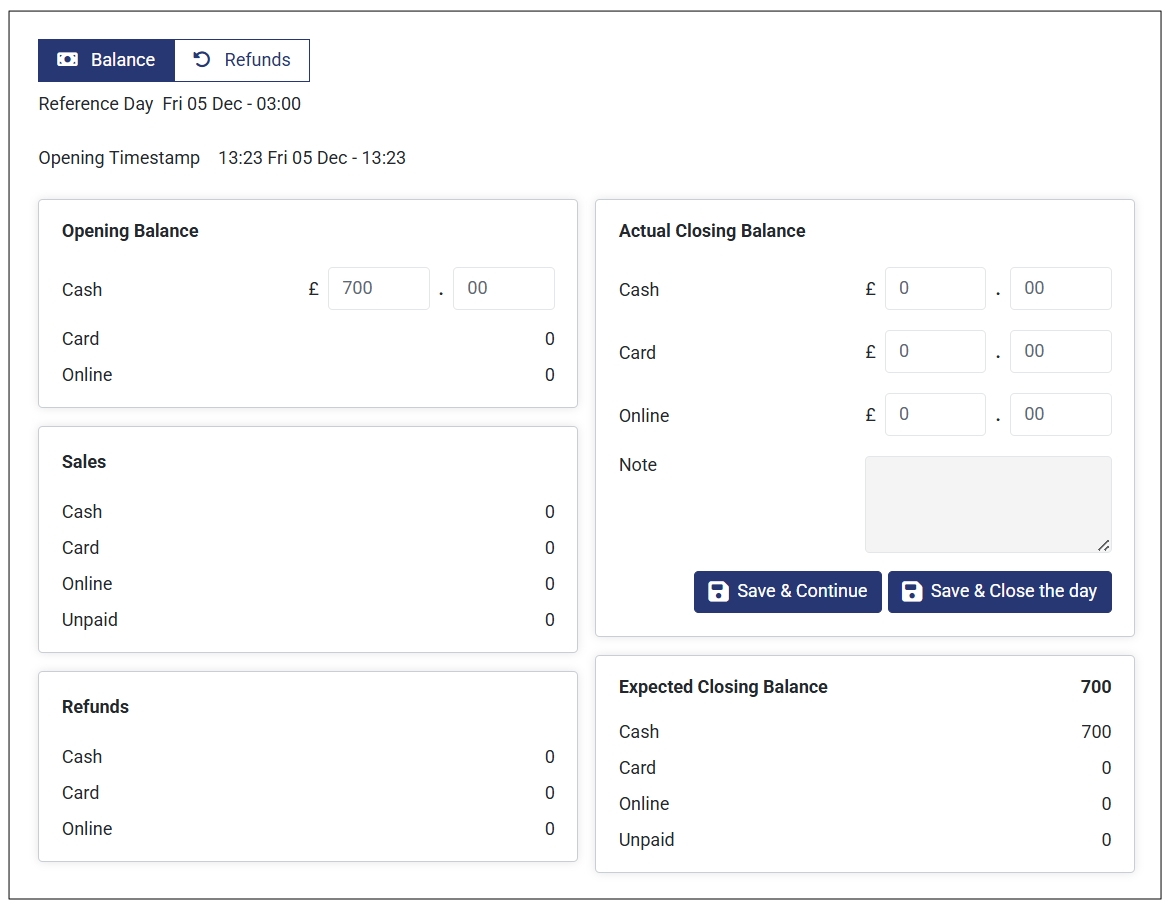
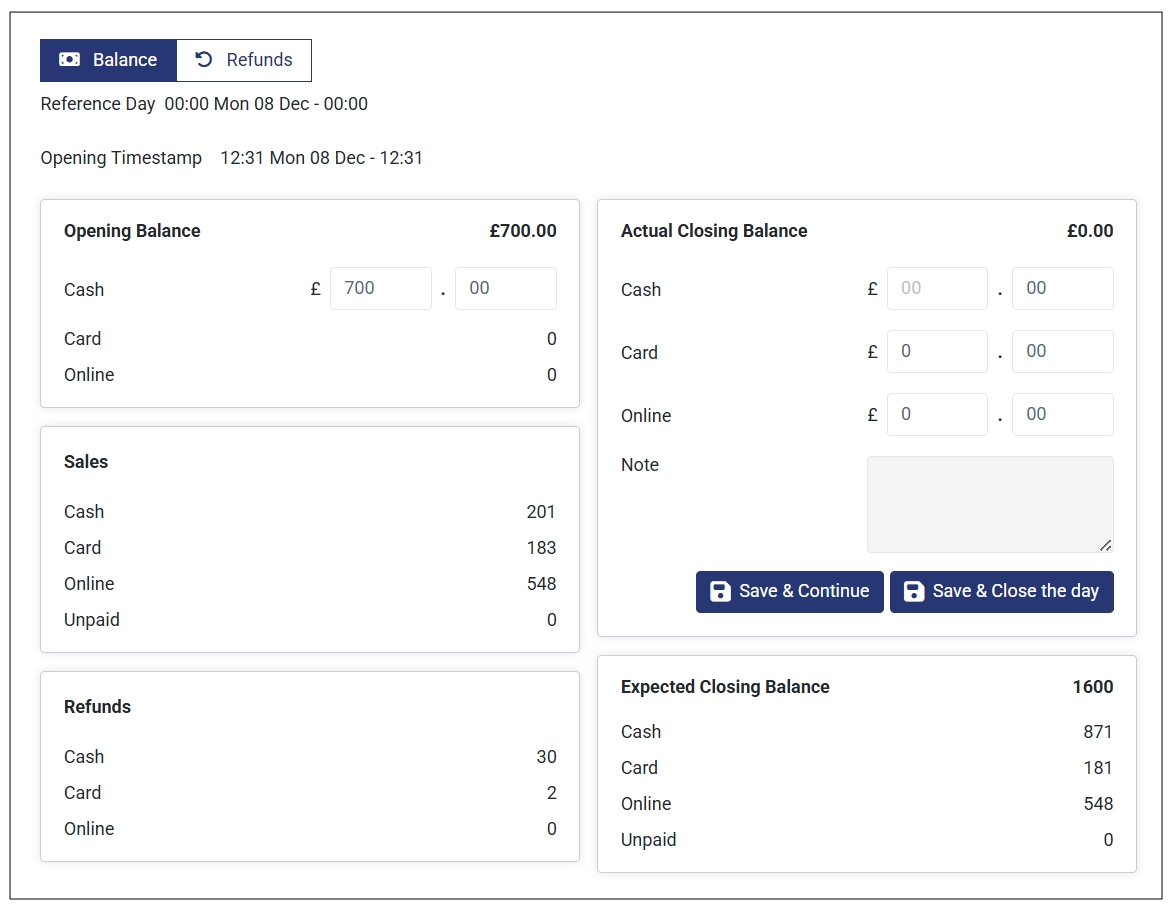
- On the balance dashboard, you can view the following:
Reference Day. This is the date when you started that particular business day.
Opening Timestamp. This is the timestamp of when you started the new business day.
Opening Balance. This is the cash amount you have at the start of a new business the day.
Sales. This is where you can view the day’s sales. It is categorized based on the payment method used to pay for the orders, that is Cash, Card, Online, and Unpaid.
Refunds: Here, you can see the total refunds made during the business day according to the payment method used to make the refund (Cash, Card, or Online).
Actual Closing Balance. Here, you can manually input the actual closing balances for the business day. These are the balances in Cash, Card and Online (in your digital wallet). You can also add a note when necessary. For instance, if you expect a balance discrepancy due to an amount used to restock or other business purposes.
Expected Closing Balance. This is the expected closing balances for the day i.e., Cash, Card, Online, and Unpaid.
Note
At the start of a new business day, only the Opening Balance and Expected Closing Balance are displayed on the balance dashboard. Every other detail is zero (0) since no sale or refund has been made yet.
Here’s how the Balance dashboard looks like when you Start a New Business Day.
View Your Daily Sales Report
Every order received and refund registered during the business day is automatically updates on the Balance dashboard. Therefore, after a successful business day, you can come back to your Balance & Refunds dashboard and view the expected closing balance. Also, you can provide the actual closing balance and compare it against the expected closing balance. As a result, you can note any discrepancies on your day’s sales report.
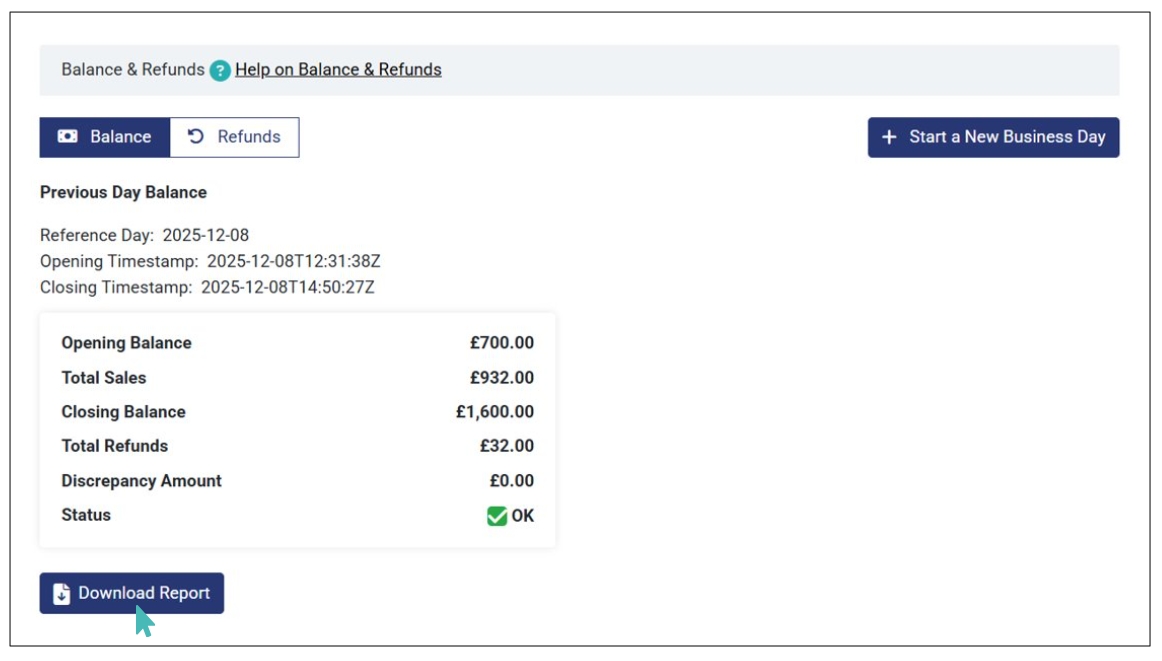
Here is an example of the balance dashboard at the end of a business day.
Analyze Your Daily Sales Report
As initially stated, you can use the balance dashboard to analyze your sales report. Simply compare the expected closing balance with the actual closing balance to gain insights of how your day’s sales went. This comparison enables you to identify any discrepancies in the sales report, preventing unnoticed financial losses.
To effectively use the balance dashboard for quick sales analysis at the end of the business day, follow these steps:
- Go to Balance & Refunds on the left pane. This will automatically open the Balance tab.
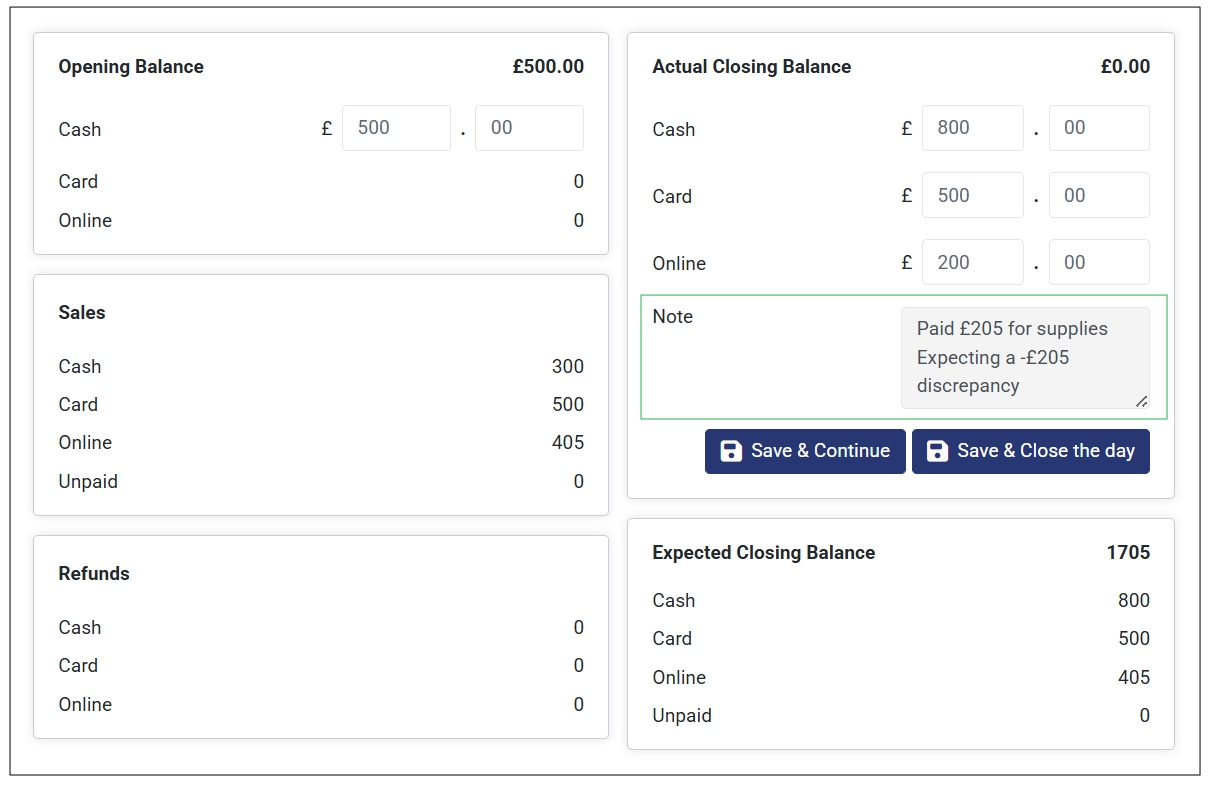
- Navigate to the Actual Closing Balance section and input the figures on the respective fields. You will need to count the amount you have in Cash and check your Card balance. Also, check your Online wallet for the payments made online. If you had a balance in your card and/or online wallet at the start of the day, you must subtract it to get the actual amount earned from the day’s orders .
- Verify the actual closing balance in respective fields and click Save & Close the Day. If it’s not at the end of the day or you expect some more orders, you can click Save & Continue.
- On clicking Save & Close the Day, you will get a full sales and refunds report for the business day.
Sample Sales and Refunds Report for a Day 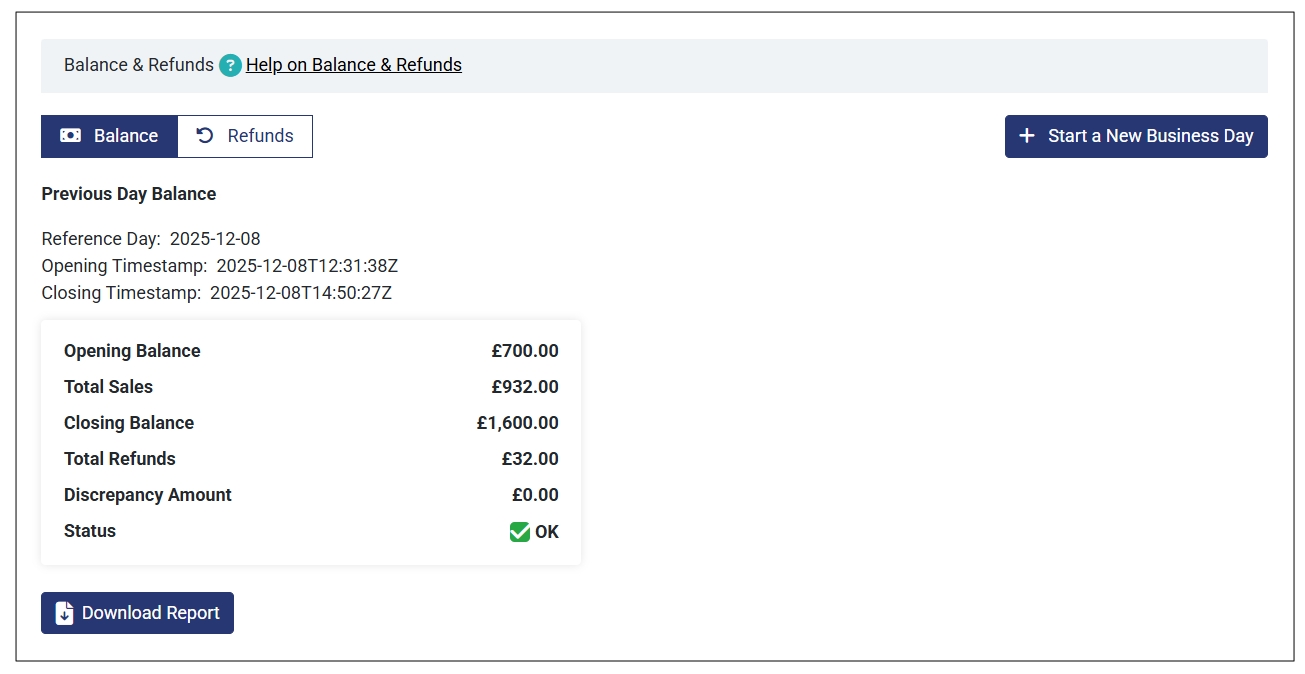

Note
Always remember to Save & Close the Day at the end of each business day. This way, you will be ready to start the next day’s sales.
Understanding the Sales Report
The sales report is simple and straightforward. It gives you a quick overview of the following:
- Opening Balance: The amount you had at the beginning of the day.
- Total Sales: The total amount of sales (paid in cash + card + online + unpaid) you made during the business day.
- Closing Balance: The total amount (opening balance + total sales – total refunds) you have at the end of the business
- Total Refunds: Total refunds (in cash + card + online) registered during the business day.
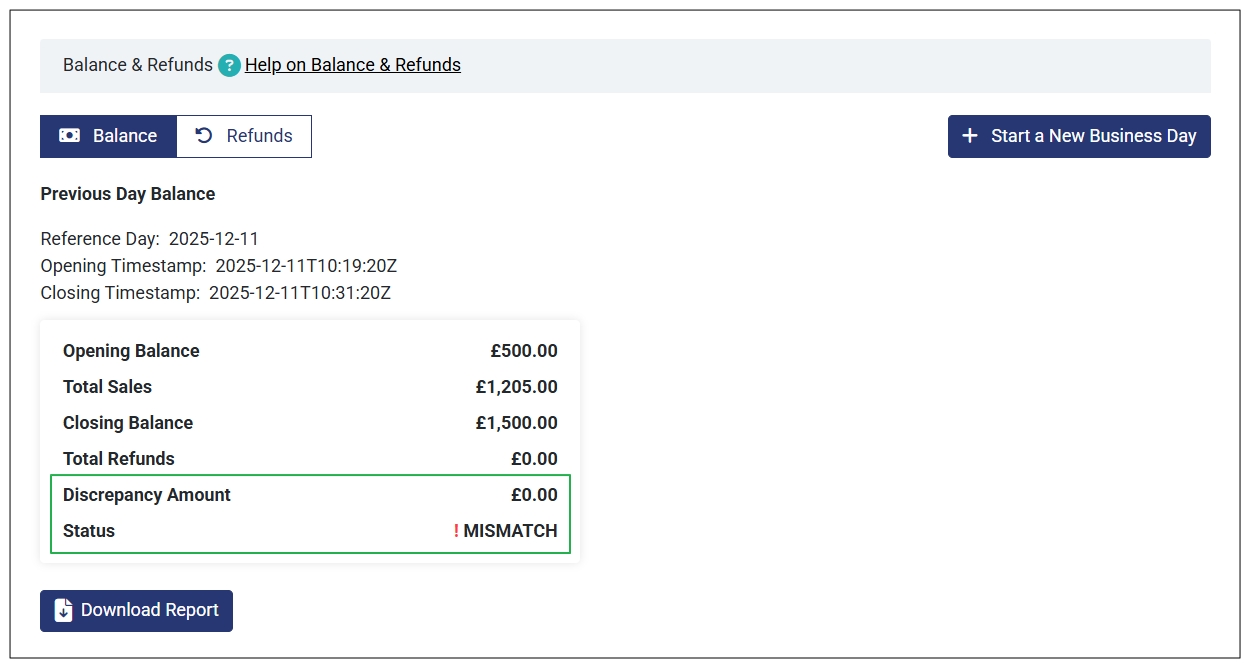
- Discrepancy Amount: This is the difference between the Expected Closing Balance and the Actual Closing Balance. A discrepancy amount can be a positive or negative amount.
- Status: The status can be OK or MISMATCH. This depends on whether there’s a discrepancy between the expected closing balance and the actual closing balance. If the discrepancy amount is zero(0) the status is OK. On the other hand, if there’s a discrepancy amount (positive or negative) the status is highlighted as MISMATCH.
What Causes the Discrepancy Amount and Mismatch Status?
Not every discrepancy in sales report raises a red flag. Here are some scenarios where you may experience a justified discrepancy in your sales report:
- When you receive an upfront payment from a customer or a payment for an order processed in the previous day. In this case, the discrepancy amount is positive.
- When you use some of the day’s earnings (sales amount) to pay for other business costs like restocking. In this case, the discrepancy amount is negative.
Here’s how the sales report looks like when there’s a discrepancy between the expected closing balance and the actual closing balance.
Tip
Not every discrepancy means you are losing finances. Always note extra payments made by customers (e.g., upfront payments) and amount taken out for various business purposes. This will help account for expected discrepancies in your sales report at the end of a business day.
How to Account for Justified/Expected Discrepancies
There are some practices you can consider to take account for justified discrepancies in your sales report at the end the business day. These include:
- Note every amount taken out of the business during the business day. This may include amount taken to cater to daily expenses.
- Track any additional amount received by the business. This amount should not be directly associated with the day’s sales e.g., customer upfront payments.
- Add a note on the Actual Closing Balance section with the expected discrepancy amount so that you can easily compare when reviewing the sales report.
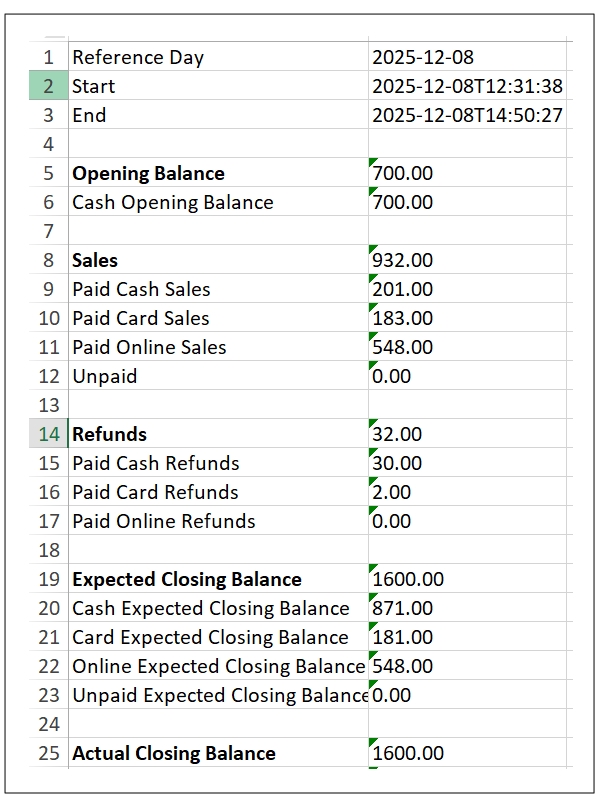
Download Your Sales Report
You can quickly download your Excel report for further analysis. Simply click the Download Report button to proceed. Note that this is only possibly when you close the day by clicking Save & Close the Day.
The Excel report contains a summary of all details on your balance dashboard, that is:
- Reference dates (day, start, and end dates).
- Opening balance
- Sales
- Refunds
- Expected closing balance
- Actual closing balance
- Discrepancy amount
- Notes
Here’s a section showing how the downloaded sales report looks like:
Register a Refund
You may want to register a refund due to various reasons. For example, when a customer mistakenly submits an order and pays for it only to find out that it has an extra or unintended order item. In this case, they may request a partial refund for that particular order.
Fortunately, GonnaOrder allows you to quickly register a refund, promoting a smooth customer experience. What’s more, you can view refunds made at end of the business day on the sales report. This ensures you keep track of your refund amounts and frequency.
Additionally, you can register a refund when the day is not open yet and it will be considered for the next day.
Ways to Register a Refund for a Customer
There are two ways in which you can register a customer refund, that is, standalone refund and order-based refund. Here is a step-by-step guide on how you can register a refund using each approach.
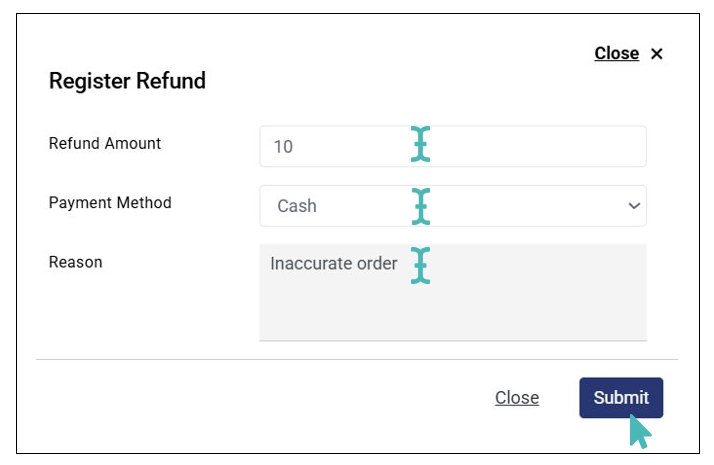
Method 1: Registering a Standalone Refund
A standalone refund is an amount you refund to a customer without having to associate it with a specific customer order in your store. Therefore, you can customize the refund amount as you wish.
To register a standalone refund, follow these steps:
- Go to your store and click Balance & Refunds on the left pane.
- Next, click the Refunds tab and then Register Refund.
- Enter the refund Amount and select the Payment Method used on the dialog box that appears. Optionally, you can add the Reason for refund. Adding the reason for each refund can help you track common refund triggers and incorporate measures to minimize refund requests.
- Click Submit to save the refund made. The refund is registered successfully and you can view it on the refunds list on the Refunds tab.
- In case you change your mind before submitting the refund, you can Close it instead.
Method 2: Registering an Order-Based Refund
As the name suggests, an order-based refund is registered under an order. In this case, you can only register the refund from that particular order on the orders dashboard. Also, there are several conditions you need to know when registering an order-based refund. These are:
The order must be paid either online, in cash, or via card. Therefore, unpaid orders do not qualify for a refund, and the Register Refund button is not visible on unpaid orders.
There’s a refund amount limit. The maximum amount refundable for the order is the total order amount.
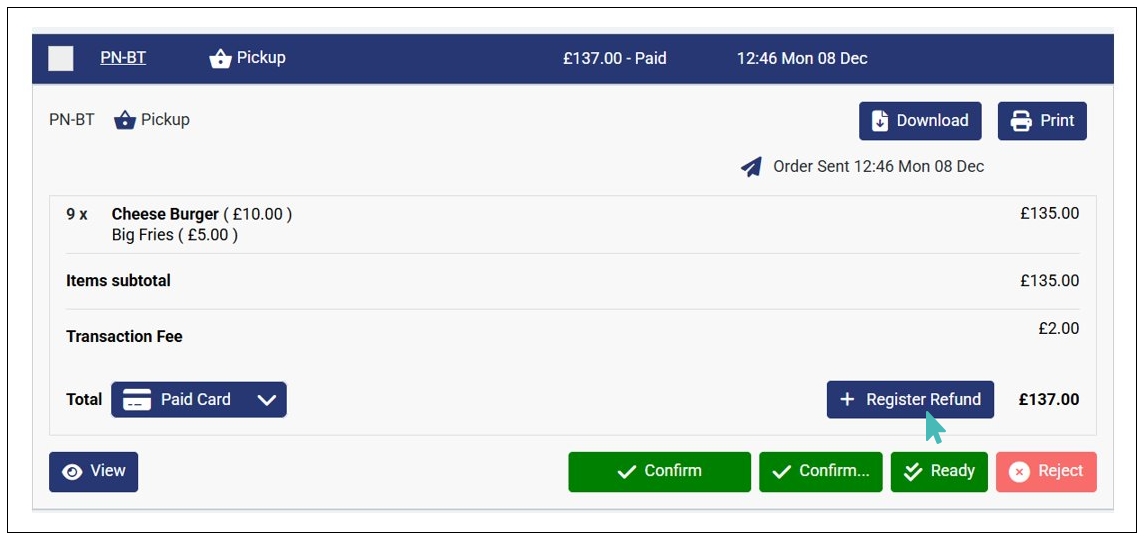
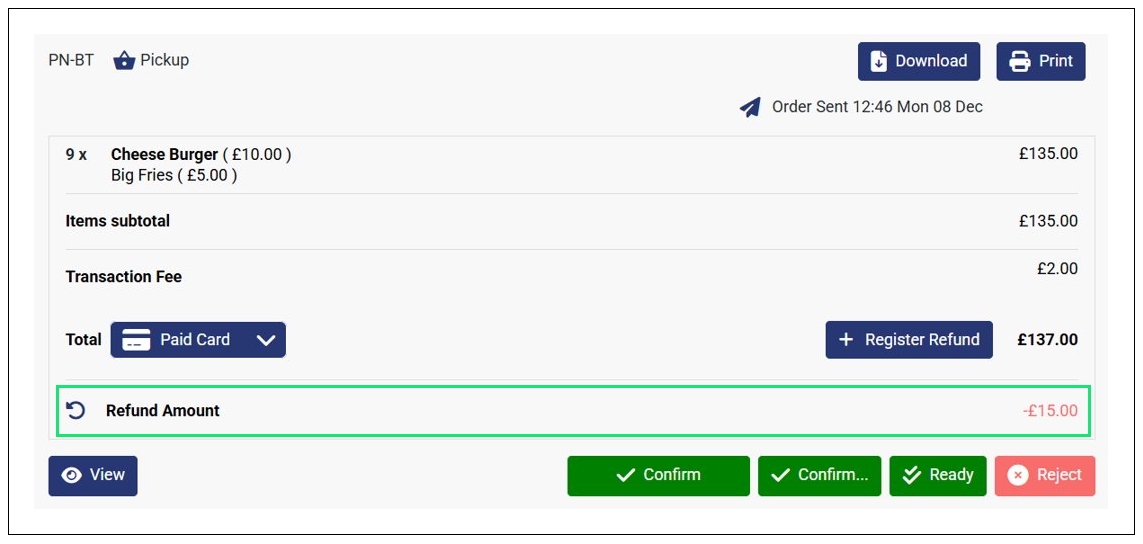
To register an order-based refund, follow these steps:
- Go to the orders dashboard on your store by clicking Orders on the left pane.
- Find and click the order you want to register a refund for.
- Click the Register Refund button to open the refund registration dialog box
- Enter the Refund Amount and select the Payment Method used to refund. Optionally, you can also add the Reason for refund.
- Click Submit to record the refund on your daily report.
- Once done, you can see the refunded amount on the order.

Notes
- The maximum amount you can refund on an order (order-based refund) is the total order amount.
- We strongly recommend adding a reason for refund regardless of the refund method used. This way, you can track the most common reasons for refund. As a result, you can incorporate measures to reduce future refund requests.
- Only paid orders are eligible for an order-based refund. Therefore, the Register Refund button is hidden (not visible) in unpaid orders.
- You can register refunds before, during, and after closing a business day. Refunds made when the business day is not open yet will be considered for the next day.
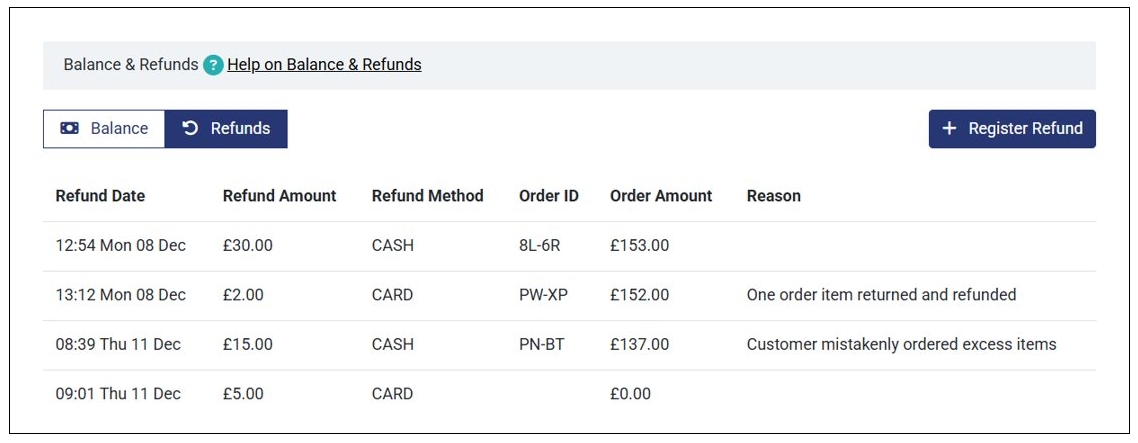
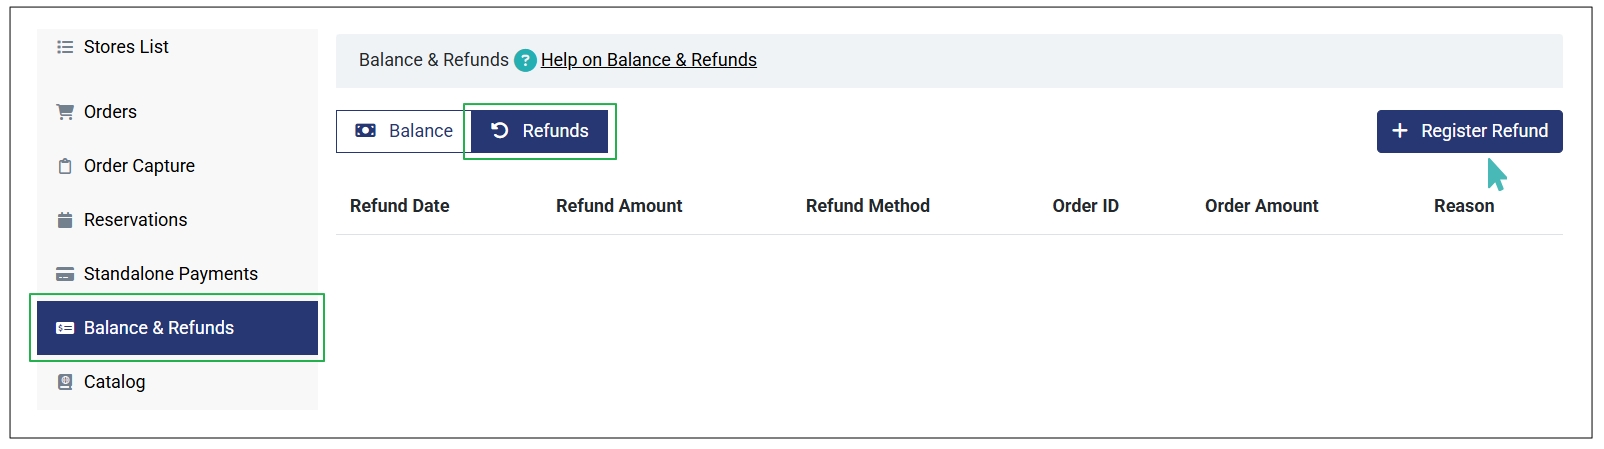
View Customer Refunds
You can view all refunds on the Refunds tab under Balance & Refunds. This includes standalone and order-based refunds. Here, you can view the following details about each refund:
- Refund Date. This is the date you made the refund.
- Refund Amount. As the name suggests, this is the amount refunded to the customer.
- Refund Method. This is the method used to refund the amount. It can be Cash or Card.
- Order ID. Here, you can find the Order ID associated with that particular refund. However, this field is blank for standalone refunds (refunds not related to any order).
- Order Amount. Again , this is only applicable for order-based refunds. It shows the value of the order associated with the refund. For standalone refunds, the order amount will be zero.
- Reason. As the name suggests, this field shows the reason for the refund. It can be blank if you did not provide the reason for refund.
Here’s how the refunds list look like.